In the olden days, Grandpa was wise and wore a belt AND braces
 True — belt and braces is fine. But if you buy brand-new trousers and immediately need both to stop them falling down, you’d question the trousers… not just keep adding more straps!
A community driving the extraordinary.
Welcome to Global Grenadiers — the worldwide community for INEOS Grenadier and Quartermaster owners and enthusiasts. Register free to join the conversation. Share your build and adventures, access technical guides, join your regional social group, get help on the trail, and receive our monthly newsletter.
INEOS Agents, Dealers or Commercial vendors — please use the Contact us link at the bottom of the page.
In the olden days, Grandpa was wise and wore a belt AND braces
True — belt and braces is fine. But if you buy brand-new trousers and immediately need both to stop them falling down, you’d question the trousers… not just keep adding more straps!You only need one strap and every vehicle thereafter can benefit.

True — and I’m all for a simple safety upgrade. I just wish we weren’t talking about propshaft containment on a vehicle that’s barely out of the showroom! And if it needs one maybe Ineos ought to fund itYou only need one strap and every vehicle thereafter can benefit.
Just don't bust your propshaft
 A battered old pickup or Defender I could understand.
I'm not going to lose sleep over it. Keep an eye on it, carry the T45 torx and extensions and get ready to lie in the mud one day.True — and I’m all for a simple safety upgrade. I just wish we weren’t talking about propshaft containment on a vehicle that’s barely out of the showroom! And if it needs one maybe Ineos ought to fund it
I might even get to see him in person! Bloody hell!I won’t lose sleep but I won’t let it drop with Ineos until they do something.I'm not going to lose sleep over it. Keep an eye on it, carry the T45 torx and extensions and get ready to lie in the mud one day.
YMMV.
I also swim in the ocean , knowing one day I might get mauled by a shark!
Then I'll blame god for poor safety measures
I've had front propshaft rear joints fail on other 4x4s, so it isn't uncommon.True — and I’m all for a simple safety upgrade. I just wish we weren’t talking about propshaft containment on a vehicle that’s barely out of the showroom! And if it needs one maybe Ineos ought to fund it

Yes the chief measurer would need to have a talking to along with Quality control people at Ineos.Or question whoever it was who measured you up for the trousers.
Suit you sir!
True — and I’m all for a simple safety upgrade. I just wish we weren’t talking about propshaft containment on a vehicle that’s barely out of the showroom! And if it needs one maybe Ineos ought to fund it
If you looked at the list of faults I have. I don’t know who would insure mine for an extended warranty. I was thinking of posting my faults in the thread about known faults and fixes. I am reticent to do so as I’ve had so many. I don’t want to he seen as an Ineos hater as I truly like the vehicle
No intention of starting a pissing contest. I've had double-doubles on several cars and NONE of them shook until about 150,000 miles. I'm not buying what you're selling.That appears to be another Double Double. It will inevitably vibrate, if not on day one but certainly after a few hundred miles or so. Double Doubles are not ideal, the centering balls are left to fully support the shaft and they wear quickly and allow misalignment and vibration.
I've had double doubles too. But non as short and with such terrible angles. Besides, multiple people have built double doubles for the Grenadier and they all vibrated bad enough they removed them. So much so that a single Cardan shaft worked better apparently. Still vibrate but I guess not as much.No intention of starting a pissing contest. I've had double-doubles on several cars and NONE of them shook until about 150,000 miles. I'm not buying what you're selling.
Crawl under there and look for yourself. It is entirely too short of a driveshaft to fit a double double.No intention of starting a pissing contest. I've had double-doubles on several cars and NONE of them shook until about 150,000 miles. I'm not buying what you're selling.
Amazon - type in
Driveshaft safety loop
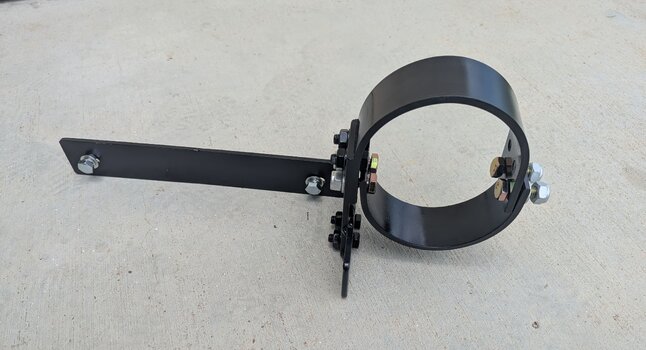
They look like this
View attachment 7915152
Basically the process is to take the right arm out of the equation and weld some angle on the left side to pick up the 2x M10 bolt holes in the gearbox cross member.
You could do it with nuts and bolts so a welder is optional.
This is what I did. With retrospect I should have just used the bottom loop rather than what I did here.
View attachment 7915153
The other bracket retains the Bowden cable for the T box as I saw it rubbing, optional extra!
Now you can get out in the sticks and really gie it llaldy!So I thought I had better have a go at this since I suggested it way back here.
I used the same universal kit as @landmannnn. Example on Amazon AU here.
View attachment 7918975
This was an exercise in put-up or shut-up to see how much of a PITA it would be to adapt and fit this universal kit. Not too bad, but you're working with 5mm thick steel so allow for that if you contemplate doing something similar with this kit.
Should you do this? Not unless you're the anxious type who worries about a possible driveshaft separation. I did it as an exercise because I have the time and tools. There's been a few driveshaft separations but they're rare enough that you should not lose sleep over it. But as I have said elsewhere, you're trying to avoid secondary damage to the vehicle from a flailing driveshaft if it occurs. This loop does that. It's definitely doable but me doing it as an exercise is not a recommendation that you should also.
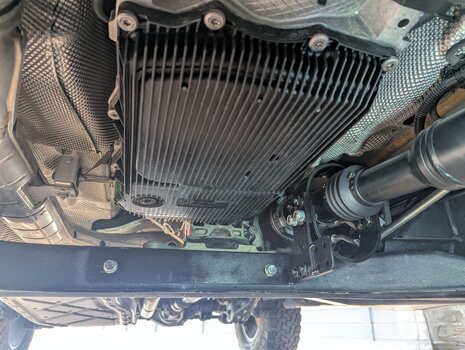
Everything I needed was in the kit but I modified it a fair bit so I would call it a donor kit. You get two mount arms and two half-loops plus some Chinesium hardware. I did it slightly different to Landmannn. I chopped up both arms to make one long mount arm to attach to the cross member. The holes in the cross member are on a 260mm spacing so I needed to lengthen one mount arm to pick up the 2nd hole. I used some of the chopped up bits to make a riser to set the loop height I wanted, plus drilled a 2nd set of holes in the half-loops then chopped off the original set to make the half-loops shorter and the loop diameter smaller. The bottom half of the loop is a bit redundant because it extends below the cross member so a flailing driveshaft will be restrained at the bottom by the cross member not the safety loop. But I ended up with a loop that is centred over the driveshaft with good clearance all around to allow for suspension travel. The top half of the loop sits just below the transfer case Bowden cable.
In the words of all dedicated DIYers: "That (driveshaft) ain't going nowhere."
Installation is easy. The mount arm, riser and top half-loop are assembled as one piece. I welded it all together after I got everything in the right place using the bolt holes. I left some bolts in place to fill up the unused holes. Place that piece over the driveshaft then loosely attach the mount arm to the cross member. Install the lower half loop and connect with 4x (upgraded) bolts and nyloc nuts. I slotted the holes in the mount arm so I could centre the loop to the driveshaft. Line that up then tighten the cross member bolts and it's done. Removal is the reverse.
Five minutes work with a 17mm socket and spanner.
This was a fairly bespoke job but I did collect some measurements if anyone is keen enough to have a go. It's fairly apparent what you need to do once you have a kit in front of you.
You could eat your dinner off yours!So I thought I had better have a go at this since I suggested it way back here.
I used the same universal kit as @landmannnn. Example on Amazon AU here.
View attachment 7918975
This was an exercise in put-up or shut-up to see how much of a PITA it would be to adapt and fit this universal kit. Not too bad, but you're working with 5mm thick steel so allow for that if you contemplate doing something similar with this kit.
Should you do this? Not unless you're the anxious type who worries about a possible driveshaft separation. I did it as an exercise because I have the time and tools. There's been a few driveshaft separations but they're rare enough that you should not lose sleep over it. But as I have said elsewhere, you're trying to avoid secondary damage to the vehicle from a flailing driveshaft if it occurs. This loop does that. It's definitely doable but me doing it as an exercise is not a recommendation that you should also.
Everything I needed was in the kit but I modified it a fair bit so I would call it a donor kit. You get two mount arms and two half-loops plus some Chinesium hardware. I did it slightly different to Landmannn. I chopped up both arms to make one long mount arm to attach to the cross member. The holes in the cross member are on a 260mm spacing so I needed to lengthen one mount arm to pick up the 2nd hole. I used some of the chopped up bits to make a riser to set the loop height I wanted, plus drilled a 2nd set of holes in the half-loops then chopped off the original set to make the half-loops shorter and the loop diameter smaller. The bottom half of the loop is a bit redundant because it extends below the cross member so a flailing driveshaft will be restrained at the bottom by the cross member not the safety loop. But I ended up with a loop that is centred over the driveshaft with good clearance all around to allow for suspension travel. The top half of the loop sits just below the transfer case Bowden cable.
In the words of all dedicated DIYers: "That (driveshaft) ain't going nowhere."
Installation is easy. The mount arm, riser and top half-loop are assembled as one piece. I welded it all together after I got everything in the right place using the bolt holes. I left some bolts in place to fill up the unused holes. Place that piece over the driveshaft then loosely attach the mount arm to the cross member. Install the lower half loop and connect with 4x (upgraded) bolts and nyloc nuts. I slotted the holes in the mount arm so I could centre the loop to the driveshaft. Line that up then tighten the cross member bolts and it's done. Removal is the reverse.
Five minutes work with a 17mm socket and spanner.
This was a fairly bespoke job but I did collect some measurements if anyone is keen enough to have a go. It's fairly apparent what you need to do once you have a kit in front of you.
It's not normally that clean!You could eat your dinner off yours!
Good insurance in my book.
 . I wanted to get those pics for y'all so I gave it a good soaping from a pump sprayer then parked a lawn sprinkler under it and moved it around a few times. Works a treat. I do keep the driveshaft CV areas clean so I can keep an eye on the boots.
Lawn sprinkler - works a treat. My main issue with that is where to park the thing within hosepipe reach where I don't mind dumping the crud....It's not normally that clean!
We're just back from a short trip that included a 75km loop along logging tracks and forest roads with shallow water crossings. The underneath was covered in mud and cow
I'm getting an aux fuel tank fitted soon so I'm also trying to keep it clean for that job.
View attachment 7918990
Not too complicated, it took me an afternoon. The thick steel is quite thick but relatively soft so not too hard to cut.So I thought I had better have a go at this since I suggested it way back here.
I used the same universal kit as @landmannnn. Example on Amazon AU here.
View attachment 7918975
This was an exercise in put-up or shut-up to see how much of a PITA it would be to adapt and fit this universal kit. Not too bad, but you're working with 5mm thick steel so allow for that if you contemplate doing something similar with this kit.
Should you do this? Not unless you're the anxious type who worries about a possible driveshaft separation. I did it as an exercise because I have the time and tools. There's been a few driveshaft separations but they're rare enough that you should not lose sleep over it. But as I have said elsewhere, you're trying to avoid secondary damage to the vehicle from a flailing driveshaft if it occurs. This loop does that. It's definitely doable but me doing it as an exercise is not a recommendation that you should also.
Everything I needed was in the kit but I modified it a fair bit so I would call it a donor kit. You get two mount arms and two half-loops plus some Chinesium hardware. I did it slightly different to Landmannn. I chopped up both arms to make one long mount arm to attach to the cross member. The holes in the cross member are on a 260mm spacing so I needed to lengthen one mount arm to pick up the 2nd hole. I used some of the chopped up bits to make a riser to set the loop height I wanted, plus drilled a 2nd set of holes in the half-loops then chopped off the original set to make the half-loops shorter and the loop diameter smaller. The bottom half of the loop is a bit redundant because it extends below the cross member so a flailing driveshaft will be restrained at the bottom by the cross member not the safety loop. But I ended up with a loop that is centred over the driveshaft with good clearance all around to allow for suspension travel. The top half of the loop sits just below the transfer case Bowden cable.
In the words of all dedicated DIYers: "That (driveshaft) ain't going nowhere."
Installation is easy. The mount arm, riser and top half-loop are assembled as one piece. I welded it all together after I got everything in the right place using the bolt holes. I left some bolts in place to fill up the unused holes. Place that piece over the driveshaft then loosely attach the mount arm to the cross member. Install the lower half loop and connect with 4x (upgraded) bolts and nyloc nuts. I slotted the holes in the mount arm so I could centre the loop to the driveshaft. Line that up then tighten the cross member bolts and it's done. Removal is the reverse.
Five minutes work with a 17mm socket and spanner.
This was a fairly bespoke job but I did collect some measurements if anyone is keen enough to have a go. It's fairly apparent what you need to do once you have a kit in front of you.