The Grenadier Forum
Register a free account today to become a member! Once signed in, you'll be able to contribute to the community by adding your own topics, posts, and connect with other members through your own private inbox! INEOS Agents, Dealers or Commercial vendors please use the contact us link at the bottom of the page.
-
Guest submit your best shot for a chance to win the December Photo Contest. Photo Contest Click Here
You are using an out of date browser. It may not display this or other websites correctly.
You should upgrade or use an alternative browser.
You should upgrade or use an alternative browser.
Installing a door side step on the utility rail
- Thread starter LEE JONG HOE
- Start date
-
- Tags
- door rail side utility utility rail
- Local time
- 12:20 AM
- Joined
- Dec 28, 2021
- Messages
- 1,161
Korean to English gives:-
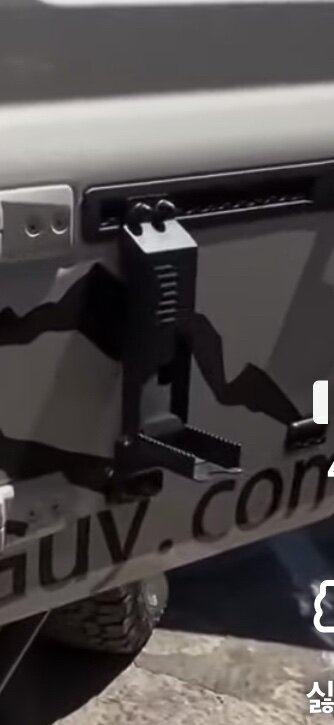
"Hello, I'm planning to install a door side step on a utility rail similar to the one in the photo.
Can you advise me on the best type of L-track bolt, material, or installation method to use?"
"Hello, I'm planning to install a door side step on a utility rail similar to the one in the photo.
Can you advise me on the best type of L-track bolt, material, or installation method to use?"
Good point that’s why it’s better to put a step on the hinges.One consideration, the utility rail is only rated to hold ~40kg on the door
Buzz and DVA both make one, I opted for the Buzz kit like the photo. Very happy with it. Note the factory bolts can be difficult to remove would advise having your dealer break them loose before attempting install.
Thank you for your response. I’ll have to think about it.Good point that’s why it’s better to put a step on the hinges. View attachment 7904657
I’ll have to ask the dealer to release it.Buzz and DVA both make one, I opted for the Buzz kit like the photo. Very happy with it. Note the factory bolts can be difficult to remove would advise having your dealer break them loose before attempting install.
As you say they were bloody tight so have to make sure you have really good torx bits or they’ll snap.Buzz and DVA both make one, I opted for the Buzz kit like the photo. Very happy with it. Note the factory bolts can be difficult to remove would advise having your dealer break them loose before attempting install.
Thank you so much for your advice.One consideration, the utility rail is only rated to hold ~40kg on the door
The paint on the screw could come off, and it might even break — it really gives me a lot to think about.As you say they were bloody tight so have to make sure you have really good torx bits or they’ll snap.
From what I remember you put new screws on that come with the steps.
One of mine was over-torqued from factory and had a lot of paint in the head, I stripped it and it took 3 master machinists at one of my factories half a day to get it out. I'd suggest either:The paint on the screw could come off, and it might even break — it really gives me a lot to think about.
(1) get a 1/2 inch drive (or metric equivalent) T50 socket, use with a breaker bar (long socket wrench) and GO SLOW
(2) ask your dealer to break them all loose for you, after that it's very easy
I would suggest #2 option after that you're looking at a 10 minute install if that.
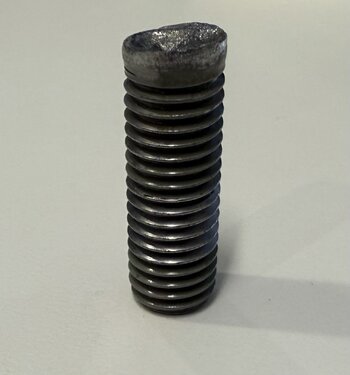
This is the bolt shank after they finally got it out, had to drill the head off first. You do use new screws that come with the steps, your original ones will 100% have at least some marks on the paint when you are done. You can touch this up easily and worst-case scenario a new factory door bolt is under $10 USD.
Attachments
I’m taking away so much valuable information. Thank you.This is the bolt shank after they finally got it out, had to drill the head off first. You do use new screws that come with the steps, your original ones will 100% have at least some marks on the paint when you are done. You can touch this up easily and worst-case scenario a new factory door bolt is under $10 USD.
Happy to help. For reference I am 1.7m and by standing on the Buzz step, rear tire or rear bumper (I have the ladder as well) I can easily reach all but the very front of the roof. I went with three Leitner load bars, not rack, and can get at everything without trouble. I keep heavier or bulkier items e.g. Maxtrax on the rear bar because I can stand on the bumper with the rear doors open and load them without any risk of damaging paint.I’m taking away so much valuable information. Thank you.
One thing we have found useful to release the factory bolts is to put someBuzz and DVA both make one, I opted for the Buzz kit like the photo. Very happy with it. Note the factory bolts can be difficult to remove would advise having your dealer break them loose before attempting install.
Plastic sheet over the bolt before inserting the torx bit. Something like a plastic shopping bag. This takes up any play and helps prevent the splines from stripping.
We also find using a cordless impact set to the “undo” option handy (I know the Milwaukee impacts have this) as it pulses the impact as opposed to putting max torque through the bolt which can help break them free.
Thank you so much for the information. If you don’t mind, could you recommend the exact model name of a torque wrench or a cordless impact wrench?One thing we have found useful to release the factory bolts is to put some
Plastic sheet over the bolt before inserting the torx bit. Something like a plastic shopping bag. This takes up any play and helps prevent the splines from stripping.
We also find using a cordless impact set to the “undo” option handy (I know the Milwaukee impacts have this) as it pulses the impact as opposed to putting max torque through the bolt which can help break them free.
@BEM-S4 I have these on order from Buzz...should be arriving shortly as they have been lost at sea or a bit of time. Just waiting for my tariff invoice from DHL!This is the bolt shank after they finally got it out, had to drill the head off first. You do use new screws that come with the steps, your original ones will 100% have at least some marks on the paint when you are done. You can touch this up easily and worst-case scenario a new factory door bolt is under $10 USD.
When you said consider a dealer to loosen... my mind went to thinking (complete with AI errors)....
But seeing the broken bolt...I hear you.
I'm sure I will give it a go with the advice/suggestions in the thread (thank you all)...but if not budging will consider the
I hear you… I happened to luck out that my office is at a manufacturing facility and I have master machinists, electrical experts, etc there to clean up whatever messes I make with DIY and it costs me a case of beer. I can only imagine the thousands the dealer (not where I purchased truck) would have cost to fix the broken bolt.@BEM-S4 I have these on order from Buzz...should be arriving shortly as they have been lost at sea or a bit of time. Just waiting for my tariff invoice from DHL!
When you said consider a dealer to loosen... my mind went to thinking (complete with AI errors)....
View attachment 7904873
But seeing the broken bolt...I hear you.
I'm sure I will give it a go with the advice/suggestions in the thread (thank you all)...but if not budging will consider thestealerdealer route.
Now I’ve got the guys sorting out my new ARB dual compressor that won’t work after install.
Similar threads
- Replies
- 13
- Views
- 740
- Replies
- 0
- Views
- 426
- Replies
- 4
- Views
- 264
- Replies
- 5
- Views
- 421


