The Grenadier Forum

Register a free account today to become a member! Once signed in, you'll be able to contribute to the community by adding your own topics, posts, and connect with other members through your own private inbox! INEOS Agents, Dealers or Commercial vendors please use the contact us link at the bottom of the page.

Workshop Manuals available?

I was at a decent moment home (around 2PM) to finally use the "access to the manual".

I had a repair to do, in fact "in warranty", but i thought: "this is easy, I do it myself!"
The handle of my right door was loose, and it was clear that it was only one (1) screw or not tightened enough.
20250819_171339 small.jpg


Not that easy for three reasons:
  1. I had to remove the inside trim and everything behind it + the window to access the bolt!
  2. Explanation was (for me) not always very clear
  3. Some "necessary" actions were not necessary, for instance disconnecting the battery (but I didn't do it anyway)
It took me the whole afternoon, and I am ... delighted.
I did it! Thanks to the not perfect and incomplete explanation, but nothing is perfect!

20250819_183054.jpg


I will try to document it completely when I have some more time. Including images or video from the Ineos manual.

[EDITED] This was a win-win: a warranty work was executed by a customer! No travel time to my dealer and I learned a lot, and no warranty cost for Ineos!
 
Last edited:
Well done @Jean Mercier ; these jobs will help us deal with oissues post warranty for sure.
It is how I manage my classic cars , as do many others.
An old site which has proved excellent for my 944 is a great example of what we could strive for.
Clarks garage click on workshop manual tab
 
So in the manual I’ve been looking up spare parts and specifically wheel bearings. So it seems front and back wheel bearings are the same. But different hub nuts. O rings are mentioned for rear bearing but not for front. Under front axle assembly I find two O rings but I can’t decipher what for. The only other O rings mentioned on front axle is a single O ring so not for bearings but possibly output shaft. Maybe some on the forum with better mechanical knowledge could enlighten me then I can put info in the resources section


IMG_2585.jpeg
IMG_2592.jpeg
IMG_2595.jpeg
IMG_2607.jpeg
 
I was playing with this a bit today. On a windows PC you can right click on an item in the parts list and select Isolate to hide everything else and show where that item is located, often hidden inside something else. The other option that works well to see small items is Exploded view. I'm unaware how those view functions work on an iPad.
 
I was playing with this a bit today. On a windows PC you can right click on an item in the parts list and select Isolate to hide everything else and show where that item is located, often hidden inside something else. The other option that works well to see small items is Exploded view. I'm unaware how those view functions work on an iPad.
👌🏼Perfect. It does work on the iPad. I just hadn’t sussed that yet. Even better for the parts list.
Just click on the three lines at top left for options.
IMG_2610.jpeg
 
👌🏼Perfect. It does work on the iPad. I just hadn’t sussed that yet. Even better for the parts list.
Just click on the three lines at top left for options.
Yep. Once I remembered I also have an iPad (brainfart...) I gave it a go and it works well.
This is the RHD front axle but same thing.

For those playing along at home, exploded view and isolate are handy features.

IMG_0108.jpeg


IMG_0110.jpeg
 
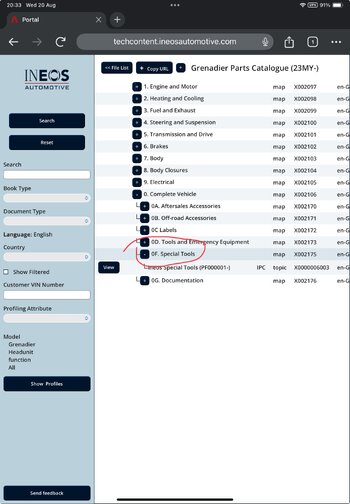
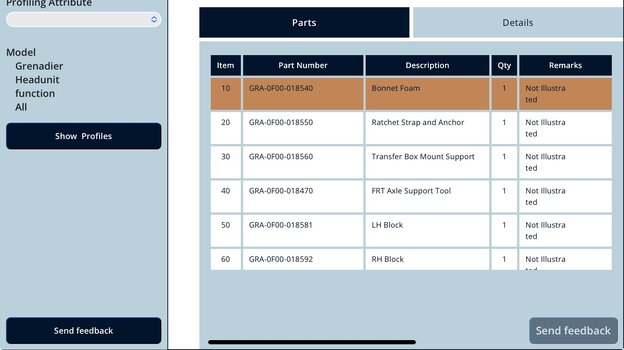
Does the manual have a special service tool list. May need a few for some common jobs.
There is a list of 135 SSTs in the IPC. Listed by PN and name but no illustrations or photos and no cross reference to where they are used.
 

Attachments

  • IMG_0112.jpeg
    IMG_0112.jpeg
    502.6 KB · Views: 6
  • IMG_0113.jpeg
    IMG_0113.jpeg
    245.1 KB · Views: 5
Thankyou. That makes it much easier to compile my parts list 👌🏼
I'll keep looking for a simpler way to cross reference the parts lists to the diagrams. If you were to take a screenshot of the diagram and the parts list you could just put the item number next to the part in the diagram instead of the full part number. Using the example of my last swivel hub pic above, just write 220 next to the o-ring instead of GRA-5E00-021390. That will tidy it up a bit and reduce transcribing errors but it's still a very tedious way to do it.
The Hide feature can be used to remove items from the parts list and the diagram temporarily. That helps. Crap like clips and brackets, etc.
 
Something to look for is if they have a section with kit numbers or an assembled component part number that are also listed as a group of separate parts. This can make buying parts considerably cheaper than ordering individual components to complete a task.
 
I'll keep looking for a simpler way to cross reference the parts lists to the diagrams. If you were to take a screenshot of the diagram and the parts list you could just put the item number next to the part in the diagram instead of the full part number. Using the example of my last swivel hub pic above, just write 220 next to the o-ring instead of GRA-5E00-021390. That will tidy it up a bit and reduce transcribing errors but it's still a very tedious way to do it.
The Hide feature can be used to remove items from the parts list and the diagram temporarily. That helps. Crap like clips and brackets, etc.
I was thinking of just drawing lines between the list and the exploded views for ambiguous things, but I guess it quickly gets kind of messy.. Example below.

It would be great if the tool could just have an option to display an item/part number label next to each item in the view..

Screenshot 2025-08-19 at 22.36.44.png
 
Last edited:
Back
Top Bottom