TR182md:
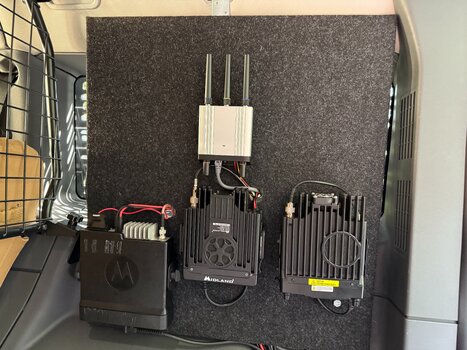
I put my Midland 575 in the empty space in the battery box under the rear seats between the batteries. I fabricated a bracket out of 1.25 x 1 x 1/8, 1 x 1 x 1/8 aluminum angle, and .040 sheet metal. Did not have to drill any holes in the truck. Used two of the large Torx bolts in the vertical channels that hold the rear seat frame in.
I have attached some photos of the bracket with the dimensions written thereon. I attached the top angles with a plate nut because I wasn't sure I could pass it in with the radio installed and put together, but it fit assembled because the .040 sheet sides are flexible, so you could rivet or bolt the top angles together before installation if you prefer. I used a single bolt to attach the top angles in case the support channels were not perfectly square, but they were square and plumb, and the bracket angles all square up just fine. Grind the rear vertical of the top angles to fit the seat support channel, and it will tilt slightly down towards the front end to accommodate the antenna attachment nut. Have experienced no rattles, but cheated by putting a little foam between the seat support channel and the .040 sheet of the bracket on one side.
I was tempted to wire the radio to the secondary battery, but ran the power wiring to the left foot well wires so the secondary battery would keep its charge when using my truck as base station on hunting trips. Also, I was concerned the radio might have some parasitic draw, so I wanted it switched. Ineos uses the secondary battery as a reserve battery so you can start the engine if you run down the primary battery to which all of the power outlets are attached. I have some solar panels I can attach to the jump start points under the hood to feed the primary battery during the day when stationary.
I ran the radio's power lines under the channel along the left (driver) side to the battery box, the microphone extension cord under the same channel to the front of the driver's seat, then under the plastic and foam floor cladding to the transmission tunnel, and the antenna cable through the firewall grommet you find when you remove the panel on the right side to access the power lines in the right (passenger) footwell, then under the plastic and foam floor cladding and under the passenger seat and rear foot well flooring to the radio. See John Canny's YouTube video of his UHF install for the location of the firewall grommet. Use some good tape to keep the cables in the recesses of the floor pan under the plastic and foam floor cladding
View attachment 7908474View attachment 7908475View attachment 7908476View attachment 7908477View attachment 7908478View attachment 7908479View attachment 7908479View attachment 7908480View attachment 7908481View attachment 7908482View attachment 7908483View attachment 7908484View attachment 7908485View attachment 7908486View attachment 7908487View attachment 7908488View attachment 7908489View attachment 7908490View attachment 7908491View attachment 7908492View attachment 7908493View attachment 7908496View attachment 7908497View attachment 7908497. I mounted the Midland ghost antenna on the magnetic antenna base on the roof between the snorkel and the Starlink Mini antenna. I used magnetic tie wrap bases to run the antenna wire to the snorkel, along behind the snorkel, then into the engine bay and through the grommet hole. Used the same magnetic tie wrap bases to run the Starlink Mini cable to the right front roof power outlet.
I fabricated a bracket out of .040 aluminum sheet to mount the microphone to the Owl mounting bracket with one of the Ram ball mounts serving double duty.
Good luck.