The Grenadier Forum
Register Now for enhanced site access.
INEOS Agents, Dealers or Commercial vendors please contact admin@theineosforum.com for a commercial account.

Build Thread @ninetubes - overlanding build - western australia

ninetubes

Grenadier Owner
Local time
1:49 PM
Joined
Feb 5, 2023
Messages
102
Reaction score
659
Location
Western australia
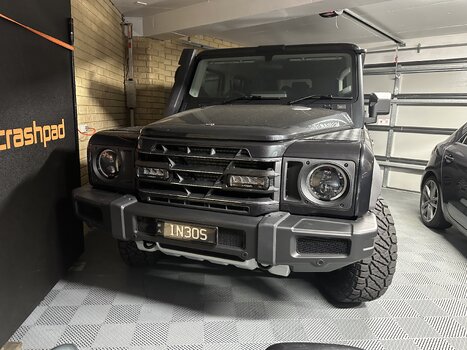
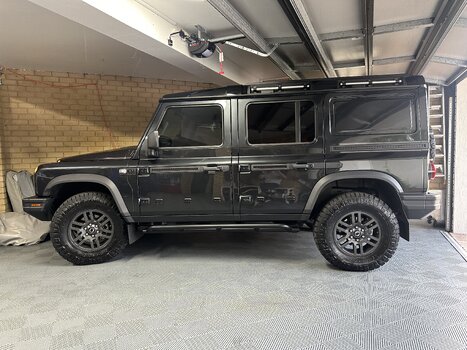
I collected my donny grey TM diesel in July 2023 to replace my old 2016 defender 90 (i still miss it dearly).
I spec'd it without the sunroofs as i have a roof rack, and without the bar/winch as I'd prefer to see what comes up aftermarket.

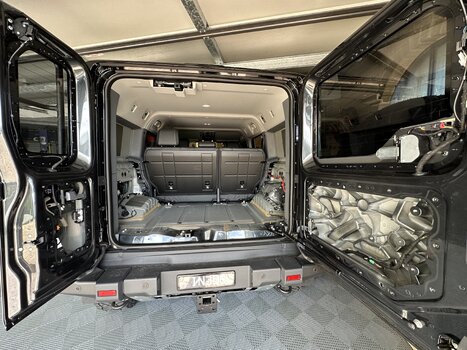
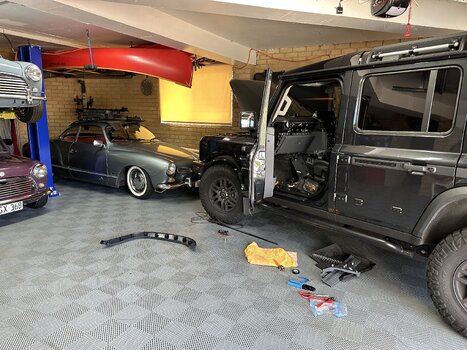
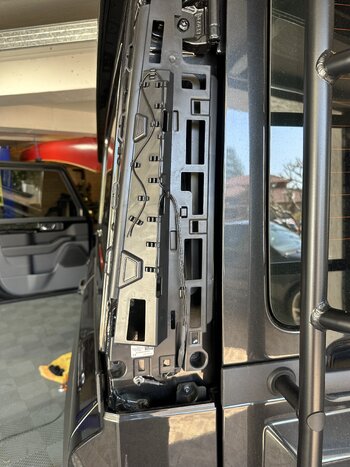
Over the last few months I've been busy learning about the car and making a bunch of mods to take it off-grid touring in remote australia.

I'll start documenting the changes chronologically from here over the next few weeks, then try to keep it up to date as i continue to progress it.
 

ninetubes

Grenadier Owner
Local time
1:49 PM
Joined
Feb 5, 2023
Messages
102
Reaction score
659
Location
Western australia
Step 1 - change the front spotlights to get a bit of that defender look back to help me cope with the loss!

Took to the front grille with a hacksaw to install the Lazer Lamps Grille kit with their "Triple R 750 Elite" lights.
I tried wiring them the same as the OEM spot lights, but it would overload and trip out after a couple of seconds, so i installed the supplied relay. Tucked the relay behind the jump start post in the front RHS of the engine bay, and picked up power feed from there too.

Lights perform well. the supplied 3D printed mounts feel a bit cheap and needed an extra couple of screws to help stiffen up the grille now it's cut.

About this time I also got the windows tinted (as dark as legally allowed here) and got the IN3OS number plate. Which a bloke at work said it was a weird number plate and asked me if I was still in my 30’s. Now I can’t unsee “in 30’s. Thanks a lot Glenn!
 

Attachments

  • IMG_1313.jpeg
    IMG_1313.jpeg
    3.3 MB · Views: 464
Last edited:

ninetubes

Grenadier Owner
Local time
1:49 PM
Joined
Feb 5, 2023
Messages
102
Reaction score
659
Location
Western australia
Planning:
After cutting the grille I felt like the "plastic was off". At the time i couldn't find any info with regard to how and where to run electrical wires for UHF ratio and electric trailer brakes, compressor placement etc, so i set to stripping the car to have a good look around and start planning.
i stripped the back door trims and the cargo areas, removed the battery covers from the rear seat, removed the front seats and carpet under them. Then took the dash apart, removed the centre console and roof switch panel. wheel inner guards came out along with the wheel arch flares and the external trims around the back door. Learnt plenty and didn't break much.
I found all the spare aux wiring - what an easter egg hunt that was!
Then set to testing a bunch of things to see how they worked and what voltage things ran at.
Also sketched out the aux switch panel as people kept asking me what was what up there - ref the photos below
 

Attachments

  • IMG_1220.jpeg
    IMG_1220.jpeg
    3.6 MB · Views: 422
  • IMG_1266.jpeg
    IMG_1266.jpeg
    4.5 MB · Views: 377
  • IMG_1267.jpeg
    IMG_1267.jpeg
    1.9 MB · Views: 271
  • IMG_1268.jpeg
    IMG_1268.jpeg
    2 MB · Views: 262
  • IMG_1279.jpeg
    IMG_1279.jpeg
    2.2 MB · Views: 264
  • IMG_1280.jpeg
    IMG_1280.jpeg
    588.3 KB · Views: 267
  • IMG_1218.jpeg
    IMG_1218.jpeg
    3.7 MB · Views: 289
  • IMG_1387.jpeg
    IMG_1387.jpeg
    932.5 KB · Views: 291
  • 71602934191__010E2010-12D9-4E0B-A389-5675A279F1DB.jpeg
    71602934191__010E2010-12D9-4E0B-A389-5675A279F1DB.jpeg
    1.6 MB · Views: 270
  • IMG_1120.jpeg
    IMG_1120.jpeg
    1.7 MB · Views: 264
Last edited:

Krabby

Global Grenadier 0076
Forum Moderator
Grenadier Owner
Lifetime Supporter
Local time
1:49 AM
Joined
Nov 5, 2022
Messages
4,607
Reaction score
8,985
Location
New Jersey, USA
Planning:
After cutting the grille I felt like the "plastic was off". At the time i couldn't find any info with regard to how and where to run electrical wires for UHF ratio and electric trailer brakes, compressor placement etc, so i set to stripping the car to have a good look around and start planning.
i stripped the back door trims and the while cargo areas, removed the battery covers from the rear seat, removed the front seats and carpet under them. Then took the dash apart, removed the centre console and roof switch panel. wheel inner guards came out along with the wheel arch flares and the external trims around the back door. Learnt plenty and didn't break much.
I found all the spare aux wiring - what an easter egg hunt that was!
Then set to testing a bunch of things to see how they worked and what voltage things ran at.
Please share any images you have of things when they were stripped down for us. The images you have already posted are great.
 

ninetubes

Grenadier Owner
Local time
1:49 PM
Joined
Feb 5, 2023
Messages
102
Reaction score
659
Location
Western australia
Lithium Second Battery:
I needed a dual battery system that would run a 40L fridge for a good few days, accept solar feed, and also run a 2000W inverter. A big inverter would mean i can not only run a coffee machine, but also an induction cooktop (which means i don't need to carry or refill gas).

I measured up and selected a 150Ah lithium battery which fitted in the factory brackets. Kind of.... the ones attached to the floor needed straightening and the hold down needed to be bent in a different spot and a spacer added.
 

Attachments

  • IMG_1147.jpeg
    IMG_1147.jpeg
    2.1 MB · Views: 292
  • IMG_1148.jpeg
    IMG_1148.jpeg
    2 MB · Views: 268
  • IMG_1150.jpeg
    IMG_1150.jpeg
    2.1 MB · Views: 271
  • IMG_1151.jpeg
    IMG_1151.jpeg
    1.6 MB · Views: 258
  • IMG_1152.jpeg
    IMG_1152.jpeg
    1.2 MB · Views: 253
  • IMG_1149.jpeg
    IMG_1149.jpeg
    1.1 MB · Views: 282

ninetubes

Grenadier Owner
Local time
1:49 PM
Joined
Feb 5, 2023
Messages
102
Reaction score
659
Location
Western australia
Dual Battery System:
Now the lithium battery was in I'd need to charge it. After much consideration, I ended up completely stripping the whole factory system and found myself much further into the wiring system than I was qualified to be!

I installed a redarc BCDC1250D charger. This would give me solar input, lithium compatibility and a high rate of charge.

Connected to this are the following separate circuits for; fridge, compressor, invertor, 50A anderson output for anything else i may need to run, along with a solar input. I also connected the factory feed for the roof circuits, so i can have camp lights running up there.

All the earths are run via a shunt for a battery monitoring display.

I moved the Nato socket feed wire to the start battery circuit. Reason for this was to convert the nato to trailer power feed as i don't plan on using it for anything else. While I was doing this I got frustrated with the conditional nature of the switching of power to the NATO plug. So I pulled the trigger wire off the albrite solenoid for the nato power feed, then ran the RHS footwell aux power (INT2) back to the solenoid. Now it’s manually switchable and will stay on if needed. Perfect.
 

Attachments

  • Aux Electrical sys sketch.jpg
    Aux Electrical sys sketch.jpg
    75 KB · Views: 288
  • F95A5A59-8798-4AE4-AD0F-4D10222F60C1.jpeg
    F95A5A59-8798-4AE4-AD0F-4D10222F60C1.jpeg
    1.5 MB · Views: 285
  • IMG_1368.jpeg
    IMG_1368.jpeg
    1.6 MB · Views: 272
  • IMG_1394.jpeg
    IMG_1394.jpeg
    2.9 MB · Views: 286
Last edited:

ninetubes

Grenadier Owner
Local time
1:49 PM
Joined
Feb 5, 2023
Messages
102
Reaction score
659
Location
Western australia
Electric trailer brakes:
Most trailers have electric brakes these days, including the little car trailer i tow my race car with. So I installed a Redarc Towpro Elite. At the time there was no vehicle specific wiring harness, so i used a universal one.
From stripping the centre console i knew there was just enough room to put the controller next to the gear selector. I wanted it in a really easy spot where i could find it with out looking if i needed to (eg when dealing with a swaying trailer, or when owing offroad). I found the dash too much of a reach, even though it was easier access to install. The roof panel is do-able but i wasnt convinced my had would easily find it without looking up at it and taking m eyes off the road.
From there, the main module went under the back seat, and i connected into the trailer wiring inside the car. in the RHS cargo area near the nato albright relay.
I ran the service brake power to pin 9 of the Euro 13 round on the car, then crossed the wires over in my adaptor (as my trailers run 7 pin flat)

FYI for others, the INEOS Installation Guide for the RedArc TowPro can be viewed here.
 

Attachments

  • Trailer brake wiring.JPG
    Trailer brake wiring.JPG
    1.3 MB · Views: 292
  • image.jpg
    image.jpg
    2.7 MB · Views: 329
Last edited:

ninetubes

Grenadier Owner
Local time
1:49 PM
Joined
Feb 5, 2023
Messages
102
Reaction score
659
Location
Western australia
UHF Radio:
I already had a GME XRS-330 remote mic UHF radio, so now to install it.

LHS footwell was selected. Under there is a mounting plate, and obviously the INT1 switched aux power is down there too.
I e since heard some markets like USA may have knee airbags mounted to this plate, rendering it unusable.

So popped off the dash panels again. Bad video here:
View: https://youtu.be/H7XzKCFyIo0?si=Bz44jNw8-dL-7Nvm


Used double sided tape and a couple of zip-ies to attach the unit to the mounting plate. Picked up the aux power wires from behind the bonnet release area, and connected that up.

Next i removed the passenger grab handle and panel. Into this i installed a GME pass-through adaptor above the glovebox. It points downward so that when the mic is unclipped from it it's completely invisible. So i connected that up to the main unit and put the grab handle back together.

At this point my roof rack hadn't arrived, but it has now and I've installed the aerial onto it. To do that, i pulled off the RHS cargo door seal, the external rear right upper corner trim and also the roof switch panel inside. Using a cable snake, i ran the aerial cable inside the headlining using the overhead switch panel opening to redirect it across to the LHS pillar and down into the foot well. I mounted the aerial onto the rack with a razed drop down bracket and a GME fold down base
That left the mic mount. Couldn't find a good spot and to save drilling holes i made one using 3D printing. It picks up the factory holes. the two 4 bolts are replaced with slightly longer ones (3 of M4x20 & one of M4x40) to accommodate the bracket. Into the top of the bracket i pressed the magnet from a GME magnetic mount.

I've added the 3D print file to this post incase anyone wants to make their own.
 

Attachments

  • IMG_1613.jpeg
    IMG_1613.jpeg
    1.8 MB · Views: 301
  • IMG_1612.jpeg
    IMG_1612.jpeg
    1.4 MB · Views: 288
  • IMG_1618.jpeg
    IMG_1618.jpeg
    1.9 MB · Views: 284
  • IMG_1269.jpeg
    IMG_1269.jpeg
    2.6 MB · Views: 293
  • IMG_1268.jpeg
    IMG_1268.jpeg
    2 MB · Views: 276
  • IMG_1260.jpeg
    IMG_1260.jpeg
    1.4 MB · Views: 270
  • IMG_1259.jpeg
    IMG_1259.jpeg
    2.5 MB · Views: 274
  • image.jpg
    image.jpg
    2.9 MB · Views: 279
  • image.jpg
    image.jpg
    2.6 MB · Views: 307
  • Grenny mic bracket - V5.zip
    95.2 KB · Views: 15
Last edited:
This site contains affiliate links for which The Grenadier Forum may be compensated.

ninetubes

Grenadier Owner
Local time
1:49 PM
Joined
Feb 5, 2023
Messages
102
Reaction score
659
Location
Western australia
33" Tyres:
Nitto RidgeGrappler LT285/70/17 went on. There are a thousand tyre choices these days, they are all compromises and each to their own. These appealed to me for my intended use. We'll see how they go.
 

Attachments

  • IMG_1424.jpeg
    IMG_1424.jpeg
    4.7 MB · Views: 355

ninetubes

Grenadier Owner
Local time
1:49 PM
Joined
Feb 5, 2023
Messages
102
Reaction score
659
Location
Western australia
Rear muffler removal:
I was pretty keen to start looking at making a second fuel tank, most obvious spot i could see was where the rear muffler lives. So to get the ball rolling a friend removed the rear muffler and straight piped it.
No it doesn't sound any different. Honestly not the slightest bit either inside the car or with your ear next to the tail pipe.
No idea why it's there, maybe for the petrol and it gets left in for the diesel. i don't know.
Anyway, i havent had a chance to get onto the tank yet, but there is room for a good 50L by my measurements. Shouldn't be too hard to tee into the filler hose either. then the plan will be an electric transfer pump to pump into the main tank.
 

Attachments

  • IMG_1331.jpeg
    IMG_1331.jpeg
    3.3 MB · Views: 326
  • IMG_1328.jpeg
    IMG_1328.jpeg
    2.5 MB · Views: 306
  • IMG_4119.jpeg
    IMG_4119.jpeg
    3.3 MB · Views: 298
  • IMG_1326.jpeg
    IMG_1326.jpeg
    3.3 MB · Views: 280
  • IMG_1327.jpeg
    IMG_1327.jpeg
    3.2 MB · Views: 270
  • IMG_4122.jpeg
    IMG_4122.jpeg
    3.2 MB · Views: 265

Greg

Grenadier Owner
Lifetime Supporter
Local time
3:49 PM
Joined
May 27, 2022
Messages
224
Reaction score
396
What does the rear muffler weigh?
 

Logsplitter

Grenadier Owner
Lifetime Supporter
Local time
6:49 AM
Joined
Oct 31, 2022
Messages
2,313
Reaction score
8,543
Location
🇬🇧
Rear muffler removal:
I was pretty keen to start looking at making a second fuel tank, most obvious spot i could see was where the rear muffler lives. So to get the ball rolling a friend removed the rear muffler and straight piped it.
No it doesn't sound any different. Honestly not the slightest bit either inside the car or with your ear next to the tail pipe.
No idea why it's there, maybe for the petrol and it gets left in for the diesel. i don't know.
Anyway, i havent had a chance to get onto the tank yet, but there is room for a good 50L by my measurements. Shouldn't be too hard to tee into the filler hose either. then the plan will be an electric transfer pump to pump into the main tank.
Very keen on doing this with my petrol Grenadier so watching closely 😍
 
  • Like
Reactions: PBD

ninetubes

Grenadier Owner
Local time
1:49 PM
Joined
Feb 5, 2023
Messages
102
Reaction score
659
Location
Western australia
Diff Breathers:
Whilst it was on the hoist for the muffler, I changed over the diff breathers.

The factory ones are a one way valve (will only exhaust air from the diff housing), technically i know they should work and that ineos probably know more than me. So without getting into the pros/cons here's what i did:

Factory housing is M10*1.0mm. Most diff breather fittings are 1/8"BSP. Incidently these two threads are very close, so a 1/8" fitting will "start" in the housing but bind within in a turn or so. If you were rough you could just wind it in a screw the thread up. I chose to do it properly and bought 10x1.0 8mm push fittings along with a generic 8mm diff breather kit.

I ran the hoses along the diff housings to the LHS and down the radius arms to the chassis. then along the chassis and up the firewall into the engine bay. Under the guard/wing on the LHS just forward of the firewall i found a bolt hole to mount the breather block. Then zip-tied up all the hoses. Only took 20 mins.

I chose not to do the TC and Trans breathers as they are relatively high and above the wading depth. which will likely be enough for my purposes. although this might change if a decent snorkel becomes available down the track.
 

Attachments

  • IMG_1752.jpeg
    IMG_1752.jpeg
    779.6 KB · Views: 328
Last edited:

Tazzieman

Grenadier Owner
Lifetime Supporter
Founding Guard
Local time
3:49 PM
Joined
Sep 30, 2021
Messages
5,784
Reaction score
11,604
Location
Tasmania
I cose not to do the TC and Trans breathers as they are relatively high and above the wading depth. which will likely be enough for my purposes. although this might change if a decent snorkel becomes available down the track.
What do you estimate the floating depth to be?
 
Back
Top Bottom