The Grenadier Forum
Register Now for enhanced site access.
INEOS Agents, Dealers or Commercial vendors please contact admin@theineosforum.com for a commercial account.

Electric Deployable Side Steps / Rock Sliders

tmarr

Grenadier Owner
Local time
11:57 PM
Joined
Feb 26, 2024
Messages
16
Reaction score
22
Location
Northern Virginia, VA, USA
So, these do not use the existing mounts at all. I'm not sure connecting to sheet metal is the best solution. Seems like it might flex (with my weight) and there's some concern about water and salt intrusion. Although, I suppose that could be mitigated with some custom EDPM drilled to accommodate the bolts.
 

flynnsk

Grenadier Owner
Forum Donor
Lifetime Supporter
Local time
10:57 PM
Joined
Jun 9, 2023
Messages
191
Reaction score
235
Location
Chicago
So, these do not use the existing mounts at all. I'm not sure connecting to sheet metal is the best solution. Seems like it might flex (with my weight) and there's some concern about water and salt intrusion. Although, I suppose that could be mitigated with some custom EDPM drilled to accommodate the bolts.
Sadly they do not. Looks as though one has to remove the sealed plugs along with the bottom protective skirt (to get access to those) that run along edge of underbody. I can only assume given the hardware (L-'bolts'), the idea is push the 'flat; end through the opening, slide the washer over and use the little plastic cards as holders. Then when the nut is tightened the length of the L portion of the bracket will hold the bolt from turning, allowing the nut to tighten. Again, given the 'oh so wonderful' install guide, left to my own devices (and limited tools) to figure it out. Does not help that Ineos has gone back on their word about Workshop guides.. /sigh.

Anywho, will keep you up to date as I figure this out.
 

SandyChamois

Grenadier Owner
Local time
11:57 PM
Joined
Aug 20, 2023
Messages
161
Reaction score
265
Location
CT, USA
IMG_1107.jpeg
IMG_0110.jpeg

Here are a couple of pics of the motors from under. You can see the plastic rocker panel trim cover must be cut for the motors and the placement of the square plastic gasket
 

SandyChamois

Grenadier Owner
Local time
11:57 PM
Joined
Aug 20, 2023
Messages
161
Reaction score
265
Location
CT, USA
And after 3 or 4 weeks with these installed now, the only issue has been the lubrication of the motor hinges. Several times the steps got stuck open and would not close. I keep a can of WD40 in the truck and spray the motor hinges and then they close fine. I may need a longer term solution, like an oil based lube or something that won’t wash off as easily in the rain
 

flynnsk

Grenadier Owner
Forum Donor
Lifetime Supporter
Local time
10:57 PM
Joined
Jun 9, 2023
Messages
191
Reaction score
235
Location
Chicago
View attachment 7852394
View attachment 7852395

Here are a couple of pics of the motors from under. You can see the plastic rocker panel trim cover must be cut for the motors and the placement of the square plastic gasket
Thanks for the close up pictures. These shows exactly what I was hoping for, the fitment of the "bolt" in place with the plastic card and the alignment with the guard/trim.

I was hoping I might be able to replace the rubber plugs with an equal diameter grommet, otherwise was thinking rubber sealant.
 

tmarr

Grenadier Owner
Local time
11:57 PM
Joined
Feb 26, 2024
Messages
16
Reaction score
22
Location
Northern Virginia, VA, USA
Thanks so much for the pictures. Once my truck is one year old, I can add these steps. But at one week old, I'm too scared. LOL.

For lubrication, you might consider giving "Gibbs Brand Lubricant" a try. Available on amazon and ebay usually. I've used this for years and it's really good. Not cheap though.

For additional sealing protection, a good flexible caulk, such as Lexel, probably wouldn't hurt.
 

thuchton

Production/Transit
Local time
10:57 PM
Joined
Nov 8, 2023
Messages
19
Reaction score
45
Location
Texas Hill Country, TX, USA
Got my electric side steps from Summer Auto installed today. I had a local shop install mine and they did it in a few hours. They said it was not any harder than other electric side steps they have installed for other vehicles. First thoughts are the upgraded steps are solid enough. They do flex a little but really not that bad at all. I am 6'2" and 280 give or take lbs and I can stand on them and feel secure.
 

flynnsk

Grenadier Owner
Forum Donor
Lifetime Supporter
Local time
10:57 PM
Joined
Jun 9, 2023
Messages
191
Reaction score
235
Location
Chicago
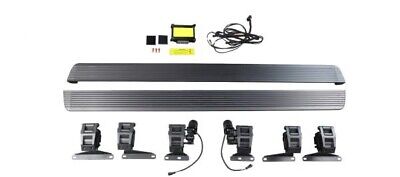
Spent a few minutes poking around underneath. The only 'tricky' part I've stumbled upon is the center 'inner' mounting point is a hard plug. Not only is this covered over with the protective wax /undercoating (matching vehicle color) it appears affixed with some sort of thick adhesive layer, seems like only way to remove is to cut/drill it out.
Center_MountPoint_wtf.jpg
The barely understandable instructions have you instead use the plastic card, similar to so:
Hardware_Ready.jpg
I was able to make use of the installed rubber plugs (minus the aforementioned plug) and the smallest dab of sealant.
Stud_In_Bung.jpg

Bungd_Studs.jpg


I have yet to tackle the routing of the wiring. I am less concerned about e-box / ecu placement than I am with getting the steps aligned and more secured (tacking those damn hard frame plugs!)

Some recommendations for any others who get the same steps, hardware and instructions.
-Sort out the included L-Bolts/studs and look for those with a slight angle. Found that those with >90Deg seemed to slip in place a bit easier.
--If on the other hand, all your hardware is perfectly aligned, get out a file and shave off the top of the short flat end (ie, the outer 'corner). This edge/corner/elbow will catch on the smaller 50mm holes. Filing these down just a hair opposite the weld, will allow them to easily slip into the orifice.

As mentioned in the YT video and shown previously (TYVM!), you will need to ever so slightly trim the plastic underbody panel.

This is held on with about half a dozen plastic push rivets
Skirting_Un-fastened.jpgAND two Torx T25 bolts on the front/leading edge, where the wheel well meets the rocker.

Skirt_Front_Torx.jpg
I recommend getting some cardboard, make a mock up of the IG plastic guard needing "Adjustment", or use a straight edge and approximate where need to cut based on comparison of install points.
Myself, I found it easiest for me, to cut exactly a width of the mount/arm, right up until the pre-dilled holes. Then make a slightly wider cut making a "Y".
The narrow (stem) accounts for the arm width, however the wider opening is needed so the bracket does not interfere with the plastic guard when pressed fully back onto the IG.
Trimmed_Skirt.jpg
Cut_Skirt.jpg

Edit: <Potatoe Pictures of install coming soon>
Still working on alignment and electrical routing
 
Last edited:

flynnsk

Grenadier Owner
Forum Donor
Lifetime Supporter
Local time
10:57 PM
Joined
Jun 9, 2023
Messages
191
Reaction score
235
Location
Chicago
Hope to have the passenger side mounts completed this evening, however still no idea how the %^*$ to remove that body plug to install the 3rd (inner most) mount.
I would be less concerned if the motor was on another mount point where was all points attached. I feel like the extra torque of the motor mounted on THAT specific mount may pose problems if not attached to that inner point.


Screenshot 2024-04-09 103015.jpg

Center_MountPoint_RemoveMe.jpg
Once I get that sorted out, and tackle the wiring, I'll get pictures up.

Edit: got this center plug taken care of..

Bung_hole.jpg
and was able to add the L-bolt / stud.
 
Last edited:

flynnsk

Grenadier Owner
Forum Donor
Lifetime Supporter
Local time
10:57 PM
Joined
Jun 9, 2023
Messages
191
Reaction score
235
Location
Chicago
Good news, is despite the atrocious install guide was able to get the ecu plugged in and activator works as expected. The included 2 pin molex (think old PC fans) plugs right into the same "box" that the other doors are just above the ODB2 connector. This sends the signal when doors are open/closed.

Plug in the provided 2 wire into the green box, just above the existing / occupied slots. Feed the "signal wire" along the side, behind the 'pull handle' for the hood and along the door jam.
Signal wire.jpg
Run along the door jam, and then under the Left Front seat.
signal_wire_driverside.jpg
Here you can place the ecu where you choose.

The left and right rear drain plugs are where I feed the motor wire that drops down to the mount and connector.

For the power, I feed the piggy back up along the center well (behind the plastic) and then up behind the knee and to the fuse box.


The ground, I used the body mounted stud under the rear seat.

Still working on alignment, however even initial go, I'm pleased.

<more potatoe pictures to come>
 
Last edited:

csjeeper

Grenadier Owner
Lifetime Supporter
Local time
5:57 AM
Joined
Mar 7, 2023
Messages
10
Reaction score
11
Location
Zuerich, Switzerland
just for your info:
 

flynnsk

Grenadier Owner
Forum Donor
Lifetime Supporter
Local time
10:57 PM
Joined
Jun 9, 2023
Messages
191
Reaction score
235
Location
Chicago
just for your info:
1st time installing, and not knowing way around the Grenadier, I would totally /#agree. The provided instructions are atrocious.
Working on final measurements. Once I have things aligned (I'm a bit OCD) I expect to have a better documented steps/guide to installing the steps.
I think with a bit of experience, one can get the install down to an hour or two, if have two people working (one on steps and another on wiring), otherwise can be a 4+ hour job.

Now having assembled the steps numerous times (alignment, paint etc), I can say the hardest part is the wiring.
 

DaveB

Grenadier Owner
Local time
1:57 PM
Joined
Mar 18, 2022
Messages
6,739
Reaction score
13,687
Location
Toogoom, Fraser Coast Queensland
So, these do not use the existing mounts at all. I'm not sure connecting to sheet metal is the best solution. Seems like it might flex (with my weight) and there's some concern about water and salt intrusion. Although, I suppose that could be mitigated with some custom EDPM drilled to accommodate the bolts.
Or losing weight
 

MASTER SHOP

Grenadier Owner
Local time
8:57 PM
Joined
Apr 23, 2024
Messages
3
Reaction score
1
Location
California, USA
I saw these guys today on youtube…… electric deployable side steps. These are not sliders… the mounting brackets would likely bend / break and the step would snap like a matchstick no doubt if you mashed them / dragged on a rock… but nonetheless for overlanding (not Moab rock crawling) and daily driving these look really appealing… I currently have the ineos side steps in my order, those are not sliders either.

I emailed them for pricing…

View: https://www.youtube.com/watch?v=gii0exbOtk8&t=126s&pp=ygUPaW5lb3MgZ3JlbmFkaWVy
https://www.ebay.com/itm/3556330929...d=link&campid=5338980679&toolid=20001&mkevt=1 i got mine from ebay
 
This site contains affiliate links for which The Grenadier Forum may be compensated.

Asnes

Grenadier Owner
Lifetime Supporter
Local time
11:57 PM
Joined
Dec 10, 2022
Messages
191
Reaction score
375
Location
Windermere, FL, USA
Summer auto will ship them to you for about $1000 - they are the source who manufacture them. You can get their info on the forum or via alibaba.
 

MASTER SHOP

Grenadier Owner
Local time
8:57 PM
Joined
Apr 23, 2024
Messages
3
Reaction score
1
Location
California, USA
Summer auto will ship them to you for about $1000 - they are the source who manufacture them. You can get their info on the forum or via alibaba.
its not the same
 
This site contains affiliate links for which The Grenadier Forum may be compensated.
Back
Top Bottom