The Grenadier Forum

Register a free account today to become a member! Once signed in, you'll be able to contribute to the community by adding your own topics, posts, and connect with other members through your own private inbox! INEOS Agents, Dealers or Commercial vendors please use the contact us link at the bottom of the page.

Upgraded the stereo in 3 phases: sharing what I have learned and completed.

Tidewater

Grenadier Owner
Local time
6:34 PM
Joined
Jun 22, 2025
Messages
11
Location
Cohasset
I picked up my Trialmaster this past July and could not be happier with it. With that being said I have been tweaking and improving this thing constantly, most notably is the stereo performance. I fully admit its a truck that I take offroad and beat on and that an audiophile quality stereo is a bit mad. My journey will be broken down into 3 phases:
  • Better Bass & sound deadening
  • Upgraded speakers
  • Amps & wiring
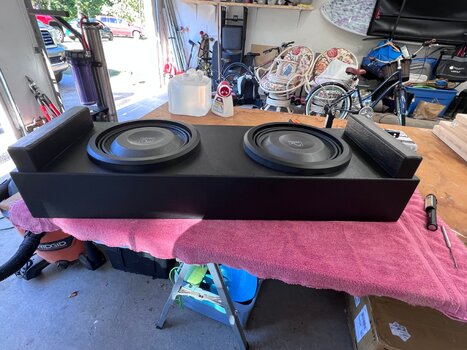
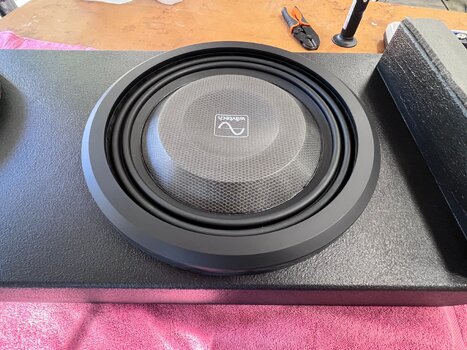
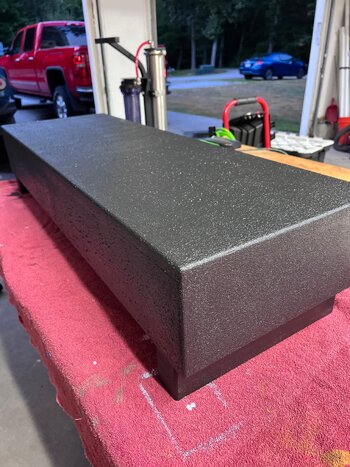
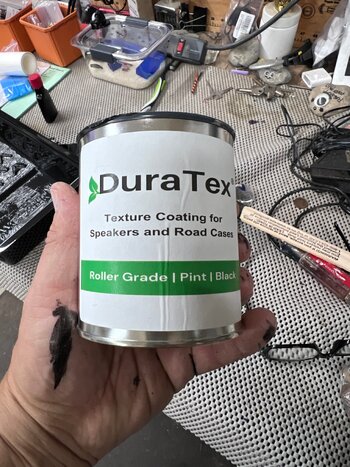
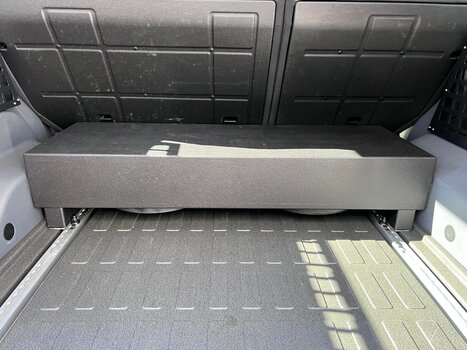
I started with Bass as I did not purchased the factory JBL option. Instead I went with a proper brand and landed on Wavtech. This is a US domestic company that has a lot going for it. They are pushing the envelope of sound innovation, quality build and actual customer service you can call and speak to someone! I will admit my Bass build might be overkill for some, but you only live once!! Went with 2-12" 2 ohm low profile subwoofers, the Wavtech 1500.1 mono block amp and custom box. The box is made from baltic birch 3/4" with one open chamber yielding 1.2 cubic foot of place. It was then painted with speaker box painted called Duratex. The amp mounts under the back passenger seat and connect directly into the "factory sub wire hookups". One of the biggest draws to Wavtech was its excellent native features for connecting to an OEM system. No need to a LOC to convert, amp has it built in! The amp rack is built out of HDPE (1/2" starboard) which makes shaping and heat setting threaded inserts a breeze. Last item is the remote gain knob that I mounted temporarily next to the handbrake. A bit of tuning, now I can hit serious bass in sealed box that is tight and smooth!

*Sub box dimensions are 39" wide x 6" high and 13" deep. The attached photos show down firing with legs. I have since then removed the legs and now it fires up with much better response.
* The sub box is held in place with 1" L track bolts I picked up from Amazon and some L brackets. If I need to take it out, it 4 screws and done!
* For the amp turn on lead, I tapped into the backseat fuse panel and used the switched circuit that controls power to the headlight leveling option. I can post a photo to help others.

Gear:
Wavtech ThinPro 12"

Wavtech 1500.1 amp

Sound deadening:
I went with Siles Max purchased from Amazon. One box did all of the floor, wheel arches etc. A full day of stripping out the 2 front seats, floor trays and the 2 back panels in the way back. Just this step alone made the whole car much quieter and more refined.
Siles Max


Options:
  • If space were more of a concern I would have stepped it down to 1 Wavtech 10" sub and Wavtech 500 watt amp. My original plan was to put a single 10" under each front seat, fiberglass enclosures etc. Its a great option but I need that space for a compressor and some other junk.
I want to recognize Matt at Watech support of answering all of my questions, checking my math and helping me select my gear! Can't recommend this company enough!

This first phase is done! If you just want to add Bass to your Grenadier here is how I did it without breaking the bank, getting top of line gear and had a lot of fun in the process. If you have any questions, please reach out to me!

Also, I now offering wiring harnesses for sale. A few different options but have mastered how to make everything plug'n without cutting anything!
-Eric
 

Attachments

  • IMG_5860.JPG
    IMG_5860.JPG
    4.5 MB · Views: 55
  • IMG_5859.JPG
    IMG_5859.JPG
    5.2 MB · Views: 49
  • IMG_5849.JPG
    IMG_5849.JPG
    5.9 MB · Views: 47
  • IMG_5850.JPG
    IMG_5850.JPG
    4.1 MB · Views: 49
  • IMG_5861.JPG
    IMG_5861.JPG
    5.3 MB · Views: 52
  • IMG_5910.JPG
    IMG_5910.JPG
    4.7 MB · Views: 55
Hey Eric, nice work! I'm gathering info for a similar concept. Although I think I will be using different gear. I've purchased some resonix cld for the doors and ideally trunk floor.

I am assuming you will post more about the "upgraded speakers" part? I've got some ideas on how I'd do this myself but interested in how you integrated to help confirm if I'm on the right track.
 
Phase 2: Speaker upgrade!

Apologies for the delay in posting. Here we go...

For this phase I researched a ton of speakers out there from all the major brands both coax and 2-way component. I landed on Morel speakers for several reasons:

  • Price/value
  • Construction quality
  • Sound quality (yes, I know subjective)
  • Tweeter clarity and smoothness
I was headed down the path of going with the Morel Hybrid 2-way for front and rear. They sounded amazing and ticked all the boxes. I did pivot to the Morel coax Tempo

Ultra Integra 602 MKII 4" and 6.5" for rear and front

Why you might ask? Well, its a truck and for the price difference I could not really justify the delta at this time. Also, Crutchfield has a solid return policy so if I wanted to swap them out after a few days I could. My opinion thus far is that these are more than I expected with a little less headache as I did not need to wire a passive crossover.

As of today I have been running the stock headunit with no amp for these 4 speakers and the sound is truly amazing. Yes, the factory speakers are 3 ohm and these Morel's are 4 ohm which means slightly less efficient in how loud they play. If you are used to listen to a song at volume level 5 with stock speakers, you will find yourself in the 6/7 range. Not a huge issue. Combine these with the sub woofer upgrade that I shared above, it is night and day different from stock!

Install was simple. Special thanks to all those on this forum who shared how to remove the door cards and how to enlarge the front speaker pods to accept a true 6.5" speaker.

The process:

  • Remove the front and rear door cards
  • Remove the old speakers
  • cut the factory wiring from the speakers close to where they are soldered on to the terminals. You will reuse this wire so that your new speakers are plug'n play
  • Sound deaden the interior of the door cards. I used Siles standard thickness sound deadening along with a roller. Purchased from Amazon
  • Enlarge the front speaker pods. I used a dremel with a die grinding bit to remove about 1/8" along the holes circumfrence. Remember to stuff the cavity with rags so material does not drop inside the door pods.
  • Vac out the debris
  • crimp the include terminal connectors to the wire and then use a bit of solder so that that the terminals hold strong to the wire. I followed up with a bit a heat shrink tubing just because that is how I roll!
  • Used foam tape between the back to the speaker basket and the door pod. This will fill any gaps and yields smoother sound.
  • Use factory screws and reattach the speaker wires to the factory harness
  • Apply some sound deadedning material around the pods
  • Apply foam rings to the perimeter of the speakers to ensure sounds directs to the speaker grill and now just inside the door. I used Sound Skins foam rings
  • Test!
  • Reinstall the door cards and your done!
Total time was about 2 hours. It will be much faster for you, especially if you reference my photos.

=====================================================================
Phase 3: 4 channel amp and custom wiring harness coming soon!

IMG_5942.JPG
IMG_5945.JPG
IMG_5944.JPG
IMG_5940.JPG
IMG_5939.JPG
 
Hey Eric, nice work! I'm gathering info for a similar concept. Although I think I will be using different gear. I've purchased some resonix cld for the doors and ideally trunk floor.

I am assuming you will post more about the "upgraded speakers" part? I've got some ideas on how I'd do this myself but interested in how you integrated to help confirm if I'm on the right track.
Derek,
Feel free to DM me for any questions. Hopefully I can answer your questions faster than I have been posting my install! Happy to help. -Eric
 
Derek,
Feel free to DM me for any questions. Hopefully I can answer your questions faster than I have been posting my install! Happy to help. -Eric
Thanks for the update! Been waiting for this post! I was curious if you figured out what type of connector the factory speakers used and where you placed tweeters, if you did an independent tweeter (based on your speaker choice, I am assuming you did not). I was hoping to not have to cut the factory harness from the stock speakers if i did not have to, but not the end of the world either way.

Do you have any photos before/after on the door speaker opening enlargement, or do you recall the thread you mention about reading up where/how others have done this?

Did you sound deaden the inner door skin, or just outer as pictured?

I'm still a bit away from doing my install, looking forward to the next post, as I'm planning on using a DSP+Amp combo under the rear seat and will need to extend and return the factory head unit wiring.
Sorry did not take any before/after photos of the speaker pods before grinding. I just held my new speaker in place and drew on the area that was interfering with the speaker so it could fit flush. You can also use a cardboard template sized to the speaker to figure out where to trim.

I did not line the inside of the door with sound deadening material. I was not up for full disassembly and wanted to see how much noise was reduce by just doing the inside of the door card. My conclusion, the door card is more than enough, dont over think it.

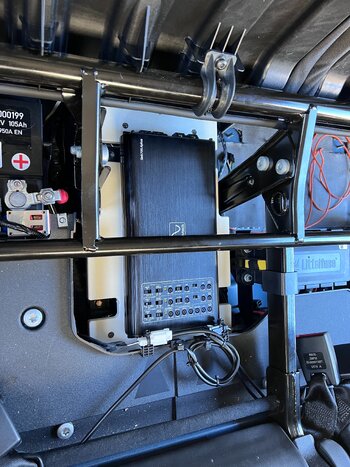
As for the amp rack, I used this from Agile Offroad Agile Offroad Amp rack fit perfect and works awesome.

With respect to the factory speaker connectors, there are 2 wires soldered to the OEM speaker then a quick connect. I simply disconnected the quick connect and then moved with wires to my new speakers. Now I can plug my new speakers into the factory harness in the door. I bought some 19mm wide Tesa tape to wrap all the wires yielding no rattles and looks complete.
 
Full disclosure on how I learned to disassemble, head unit connections etc. came from searching this forum and reaching out to the CEO of Car & Audio Bjorn Student. His firm sells the complete turn key kit for upgrading amp/dsp, sub and front speakers. He was very kind enough to share his install manual so that I could reference.
 
Phase 3: 4 Channel Amp and wiring harness

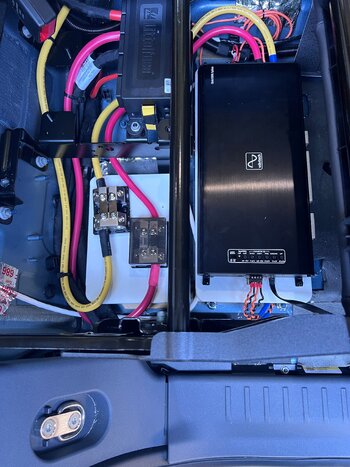
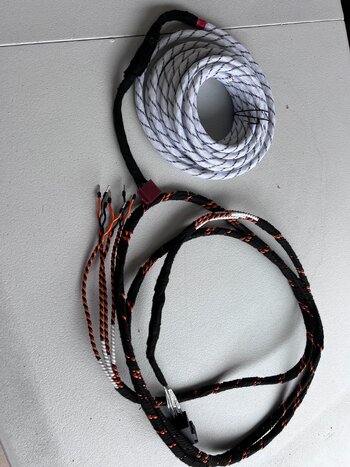
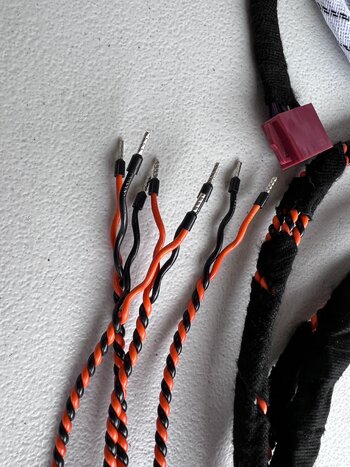
Spent last night running the wiring harness to the head unit. It was a tight fit to get the brown connector removed from the unit but it got done! Below are the wiring looms for the amp output and the speaker level inputs from the head unit. Happy to report that the signals are clean, wiring went in easy and overall it looks professional. Having 125 watts of power to high end speakers is a game changer. I have begun dialing in the HP crossover, gain and trim levels. The sound stage is more than I could have hoped for. Would 2 way component speakers have better sound stage? The answer is yes, but for me that $800 additional premium is not worth it at this time.

I will post some shots off the wiring and how I routed it.
 

Attachments

  • IMG_5923.JPG
    IMG_5923.JPG
    5 MB · Views: 6
  • IMG_5924.JPG
    IMG_5924.JPG
    3.5 MB · Views: 5
  • IMG_5926.JPG
    IMG_5926.JPG
    3.7 MB · Views: 6
  • IMG_5865.JPG
    IMG_5865.JPG
    5.2 MB · Views: 6
Phase 3: 4 Channel Amp and wiring harness

Spent last night running the wiring harness to the head unit. It was a tight fit to get the brown connector removed from the unit but it got done! Below are the wiring looms for the amp output and the speaker level inputs from the head unit. Happy to report that the signals are clean, wiring went in easy and overall it looks professional. Having 125 watts of power to high end speakers is a game changer. I have begun dialing in the HP crossover, gain and trim levels. The sound stage is more than I could have hoped for. Would 2 way component speakers have better sound stage? The answer is yes, but for me that $800 additional premium is not worth it at this time.

I will post some shots off the wiring and how I routed it.
I am excited to see the wiring set up. This is something that I enjoy doing, but haven't attempted on the Ineos because there is no information and reference as to where to start and what to look for. I have enough projects right now that I can't waste a day taking the interior apart just for an exploration mission.
 
So I've also seen Bjorn's manual, ultimately decided on a slightly different build varying some of the equipment, locations etc.

Great sharing the Agile mount, was definitely not looking forward to fabbing something myself. Good to hear its simple to just desolder the factory harnesses, for some reason I imagined it more complicated.

Couple of follow up questions:

is your amp in the middle? Looks like it from the pic, I will need to mount in the middle, as I have the dual batteries.

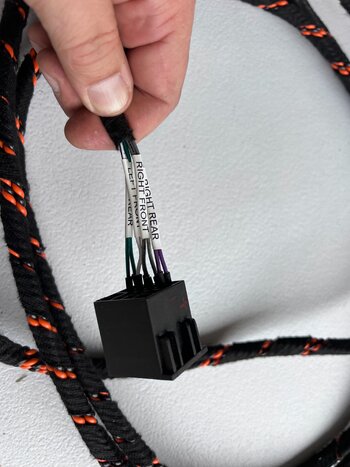
When you ran the wiring harness from the brown connector back to the amp, what type of connector is it? from what I've been able to figure out its just a standard ISO harness, like this https://www.amazon.com/Connector-Ha...ofessional/dp/B0C5QGL8KQ?tag=globalgrena0b-20, but would appreciate a confirmation to save me the order/return circle.

What is the black cable with the labeled speakers for? Is that the return from the amp to the original brown connector you had removed from the head unit that runs to the speakers themselves?

Thanks!
 
I am excited to see the wiring set up. This is something that I enjoy doing, but haven't attempted on the Ineos because there is no information and reference as to where to start and what to look for. I have enough projects right now that I can't waste a day taking the interior apart just for an exploration mission.
The wiring is pretty straight forward:

  1. disconnect battery and let sit 30 minutes before doing any electrical work
  2. Remove floor trays for drivers and rear passenger floors
  3. Remove door sills
  4. Remove lower plastic off of B Pillar
  5. Remove hood lever and plastic around it
  6. Remove side and lower dash panels under steering wheel
  7. Remove "brown" ISO 8 pin socket from back of amp unit. Looking at the unit, this is located on the left side rear
  8. Plug in the new brown ISO 8 pin from the extended harness. You have now created an extension to feed the amp with speaker level source input
  9. Connect the black connector to the factory brown ISO 8 pin located under the dash. This is now the feed from amp.
Not really hard to do and not much exploration either. Post any questions!
 
Back
Top Bottom