The Grenadier Forum

Register a free account today to become a member! Once signed in, you'll be able to contribute to the community by adding your own topics, posts, and connect with other members through your own private inbox! INEOS Agents, Dealers or Commercial vendors please use the contact us link at the bottom of the page.

Show us your mods.

Not really a mod, but a field upgrade. Coming home from Georgetown last weekend, pulled into the servo (petrol station), and the only diesel pump they had operating was high flow. Could not get it in the tank. Had to go to another station.
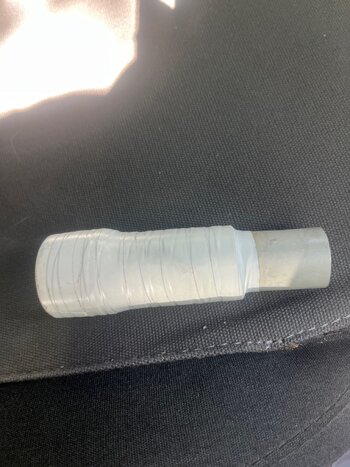
Looked into what to use as a 32mm id to 25mm od funnel. Came up with 2 pieces of electrical conduit. One 25mm, and the other the flared end of a 32mm piece. Both about 70mm long. I cut 2 slots in the 32mm piece about 20mm long, leaving the flared end untouched. I inserted the 25mm section into the 32mm piece, and heated with a blow torch, and put a band clamp around to clamp it tight. Once cooled, I used pressure PVC glue to glue them together. Presto 32mm inside diameter (the size of a high flow nozzle) to 25mm outside diameter fitting. Easily opens the flap, and can insert the nozzle. I did wrap it in electrical tape, as I cooked it a bit too much, and scorched the conduit.
 

Attachments

  • IMG_1621.jpeg
    IMG_1621.jpeg
    4.2 MB · Views: 33
More Simpson Desert prep... this time water storage solutions. If you're in the market, I found the Pak Offroad 40L Footwell tank fits like a glove.

(If it's not obvious, the driver and passenger seats are canted forward in the below photo)

View attachment 7829871

It handily ships with a rechargeable tap dispenser so no need to plumb in taps etc if it's a temporary fitment.

FYI Stewart at Pak indicates that a rear loadspace tank is also in the works for the Grenadier.

@globalgregors are you able to fully open the seat bases with this tank in place?
 
Today I finished trimming the Lowes Mod load space mat. I only cut access to the two most fore/aft positions, as they will used for a cross-rigged fridge retention system. The last picture shows the NiteIze CamJam ratchet straps and stitched loop straps.

That’s how the loadspace will be day-to-day, with a thin mat covering the straps. Remove the over-mat, throw in the fridge, tighten the loops over the handles, plug in and load.

I’m so excited to get the fridge in!

IMG_0989.jpeg

IMG_0990.jpeg
 
Sorry, and since this has resurfaced, I assume you have to access both left and right sides separately and what method are you using to pump water out. 😀
Yes, the low section on each side must be 5-7 litres, so when you’re down to the last bit and you don’t want to drain the contents to one side it may be necessary to switch over.

It comes with a USB-rechargeable dispenser/pump with a flexible inlet hose, similar concept to the one on the Dometic water carrier (if you’ve seen those).

There is a fitting on both sides if you are plumbing it in permanently.

However I normally prefer to access from one side of the vehicle and I’ve never got it that close to depletion in use.

At the end of a trip we remove it from the vehicle to drain any contents that remain in the tank.
 
Didn't make one of that, but I am doing one on the lazer lights...
The manual must be damn useful when taking that all apart. I couldn’t work out how to get all the plastic outer bumper off when my auxiliary rads kept falling out, so had to improvise by taking front light out and wheel arch liner, to enable bush fixes of the rad mounting.
 
I have temporarily lost my manual access! Lynn is working on it.. So I had to do it all blind.
I figured it out in the end, but yes it would have been much quicker with the manual, there was a fair bit of head scratching.
 
Back
Top Bottom