TLDR:
INTRODUCTION
Back in May of this year I picked up a ¾ platform rack from Leitner Designs Australia at their new operation in Archerfield (Brisbane, Australia). Despite being an early retiree who, according to my wife, has all the time in the world, it has taken me until just recently to unbox, assemble and install the rack onto my 5-door Grenadier station wagon.
This review serves to share some background on Leitner Designs and Leitner Designs Australia; the process of assembling and installing the ¾ rack; and my final impressions including the all important question of "How high it it?" Plus, I have obtained a discount code for Australian and NZ forum members but only after you read through. No jumping ahead!
LEITNER DESIGNS
https://www.leitnerdesigns.com/
In the USA Leitner Designs does a lot more than just Grenadier products. The company has been around since 2007 under the leadership of founder Bernard Leitner. The cornerstone of their product range is their Active Cargo System (ACS), which includes this Grenadier ¾ rack. Bernard Leitner has an interesting back story including a family link to the ATK motorcycle company. Bernard was machining motorcycle part at the age of 8 and he designed and built his first motorcycle using parts laying around his Dad’s workshop when he was 15.
Be sure to check out Bernard’s story here: https://www.leitnerdesigns.com/pages/our-founder
LEITNER DESIGNS AUSTRALIA
https://leitnerdesigns.com.au/
Leitner Designs Australia (ABN 96 685 200 257) is run by Dan, Nick and Joel. These guys are driving their own 4WD rigs and have similar interests to many Grenadier owners. They saw a gap in the market for a dedicated ultra-low profile rack system for local Grenadier owners and approached Leitner Designs to set up a licenced operation to service Australian and New Zealand customers. Leitner Designs Australia also sells truck bed racks and roof platforms and related accessories for popular US sourced vehicles sold in Australiaand are actively working with Leitner Designs to expand the product range for Australian market vehicles.
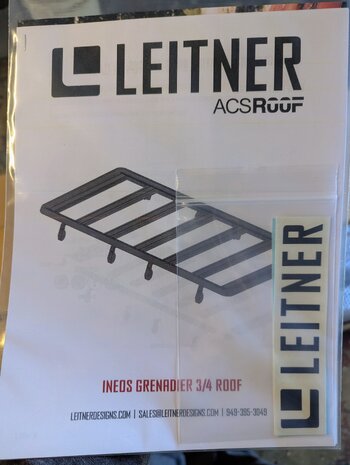
FEATURES OF THE GRENADIER ACS ROOF 3/4 PLATFORM RACK
https://leitnerdesigns.com.au/products/acs-roof-platform-rack-for-grenadier
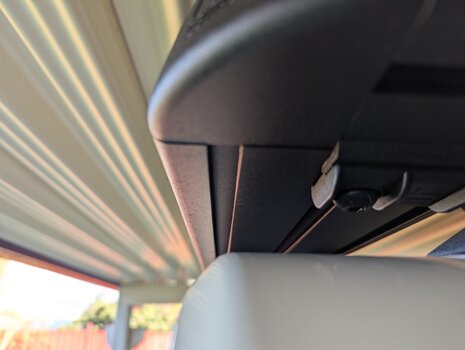
What first stood out to me when cross-shopping for a rack was the Leitner Designs integrated rail and bracket system. This ties the rack to the reinforced roof rollover structure behind the grab rails. It also provides for a very low mounting system and leaves full access to the grab rails. My rack sits about 2mm above the plastic roof runners which is just enough to avoid rubbing.
The factory Rhinorack accessory and most other brands use a rain gutter mounting leg or a backbone frame. I’ve read the argument that a gutter mount is the only factory approved method and I don't dispute that but I'm not convinced that it’s the strongest arrangement when the gutter is a folded thin metal flange that can be flexed by hand. The Leitner rail bracket system is substantial. It's not bearing weight on top of the gutter and it's not going to accumulate dirt, sand or salt around the legs and clamps which may over time wear through the paint and require maintenance.
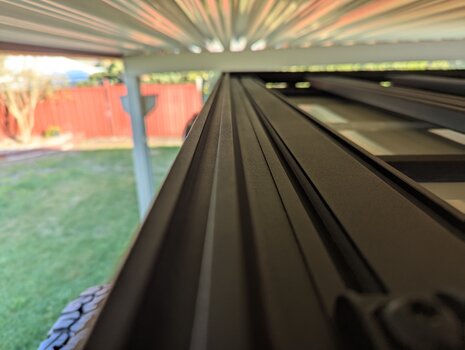
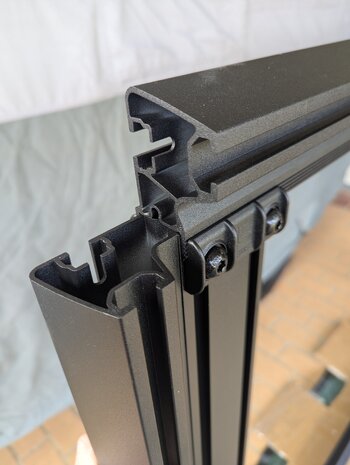
A further point of difference with the Leitner design is the frame corner clamp system. This allows the rack to be shipped in a knock-down form which ultimately saves money for the customer. Knock-down kits are not unique to Leitner but the corner clamp system is superior to brands that use a corner plug as the method to secure the sides and ends with screws. By designing a double-sided serrated clamp system that is secured by four Grade 10.9 M8 bolts per corner, Leitner has produced a frame that is not only compact for shipping but delivers excellent rigidity and strength after assembly.
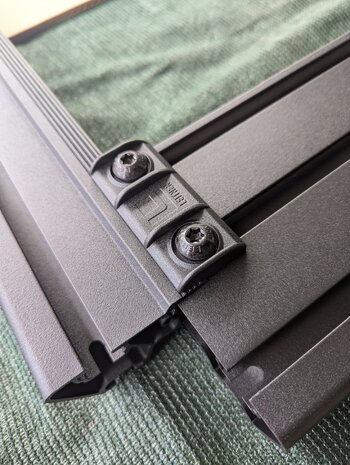
A single-sided serrated clamp system is used to secure the lateral-oriented load planks. The default plank position is equally spaced front to rear with a ~200mm gap in between the planks. The frame rail serrations run full length so the load planks can be positioned anywhere along the frame during assembly and repositioned at any time because the clamps are accessible from above the rack. Additional load planks can be purchased and added at any time without removing or disassembling the rack. Most competitor products secure their planks in a fixed position and the screws are underneath the frame so are not readily accessible in service. This Leitner design flexibility allows for other accessories to be mounted in between the load planks without taking up space (or adding height) on top of the planks. Examples would be a fixed solar panel or a Starlink Mini antenna. These features and flexibility makes the Leitner rack quite versatile.
All rack materials appear to be very high quality. For you metal nerds the frame extrusions and load planks are 1.5 to 3.0mm 6063 T6 aluminium. The grab rail brackets are machined from billet 6061 T6. All structural components are finished in a black textured satin dual-stage powder coat.
Most of the visible hardware is 10.9 rated and finished in black zinc-nickel coating. The Torx screws have the Leitner brand set into them which is a nice touch. The exception is the M8 Nyloc bracket nuts. They’re the only visible hardware item in a silver finish. I have sent feedback through Leitner Designs Australia that those nuts would look much better in black. A very minor point, fussy even.
Leitner don't lock you into their ecosystem. Their load plank T-track slots will accept accessories from Thule, Rhino-Rack, and Yakima.
Leitner Designs Australia publish these specs for the ¾ rack:
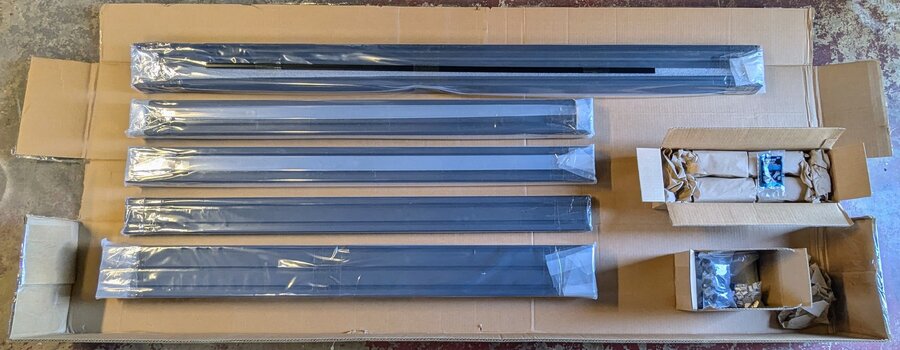
The ¾ rack is packed in a cardboard carton that is 2250mm long x 330mm wide x 200mm tall. The carton weighs 39kg. Leitner Designs Australia are bringing in stock in ISO shipping containers, so each carton is well protected during transit. My kit was undamaged on collection from Archerfield.
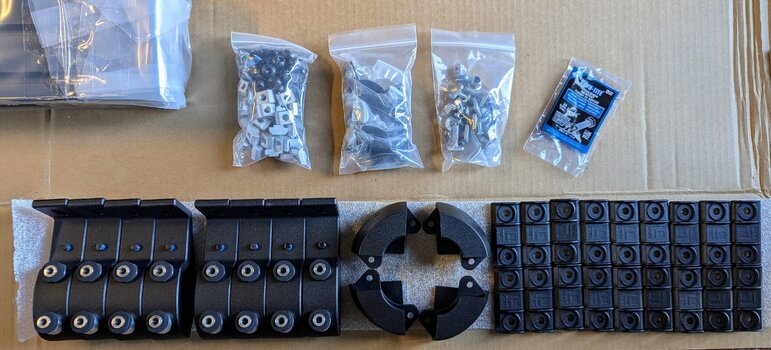
The kit contents are remarkably well wrapped. I’m talking next level OCD wrapping. Large parts are individually wrapped in heavy plastic film. Small parts are bagged. The roof brackets are bundled into sets of four and wrapped in Kraft paper and foam sheet then boxed separately to everything else. Voids are filled with wadded Kraft paper to reduce movement during transit. This kit is packed for disgruntled baggage handler levels of abuse. It's a credit to Leitner that they take so much care to ensure your rack kit arrives in good condition.
The kit contains everything required to assemble and install the rack, including a printed instruction manual, a tube of thread lock and a required tools list:
ASSEMBLY
The assembly instructions can be downloaded from a link at the bottom of the product page here: https://leitnerdesigns.com.au/products/acs-roof-platform-rack-for-grenadier
The instructions say to allow 1-2 hours assembly time. Working with a partner on the opposite side that’s probably about right. My lizard aircraft engineer brain means I’m fastidious (nah, I’m just slow). Working alone it took me about 4 hours but that included taking pics, making notes, a lunch break and contemplating a retiree nap.
The instructions are easy to follow with schematics and photographs to explain each step. The frame is substantial so you will need a suitable sized flat working area. I did the assembly over a concrete floor and used a ground mat and the flattened carton to prevent scratches. You do need to flip the frame over during assembly. It’s not heavy but a 2nd set of hands is useful.
I deviated slightly from the instructions. After the frame is assembled the load planks get installed before the rack gets fitted onto the vehicle. I left the load planks off until I mounted the empty frame onto the roof brackets.
INSTALLATION
Note: Don’t miss out the step of installing the wind breaker strip underneath the front cross member and, this is the important part, do this step BEFORE you install the rack. Follow my advice here.
You should use two people to lift the frame onto the roof. I didn’t have anyone to help me on the day, so I did it using a rope lift system to hoist the rack under my workshop awning roof then parked my vehicle underneath and lowered the rack. It worked. Installing the M8 Nyloc nuts to secure the rack to the brackets is fiddly due to space constraints behind the brackets. A 13mm combination ring/open-end wrench is the go. It’s slow but about the only way to get it done.
OBSERVATIONS, AND THE HEIGHT QUESTION
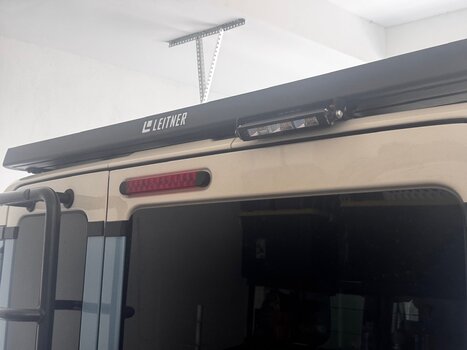
The installed rack is low profile and integrates well into the roofline through those clever rail brackets. There is no noticeable wind noise on the road because the front edge is above the B pillar and well back from the windscreen. Don’t forget the wind breaker strip!
The Grenadier inner roof structure seems to taper from front to rear. The distance between the left and right-side bracket set at the front is wider than the bracket set at the rear. It’s not the Leitner brackets, they’re all the same size. And it's not just my 2/2023 built-on-a-Friday-afternoon-before-a-holiday vehicle. The same thing is visible in images on the Leitner website. I’m not telling you where to look. It’s not a Leitner quality issue and they have allowed for it in the brackets so they can be fitted in any position. It’s just another Ineos quirk that adds character.
How tall is it? On my Grenadier 5-door wagon the height from the ground to the top of the installed rack is 2094mm measured at the RHS D pillar. That’s with a ½ tank of fuel over standard suspension with blue triangle rear springs and 49psi in 17” BFG rear tyres (towing pressure). That leaves me with a lazy 8mm of clearance between the top of the rack and my garage door
At a regular 36psi tyre pressure and a full tankof fuel the height comes down to 2078mm. That's my vehicle not yours but that should give you an idea of the final height.
Something that is not obvious until you see it in the flesh is there is a ~22mm height difference between the top of the load planks and the top of the frame. In other words, the rack is dished. If you’re carrying oversized items this may be something to consider because the platform surface is not flat edge to edge. Oversized loads will sit on the frame rails and not on the load planks unless shoring is placed under the load. Conversely, because the load planks are lower than the frame, there is space to put low-profile anchors on top of the load planks without adding extra height to the rack. That’s an unexpected bonus for my garage door clearance. I can install some folding lashing rings or tabs and not have to take them off each time I park in my garage. This is in addition to having full access to the grab rails for securing a load.
FINAL IMPRESSIONS
For my needs this Leitner ¾ rack is a great solution. As an aircraft engineering nerd who has spent his working life around exotic materials, surface finishes, dimensional accuracy, etc. this Leitner Designs rack feels like similar quality. I’ve had Rhino and Rola products before and they were fine but this Leitner rack is a step above. It was easy and enjoyable to put it together and see that is was square without needing adjustment. If you're after a 3/4 length rack and especially if you have garage/parking height constraints like me then this Leitner Designs rack is highly recommended.
FORUM MEMBER DISCOUNT (AUS and NZ only)
Leitner Designs Australia have offered an 8% discount code for Australian and New Zealand forum members.
Conditions:
I’ve done the math for you. That code equates to A$239.92 off the current price of a ¾ rack (price checked on 9th August, 2025). Plus, you still get the free shipping within Australia.
- Plenty of folks have posted about the Leitner 3/4 rack but I haven't seen a review done for Grenadier
- It's great, you should buy one
- I have left the images as attachments to reduce scrolling on portable devices
- Discount code for AS and NZ buyers
INTRODUCTION
Back in May of this year I picked up a ¾ platform rack from Leitner Designs Australia at their new operation in Archerfield (Brisbane, Australia). Despite being an early retiree who, according to my wife, has all the time in the world, it has taken me until just recently to unbox, assemble and install the rack onto my 5-door Grenadier station wagon.
This review serves to share some background on Leitner Designs and Leitner Designs Australia; the process of assembling and installing the ¾ rack; and my final impressions including the all important question of "How high it it?" Plus, I have obtained a discount code for Australian and NZ forum members but only after you read through. No jumping ahead!
LEITNER DESIGNS
https://www.leitnerdesigns.com/
In the USA Leitner Designs does a lot more than just Grenadier products. The company has been around since 2007 under the leadership of founder Bernard Leitner. The cornerstone of their product range is their Active Cargo System (ACS), which includes this Grenadier ¾ rack. Bernard Leitner has an interesting back story including a family link to the ATK motorcycle company. Bernard was machining motorcycle part at the age of 8 and he designed and built his first motorcycle using parts laying around his Dad’s workshop when he was 15.
Be sure to check out Bernard’s story here: https://www.leitnerdesigns.com/pages/our-founder
LEITNER DESIGNS AUSTRALIA
https://leitnerdesigns.com.au/
Leitner Designs Australia (ABN 96 685 200 257) is run by Dan, Nick and Joel. These guys are driving their own 4WD rigs and have similar interests to many Grenadier owners. They saw a gap in the market for a dedicated ultra-low profile rack system for local Grenadier owners and approached Leitner Designs to set up a licenced operation to service Australian and New Zealand customers. Leitner Designs Australia also sells truck bed racks and roof platforms and related accessories for popular US sourced vehicles sold in Australiaand are actively working with Leitner Designs to expand the product range for Australian market vehicles.
FEATURES OF THE GRENADIER ACS ROOF 3/4 PLATFORM RACK
https://leitnerdesigns.com.au/products/acs-roof-platform-rack-for-grenadier
What first stood out to me when cross-shopping for a rack was the Leitner Designs integrated rail and bracket system. This ties the rack to the reinforced roof rollover structure behind the grab rails. It also provides for a very low mounting system and leaves full access to the grab rails. My rack sits about 2mm above the plastic roof runners which is just enough to avoid rubbing.
The factory Rhinorack accessory and most other brands use a rain gutter mounting leg or a backbone frame. I’ve read the argument that a gutter mount is the only factory approved method and I don't dispute that but I'm not convinced that it’s the strongest arrangement when the gutter is a folded thin metal flange that can be flexed by hand. The Leitner rail bracket system is substantial. It's not bearing weight on top of the gutter and it's not going to accumulate dirt, sand or salt around the legs and clamps which may over time wear through the paint and require maintenance.
A further point of difference with the Leitner design is the frame corner clamp system. This allows the rack to be shipped in a knock-down form which ultimately saves money for the customer. Knock-down kits are not unique to Leitner but the corner clamp system is superior to brands that use a corner plug as the method to secure the sides and ends with screws. By designing a double-sided serrated clamp system that is secured by four Grade 10.9 M8 bolts per corner, Leitner has produced a frame that is not only compact for shipping but delivers excellent rigidity and strength after assembly.
A single-sided serrated clamp system is used to secure the lateral-oriented load planks. The default plank position is equally spaced front to rear with a ~200mm gap in between the planks. The frame rail serrations run full length so the load planks can be positioned anywhere along the frame during assembly and repositioned at any time because the clamps are accessible from above the rack. Additional load planks can be purchased and added at any time without removing or disassembling the rack. Most competitor products secure their planks in a fixed position and the screws are underneath the frame so are not readily accessible in service. This Leitner design flexibility allows for other accessories to be mounted in between the load planks without taking up space (or adding height) on top of the planks. Examples would be a fixed solar panel or a Starlink Mini antenna. These features and flexibility makes the Leitner rack quite versatile.
All rack materials appear to be very high quality. For you metal nerds the frame extrusions and load planks are 1.5 to 3.0mm 6063 T6 aluminium. The grab rail brackets are machined from billet 6061 T6. All structural components are finished in a black textured satin dual-stage powder coat.
Most of the visible hardware is 10.9 rated and finished in black zinc-nickel coating. The Torx screws have the Leitner brand set into them which is a nice touch. The exception is the M8 Nyloc bracket nuts. They’re the only visible hardware item in a silver finish. I have sent feedback through Leitner Designs Australia that those nuts would look much better in black. A very minor point, fussy even.
Leitner don't lock you into their ecosystem. Their load plank T-track slots will accept accessories from Thule, Rhino-Rack, and Yakima.
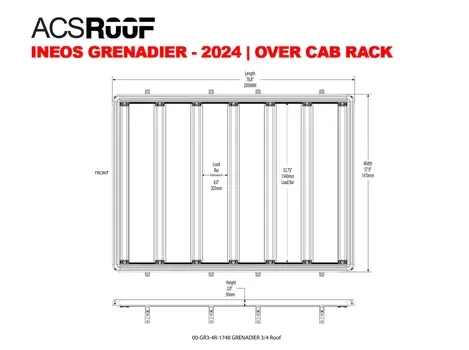
Leitner Designs Australia publish these specs for the ¾ rack:
- Dynamic Weight Capacity (Off-Road): 113 kg.
- Dynamic Weight Capacity (On-Road): 226 kg.
- Static Weight Capacity (Parked): 453 kg.
- Height: 50.8mm.
- Weight: 34kg.
- Length: 2000mm.
- Width: 1470mm.
The ¾ rack is packed in a cardboard carton that is 2250mm long x 330mm wide x 200mm tall. The carton weighs 39kg. Leitner Designs Australia are bringing in stock in ISO shipping containers, so each carton is well protected during transit. My kit was undamaged on collection from Archerfield.
The kit contents are remarkably well wrapped. I’m talking next level OCD wrapping. Large parts are individually wrapped in heavy plastic film. Small parts are bagged. The roof brackets are bundled into sets of four and wrapped in Kraft paper and foam sheet then boxed separately to everything else. Voids are filled with wadded Kraft paper to reduce movement during transit. This kit is packed for disgruntled baggage handler levels of abuse. It's a credit to Leitner that they take so much care to ensure your rack kit arrives in good condition.
The kit contains everything required to assemble and install the rack, including a printed instruction manual, a tube of thread lock and a required tools list:
- Torque wrench (0 to 20 lb.ft / 0 to 30Nm)
- T30 Torx bit socket
- T40 Torx bit socket
- 13mm combination wrench
- 3mm hex key
- #2 Philips bit or screwdriver
ASSEMBLY
The assembly instructions can be downloaded from a link at the bottom of the product page here: https://leitnerdesigns.com.au/products/acs-roof-platform-rack-for-grenadier
The instructions say to allow 1-2 hours assembly time. Working with a partner on the opposite side that’s probably about right. My lizard aircraft engineer brain means I’m fastidious (nah, I’m just slow). Working alone it took me about 4 hours but that included taking pics, making notes, a lunch break and contemplating a retiree nap.
The instructions are easy to follow with schematics and photographs to explain each step. The frame is substantial so you will need a suitable sized flat working area. I did the assembly over a concrete floor and used a ground mat and the flattened carton to prevent scratches. You do need to flip the frame over during assembly. It’s not heavy but a 2nd set of hands is useful.
I deviated slightly from the instructions. After the frame is assembled the load planks get installed before the rack gets fitted onto the vehicle. I left the load planks off until I mounted the empty frame onto the roof brackets.
INSTALLATION
Note: Don’t miss out the step of installing the wind breaker strip underneath the front cross member and, this is the important part, do this step BEFORE you install the rack. Follow my advice here.
You should use two people to lift the frame onto the roof. I didn’t have anyone to help me on the day, so I did it using a rope lift system to hoist the rack under my workshop awning roof then parked my vehicle underneath and lowered the rack. It worked. Installing the M8 Nyloc nuts to secure the rack to the brackets is fiddly due to space constraints behind the brackets. A 13mm combination ring/open-end wrench is the go. It’s slow but about the only way to get it done.
OBSERVATIONS, AND THE HEIGHT QUESTION
The installed rack is low profile and integrates well into the roofline through those clever rail brackets. There is no noticeable wind noise on the road because the front edge is above the B pillar and well back from the windscreen. Don’t forget the wind breaker strip!
The Grenadier inner roof structure seems to taper from front to rear. The distance between the left and right-side bracket set at the front is wider than the bracket set at the rear. It’s not the Leitner brackets, they’re all the same size. And it's not just my 2/2023 built-on-a-Friday-afternoon-before-a-holiday vehicle. The same thing is visible in images on the Leitner website. I’m not telling you where to look. It’s not a Leitner quality issue and they have allowed for it in the brackets so they can be fitted in any position. It’s just another Ineos quirk that adds character.
How tall is it? On my Grenadier 5-door wagon the height from the ground to the top of the installed rack is 2094mm measured at the RHS D pillar. That’s with a ½ tank of fuel over standard suspension with blue triangle rear springs and 49psi in 17” BFG rear tyres (towing pressure). That leaves me with a lazy 8mm of clearance between the top of the rack and my garage door
At a regular 36psi tyre pressure and a full tankof fuel the height comes down to 2078mm. That's my vehicle not yours but that should give you an idea of the final height.
Something that is not obvious until you see it in the flesh is there is a ~22mm height difference between the top of the load planks and the top of the frame. In other words, the rack is dished. If you’re carrying oversized items this may be something to consider because the platform surface is not flat edge to edge. Oversized loads will sit on the frame rails and not on the load planks unless shoring is placed under the load. Conversely, because the load planks are lower than the frame, there is space to put low-profile anchors on top of the load planks without adding extra height to the rack. That’s an unexpected bonus for my garage door clearance. I can install some folding lashing rings or tabs and not have to take them off each time I park in my garage. This is in addition to having full access to the grab rails for securing a load.
FINAL IMPRESSIONS
For my needs this Leitner ¾ rack is a great solution. As an aircraft engineering nerd who has spent his working life around exotic materials, surface finishes, dimensional accuracy, etc. this Leitner Designs rack feels like similar quality. I’ve had Rhino and Rola products before and they were fine but this Leitner rack is a step above. It was easy and enjoyable to put it together and see that is was square without needing adjustment. If you're after a 3/4 length rack and especially if you have garage/parking height constraints like me then this Leitner Designs rack is highly recommended.
FORUM MEMBER DISCOUNT (AUS and NZ only)
Leitner Designs Australia have offered an 8% discount code for Australian and New Zealand forum members.
Conditions:
- The code provides an 8% discount off a single purchase of Grenadier products sold through the Leitner Designs Australia shop located at https://leitnerdesigns.com.au/
- The discount is in addition to free shipping within Australia for orders over A$100.00. NZ members will need to obtain a freight quote.
- The code is valid once per forum member so go nuts with your shopping cart to maximise the discount.
- Orders placed for shipping addresses outside Australia or New Zealand will be cancelled and refunded.
- The code will remain valid unless cancelled by Leitner Designs Australia.
I’ve done the math for you. That code equates to A$239.92 off the current price of a ¾ rack (price checked on 9th August, 2025). Plus, you still get the free shipping within Australia.
Attachments
-
 1. Unboxing.jpg3.1 MB · Views: 296
 -
 13. Finished.jpg3.7 MB · Views: 262
 -
 12. Leitner Designs rail brackets installed.jpg2.8 MB · Views: 266
 -
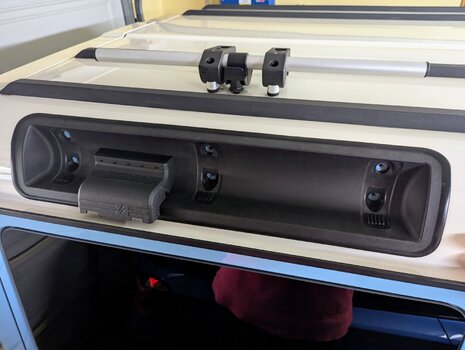 11. Factory grab rail disassembly.jpg2.7 MB · Views: 243
 -
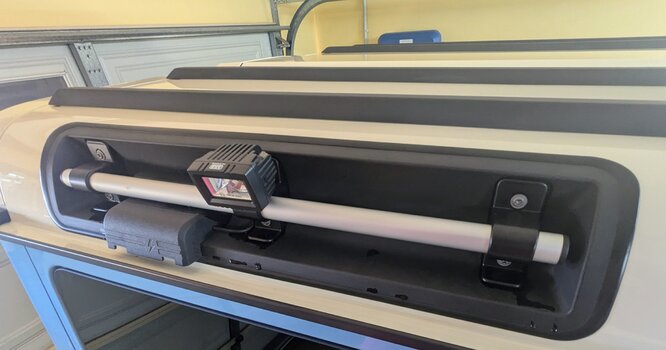 10. Factory grab rails (plus accessory ARB rack light).jpg1.8 MB · Views: 251
 -
 9. Ineos versus Leitner rail brackets.jpg4.6 MB · Views: 249
 -
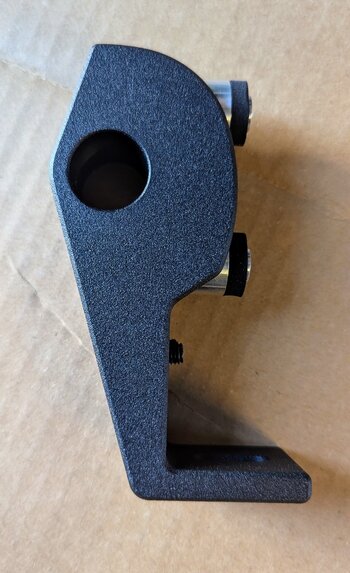 8. Leitner Designs grab rail bracket.jpg2.1 MB · Views: 243
 -
 7. Extrusion detail.jpg2.8 MB · Views: 227
 -
 6. Corner detail.jpg5 MB · Views: 230
 -
 5. Frame assembly.jpg4.8 MB · Views: 228
 -
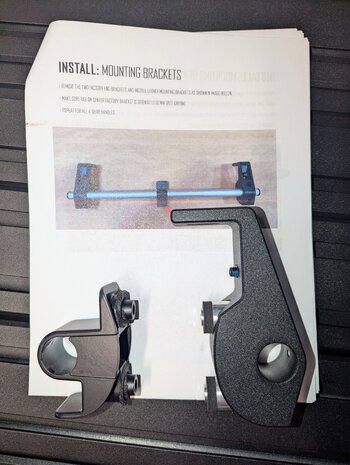
 4. Instructions.jpg2.5 MB · Views: 213
 -
 3. Small parts and brackets.jpg2.8 MB · Views: 218
 -
 2. Laid out.jpg1.5 MB · Views: 218
 -
 ACS_ROOF_SECONDARY_SCHEMATICS_GRENADIER.webp34.8 KB · Views: 236