The Grenadier Forum

Register a free account today to become a member! Once signed in, you'll be able to contribute to the community by adding your own topics, posts, and connect with other members through your own private inbox! INEOS Agents, Dealers or Commercial vendors please use the contact us link at the bottom of the page.

Anyone instal the underset Agile twin ARB? Wiring issue

MileHigh

That Guy
Grenadier Owner
Lifetime Supporter
Local time
10:51 AM
Joined
Aug 4, 2022
Messages
1,194
Location
Colorado
Of course it’s 4pm on a Saturday and I get most of the way through the instal of the brushless ARB Twin with the Agile kit. The online video is interesting, but not a standard IG (1924) and the install video is for the brushed version. Not a major issue, they have a brushless there.

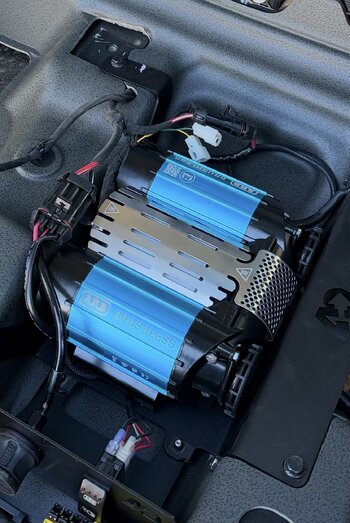
The issue I’m having getting the wires into something other than a spaghetti mess under the seat. The routing to the back is pretty clear, but the underseat area is what I’m struggling with.

The online instructions are so low res that they are pretty much useless for details like how the wires are supposed to. There doesn’t seem to be enough freedom in the wire harness, and I know these things are going to throw off a lot of heat.

This is from their online PDF, which seems to be VGA resolution ? I wonder if its my iPad?

Has anyone installed on of these?

Pics of the manual and what I’m looking at.

IMG_2015.jpeg
IMG_2059.jpeg
 
Thanks, that’s about what I did. The door side black clip I put underneath the air hose, since that is what I think I see they did. DM’d you about something else.
 
Thanks for you help! I’m very timid doing this stuff and work it over in head a bunch.

Got it all worked and back in. that big plastic piece on the driver side rear seat is a PITA to get in and out and I’m not sure it needs to be done, at least on my Base 2024 model. You just need access to the fuse box, and I think you could run the wires with the black monster in place.

Also the passenger side seat rear seat can stay. Maybe even the drivers side rear seat.

The written directions picture are pretty worthless, the video is great, but it is an odd ball model, so it isn’t always applicable.

I do say that I’d have no fear removing body panels and running wires.

All that work and you can barely see it…
 
Watch the OWL video for help routing the wires, he does essentially the same thing with much less disassembly.
I definitely agree. I think if you’re using the fuse area as seen in the PDF directions, I don’t think you need to either take the seats off or the big black battery area cover. Those two are the biggest pains in the whole process.
You do need to take them off for the 1924 version. I think that is used in the video. And you might need to take the big black battery cover off if you’re doing the brushed version which I guess has much larger fuse box. He mentions that the brushless fuses could even be taken off and just the wires run which I’m pretty sure would make it so you definitely don’t have to pick up black plastic battery cover off.

I did not have the airbag warning come off when I started back up. I heard others had had that. I wonder if it’s because I was so slow that I had left the doors open for so long that the Grenadier had gone fully back to sleep and battery saving mode before I started taking the passenger seat off.
 
I fitted the ARB twin under seat compressor (not brushless). My vehicle is a two seat utility, I took the cable through the existing cable hole into the transmission tunnel then connected directly to starter battery. (Note this is an old photo and I now have an mppt controller, in the place of that Victron mains charger) I unbolted the passenger seat, for ease of installation.
No fault codes, if you wait a while with relevant doors open,
Two x 40 amp fuses for older model with brushes )
IMG_4383.jpeg
IMG_4379.jpeg
IMG_4385.jpeg
before disconnecting battery negative leads.
 
Back
Top Bottom