Here's my Wolfbox G900 install write-up...
View attachment 7855126
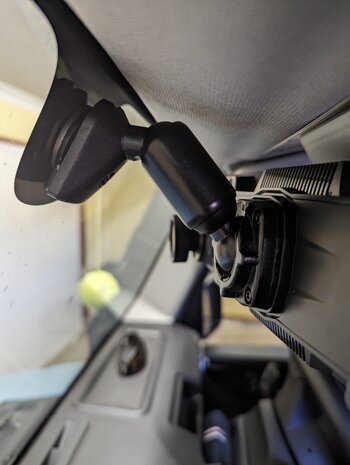
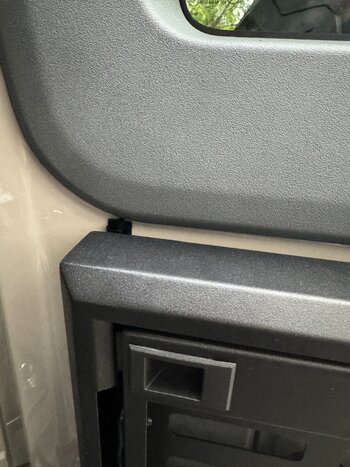
Ignore the dangling camera as I had not stuck it to the plastic trim yet, but you can see that it's in the same position as those who installed this camera inside the door before me. I took the top and bottom plastic trim off to access the interior. There's just one screw that holds the bottom piece (you can see the plastic plug covering the screw). All the panels pop off when you pull it straight out. The rear camera wire was zip-tied to the washer/electrical wiring harness inside. I did pass the camera wire through the rubber grommet that leads out of the top section of the door interior into the bottom half (where the screwed-on plastic piece is (where many have replaced it with a folding table). It's a tight squeeze to get it through the grommet, but it'll fit. You'll have to remove some wiring harness cloth tape. If you dont feed it through the rubber grommet, then the wire will be visible coming out of the bottom trim and then back into the screwed-on first-aid/table cover trim piece.
View attachment 7855127
The wire then continues to follow the wiring harness inside the door until it exits out the bottom of the plastic panel. Some others have been able to snake the wire through the rubber accordion tube, but I could not figure out how to do that. It is such a tight squeeze to get that wire through the tube and I didnt have a wire fishing tool to get that done. If there's someone who actually did this themselves (and not a pro installer), please let us know how you did it. I even pulled the tube off the door on the right side, but it was so jammed-tight of wires that I couldnt even pull it back to expose any access to fee a wire through. So, you can see that the wire comes out the bottom and follows the gas strut (zip-tied) with some slack so that the wire does not get stretched when the door is fully open. The wire is then tucked under the weatherstripping, going up. I made sure to not screw on the bottom panel too tightly in the corner where the wires comes out from under the panel, so as to not cut/crimp the wire.
View attachment 7855128
The wire is then fed up and tucked under/into the weatherstripping/trim pieces and the gap of the roof panel. Nothing had to be removed, so no plastic was harmed in the install. It's a tight and clean install and you dont see the wire at all.
View attachment 7855129
The wire then snakes along the gaps of the A, B, and C-pillars. Again, it's a tight fit so I think the wire is pretty secure (and hidden). Nothing needed to be removed along this roof section.
View attachment 7855130
In this pic, the red wire is the rear camera wire that that is tucked under the roof panel heading towards the mirror, while the green line shows how the GPS wire snakes up the A-Pillar back to the mirror. Excess wire was tucked inside the A-Pillar, and I was (hopefully) careful not to interfere with the air-bag. I did notice that the gap between the windshield/windscreen glass and the roof panel is not super tight, so it was a bit difficult to get the two wires to stay tucked in. If I find that the wires keep popping out, then I may use a few of those included adhesive clips to secure it to the windshield/windscreen. The A-Pillar is easy to remove...just three screws (one you see in the pic, and two securing the grab handle) that are behind plastic rectangle covers). I was NOT able to completely remove the plastic trim piece off the A-pillar, but you dont really need to. You can open it up just enough to tuck the wires behind it.
View attachment 7855134
The power cable was routed from the mirror and across the front roofline (tucked under the roof panel) and down the A-Pillar. The plastic trim of the A-Pillar is held on with one screw. Remove that and the plastic trim pulls off completely. side note: The screw that secures the plastic cover to the A-Pillar was cross-threaded, but I was able to get the screw on tight enough...we'll see if there's a rattle.
View attachment 7855135
The power line is then snaked inside the weatherstripping and behind panels #1 and #3. In order to access and remove the plastic panels, you have to remove them in a specific sequence. Panel #1 just pops out (no screws). Panel #2 has two screws on the bottom two corners. You'll have to poke your head under to see them. And then there's a 3rd screw holding panel #2 to #3 on the left side. Remove that screw. Panel #3 has 3-4 screws along the bottom edge that you'll have to remove. You'll see them once panel #2 is removed. The power cable is then snaked across, under the steering column and to the fuse panel. I zip-tied it to various places so that it wouldn't rattle. All the excess wire was bundled and zip tied inside behind panel 3.
View attachment 7855136
Finally, within the fuse box I have two pigtails...the switched circuit (a/k/a ACC) is the one at the top right (FC21-12V Front Outlet) with the pigtail going to the right. Note: the power source side of the circuit is on the left side of the fuse socket, so the pigtail needs to go to the right. If you wire it so that the pigtail goes to the left, then you've essentially wired the two fuses in series, rather than in parallel (no bueno). Because the pigtail goes to the right, it obscures all the other fuses along that bank, so I wired the always on wire (a/k/a BATT) to FC12 - Head Unit (or maybe it was FC11??). Either way, I used a voltmeter to ensure that there was power to this circuit even when the key was out of the ignition. Again, in this power bank (FC10-FC17) the power source is coming in from the left side, so the pigtail needs to go to the right. The black ground wire was secured to the silver metal-colored bolt (you cant see it in this pic, but it was behind the plastic trim in the lower right corner). I noticed that the black bolts inside the fuse box are not connected to ground, so I didnt use those. Note: my hardwire kit had its ACC and BATT wires reversed, so if you install your mirror and wire it according to directions and then find that the mirror display continues to stay on even when the vehicle is "off", then it's possible your hardware kit is wired backwards too. Just simply swap the two wires <chef's kiss>. I did tell Wolfbox support and they emailed me that same day. They were willing to send me a new power cable, but I didnt feel it was necessary. A+ for customer support!
View attachment 7855137
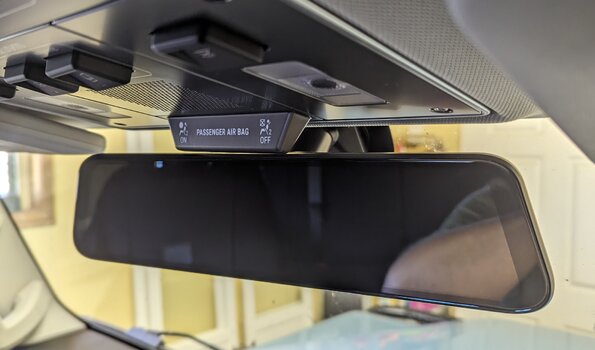
Finally, here is the image of the wires coming into the mirror...I might use some black zip ties to clean it up a bit...another day. One other note...I wanted to install the red wire from the rear camera to my reverse lights so that the back-up lines would work, but I literally could not figure out how to access the reverse light wire without tearing apart my entire cargo area. I think I saw a post where someone showed how to do this by accessing the light from the outside, so I might tackle that one later as well. Oh yeah, also I did NOT buy the longer rear camera wire from Wolfbox, but instead a
5' wire extension off of Amazon . This extension was probably not needed using the roof route that I used as I think the wire is long enough to make it to the camera, but it was $8 USD and I didnt want to get hung up during my install and not having enough cable to work with.
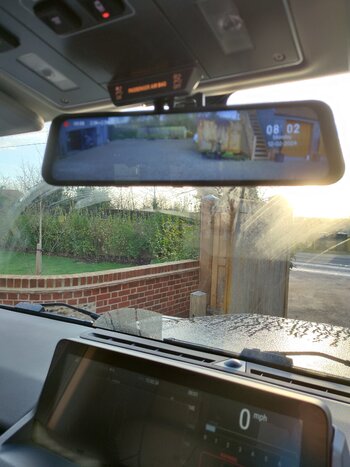
Review: I've only driven a little bit with the mirror, but initial impressions: 1) When the sun is shining behind you and low to the horizon, the glare off the mirror is really bad. The reflections make the mirror nearly unusable. Query to the masses: Does the anti-reflective film you get from Wolfbox help this situation? 2) As with all digital mirrors, your eyes will need to adjust focus to the mirror when you are transitioning from looking at a far distance (e.g., out the front windshield) to the mirror. It's not horrible (and not an issue specific to Wolfbox, but with all digital mirrors), and it'll take a little bit of adjustment. If there's a reflection or glare off the mirror, then your eyes will really be hunting around for what image to focus on. Honestly, I dont think I'll be able to do a quick rearward check anymore as I do with a traditional mirror. You will need to hover your eyes over the image for 1-2 seconds to focus...not a deal-breaker, but something to note. 3) I'm at an age where I need reading glasses, but my "far-sightedness" only needs to be corrected for reading small print in low light. I think if you have more severe hyperopia (i.e., nearby objects are blurry), then a digital mirror may not work for you. Thankfully, the distance from your eyes in a driving position to the mirror surface is pretty far (~arm's length), so it may only be an issue for a smaller percentage of folks. 4) the video image seems kind of zoomed in, so I feel I need to constantly adjust the vertical orientation of the video feed to either capture cars behind me at a distance, or cars that are right on my tail. I think this is just a matter of me needing to drive it more and find a happy-medium setting. 5) low light images off the rear camera is not super great. It's pretty grainy, but that's understandable as image sensors have to really boost their gain in low light and this causes noise in the image. All in all, the digital mirror solves the problem of terrible rear visibility out the back of the truck, but a digital display has its shortcoming compared to an old fashioned mirror. I dont regret the purchase and the install was fairly straightforward. I have previously installed dashcams in four other cars (two others also had rear-facing cameras), so I do have some experience doing this and this install was pretty typical.


 I forgive you.
 .
.