The Grenadier Forum

Register a free account today to become a member! Once signed in, you'll be able to contribute to the community by adding your own topics, posts, and connect with other members through your own private inbox! INEOS Agents, Dealers or Commercial vendors please use the contact us link at the bottom of the page.

Build Thread The Lobster, DaneJa's overlanding build

New wheels and tires:

Quite a large cosmetic difference with these. Method 703 in Gloss Titanium (17x7.5 | 6x130 | 50/6.20") wearing Mickey Thompson Baja Boss 255/85R17. I only drove home, but these actually seem quieter, but that might be the pressure difference -- I was at 36/36, these are at 41/47 from the shop and I'll probably leave them there. I also mounted Agile Offroad's Spare Tire Offset Mount. You can see the PPF here but they have a bit more work to do so I'll let them finish before showing more.

PXL_20250528_010252043.jpg


PXL_20250528_213155242.MP.jpg


PXL_20250528_213623538.jpg


They did nice work. These tires have asymmetric tread with an inside and outside, the wheels have bead grabbing features that make them difficult to mount a tire, and the TPMS sensors all had to go back to same locations, and I checked the torque values and it's all good. That said, this practice of using four rolling floor jacks in a sloped parking lot seems sketchy as hell to me.

PXL_20250528_203834749.jpg


Air Down Gear Up Drawers and Sleeping Platform:

I'm very pleased with the work on these. This is the first final install on a Grenadier of this system and they're going to do some refinement, but overall the system is excellent. They're going to make a magnetic cover for the gap to the left of the fridge along with a few other tweaks. The system has a few configurations you'll see in the pictures. They also have different systems available depending on your needs. Obviously I went with the drawer fridge and sleeping platform option.

PXL_20250528_164507238.jpg


PXL_20250528_163520891.MP.jpg


PXL_20250528_164410398.jpg


PXL_20250528_163911537.jpg


PXL_20250528_163918480.jpg


PXL_20250528_170147953.jpg


PXL_20250528_170141057.jpg


PXL_20250528_164621240.jpg
 
Last edited:
Finally got to see a Devil Red in the flesh today... lots of uniqueness to the color and is quickly becoming a favorite. It's not pure red, but rather, has some brightness that I dare say may be 'pink.' Reminiscent of a half-year-only Jeep Wrangler color called (of all things to raise in this thread) "Rock Lobster," which is my all-time favorite on a newer Jeep - and almost Monza Red, which was a one-year-only NAS Defender 90 color... although that had a bit of orange to it (still a top choice (next to Arles)).

Yours is coming along beautifully!
 
Last edited:
The guys who did the audio install, Blue Chip, created a sizzle reel and posted it to their Instagram.


If you don't have IG, it's also in this album of images they shared with me. If you want to see the process of the install check it out, but I'll post a few below. Here are a couple features I haven't talked about already.

This knob controls the DSP. It took a while to figure out where to put it, but this is a great spot. It's easy to control, tucked out of the way, and blends right in with the light and screen saver screen both turned off. They set up the DSP with a selectable tune optimized for the driver and one optimized for all seats. The knob also allows finer control of the master volume and sub volume, among many other features we're not really using. The amp/DSP takes high-level output from the OEM system, so speed compensated volume still works.

DSC01315(1).jpg


Here's where the amp/DSP is tucked into the left-rear quarter panel. It fits like a glove.

IMG_2103.jpg

IMG_2104.jpg

IMG_2115.jpg


Here are a couple more shots of the sub box.

IMG_1888.jpg

IMG_1939.jpg

IMG_1940.jpg

IMG_2082.jpg


The eagle-eyed may have spotted in earlier pictures that I installed the Grenadier USA black anodized aluminum roof grab handles.

PXL_20250528_154135252.jpg


And finally, a couple shot outside the truck. There is also satin PPF on the piano black interrior elements, but I didn't take any pictures of that. Much of the PPF job is complete, but they still need to add a black strip on the bottom of the doors and side panels, black out the chrome on the grill, work out some details, and apply ceramic coating. I'll get the truck back on Tuesday, job complete, hopefully.

DSC08863.jpg

DSC08844.jpg

DSC08828.jpg
 
The guys who did the audio install, Blue Chip, created a sizzle reel and posted it to their Instagram.


If you don't have IG, it's also in this album of images they shared with me. If you want to see the process of the install check it out, but I'll post a few below. Here are a couple features I haven't talked about already.

This knob controls the DSP. It took a while to figure out where to put it, but this is a great spot. It's easy to control, tucked out of the way, and blends right in with the light and screen saver screen both turned off. They set up the DSP with a selectable tune optimized for the driver and one optimized for all seats. The knob also allows finer control of the master volume and sub volume, among many other features we're not really using. The amp/DSP takes high-level output from the OEM system, so speed compensated volume still works.

View attachment 7898029


Here's where the amp/DSP is tucked into the left-rear quarter panel. It fits like a glove.

View attachment 7898026
View attachment 7898027
View attachment 7898028


Here are a couple more shots of the sub box.

View attachment 7898033
View attachment 7898034
View attachment 7898038
View attachment 7898039


The eagle-eyed may have spotted in earlier pictures that I installed the Grenadier USA black anodized aluminum roof grab handles.

View attachment 7898040


And finally, a couple shot outside the truck. There is also satin PPF on the piano black interrior elements, but I didn't take any pictures of that. Much of the PPF job is complete, but they still need to add a black strip on the bottom of the doors and side panels, black out the chrome on the grill, work out some details, and apply ceramic coating. I'll get the truck back on Tuesday, job complete, hopefully.

View attachment 7898041
View attachment 7898042
View attachment 7898043
I've never thought about buying a red car in all these years. For me, it always had the association of a fire engine. But I have to say, your Grenadier looks really good in combination with this wheels. Hats off!
 
PPF is finally fully complete. Final additions are the black strip just above the rock sliders, chrome delete on the grill, some detail cleanup, and ceramic coating. Also here's a picture of the PPF applied to the interior piano black areas.

PXL_20250603_231809292.jpg


PXL_20250603_230701546.jpg


PXL_20250603_225922041.jpg


PXL_20250603_230002853.MP.jpg


Lastly, I swapped the dash gear rail for a black one. The red one seemed to cheapen the interior. The Grenadier USA Cup Holder is also installed.

PXL_20250603_231826521.jpg
 
New wheels and tires:

Quite a large cosmetic difference with these. Method 703 in Gloss Titanium (17x7.5 | 6x130 | 50/6.20") wearing Mickey Thompson Baja Boss 255/85R17. I only drove home, but these actually seem quieter, but that might be the pressure difference -- I was at 36/36, these are at 41/47 from the shop and I'll probably leave them there. I also mounted Agile Offroad's Spare Tire Offset Mount. You can see the PPF here but they have a bit more work to do so I'll let them finish before showing more.

View attachment 7897701

View attachment 7897702

View attachment 7897703

They did nice work. These tires have asymmetric tread with an inside and outside, the wheels have bead grabbing features that make them difficult to mount a tire, and the TPMS sensors all had to go back to same locations, and I checked the torque values and it's all good. That said, this practice of using four rolling floor jacks in a sloped parking lot seems sketchy as hell to me.

View attachment 7897705


I am contemplating that size tire as well...as the tall skinnys I think give better footprint when aired down and have less friction/rolling resistance on highway due to narrower tread. Looking good. I like the wheel color you chose too. If I wasnt such a fan of steely's...would consider those as well. Just have bad memory of cracking a wheel offroading and having to use spare when I could have used a mini sledge and hammered steely back out if needed....at least to get home. LOL Nice mods...
 
I am contemplating that size tire as well...as the tall skinnys I think give better footprint when aired down and have less friction/rolling resistance on highway due to narrower tread. Looking good. I like the wheel color you chose too. If I wasnt such a fan of steely's...would consider those as well. Just have bad memory of cracking a wheel offroading and having to use spare when I could have used a mini sledge and hammered steely back out if needed....at least to get home. LOL Nice mods... If get a couple pics from front or rear so can see tire profiles would appreciate.

DSC08831.jpg


DSC08833.jpg


DSC08841.jpg


DSC08861.jpg
 
Grenadier Works Rear Gate Interior Pull Handle
Quick install, no complaints. It's nice to have a handle instead of grabbing the door edge and weather strip. I wonder how long that bottle opener will stay put if used, though.

PXL_20250604_215252801.MP.jpg


PXL_20250604_215525507.jpg


Grenadier Works License Plate Light Shrouds
Another quick install. I haven't tested it, but there's not much to go wrong here.

PXL_20250604_215946988.jpg


PXL_20250604_220420886.jpg


Agile Offroad Fire Extinguisher Bracket Kit w/Range Industries Quick Release Mount
The Agile bracket replaces the metal bracket under the seat and the quick release mount bolts to that. The quick release is really nice and feels solid as hell. As with their other products, the installation instructions from Agile are pretty good. Now I just need to put an extinguisher on it.

PXL_20250604_221238090.MP.jpg


PXL_20250604_230357481.jpg


Kingpin Equipped 12" F-Series Lights w/Rotary Dimmer Switch and Search Mount Kits
The illumination provided by the single ceiling light in the cargo area isn't really sufficient, and is non-existent if you have a shelf mounted and loaded. I picked up a couple lights, swivel mounts, and a dimmer switch from Kingpin Equipped to solve the issue. When the audio installer was running power for the National Luna light on the rear door fold-down table I asked him to put a deutsch connector in the compartment on the right-hand side of the cargo area. I used that connector for power. That circuit is powered from the INT 1 switch.

PXL_20250604_233700484.jpg


PXL_20250604_233708629.jpg


I ran the cables up and over under the vertical side trim panels and stuffed under the interior lip of the inner door seal.

PXL_20250605_001502734.jpg


PXL_20250605_001554223.jpg


The rear outlet and its 400w output was more than enough and was very convenient for my soldering iron.

PXL_20250605_003251573.jpg


I stuck the lights and the dimmer switch up using the supplied 3M VHB double-sided tape. The kit includes screws that I will use if it doesn't hold through the summer.

PXL_20250605_031932263.jpg


The phone camera does a lot of automatic adjustment so the difference between bright and dim isn't very apparent, but it's a nice range of control both for the Kingpin and National Luna lights.

PXL_20250605_030947821.jpg


PXL_20250605_030923591.jpg


PXL_20250605_031054544.MP.jpg


PXL_20250605_031035907.jpg
 
Last edited:
New wheels and tires:

Quite a large cosmetic difference with these. Method 703 in Gloss Titanium (17x7.5 | 6x130 | 50/6.20") wearing Mickey Thompson Baja Boss 255/85R17. I only drove home, but these actually seem quieter, but that might be the pressure difference -- I was at 36/36, these are at 41/47 from the shop and I'll probably leave them there. I also mounted Agile Offroad's Spare Tire Offset Mount. You can see the PPF here but they have a bit more work to do so I'll let them finish before showing more.

View attachment 7897701

View attachment 7897702

View attachment 7897703

They did nice work. These tires have asymmetric tread with an inside and outside, the wheels have bead grabbing features that make them difficult to mount a tire, and the TPMS sensors all had to go back to same locations, and I checked the torque values and it's all good. That said, this practice of using four rolling floor jacks in a sloped parking lot seems sketchy as hell to me.

View attachment 7897705


Air Down Gear Up Drawers and Sleeping Platform:

I'm very pleased with the work on these. This is the first final install on a Grenadier of this system and they're going to do some refinement, but overall the system is excellent. They're going to make a magnetic cover for the gap to the left of the fridge along with a few other tweaks. The system has a few configurations you'll see in the pictures. They also have different systems available depending on your needs. Obviously I went with the drawer fridge and sleeping platform option.

View attachment 7897706

View attachment 7897708

View attachment 7897709

View attachment 7897710

View attachment 7897711

View attachment 7897712

View attachment 7897713

View attachment 7897714
Nice build. What is the length of the sleeping platform? I went to the web page of the company that made it and the do not have much information on the specs. and pricing only they will accept a $500 deposit on future builds. Any additional information that you have would be appreciated. Thanks!
 
Nice build. What is the length of the sleeping platform? I went to the web page of the company that made it and the do not have much information on the specs. and pricing only they will accept a $500 deposit on future builds. Any additional information that you have would be appreciated. Thanks!

If you email Andy at info@airdowngearup.com he is very responsive, but I'll certainly answer questions about my setup. The platform fully deployed is 6'1" (185 cm). I'm 6'5" and can lay diagonally flat on my back with plenty of room to spare and can sleep normally (on my side) on half. If you put your head or feet where the center console is, between the front seats, you could have tons of length if you're taller me.
 
Last edited:
I finished up a couple quick projects this morning mounting the forward fire extinguishers under the front seat and making a NATO to Anderson adapter cable for my air compressor.

I used the NATO plug available from Agile Offroad and a few feet of red and black 6 gauge wire. I used the same method as the battery terminal clamp to Anderson adapter I posted earlier but with a small additional frustration. The NATO terminals have a very small hole in the side which allowed the solder to drip out on one of them. After a couple attempts I was able to get it done, though. The connections survived the pull test and the compressor runs just fine using it.

PXL_20250605_143124258.jpg


I decided to mount both an Element and a more traditional fire extinguisher in the front and an Element in the rear. I figure the Element is handy for smaller jobs or when I don't want to make a mess, and the traditional bottle for the more serious stuff. I would have liked to get an ABC bottle as it seems the Element extinguishers struggle with things like wood fires, but for now it's just BC.

PXL_20250605_190457985.jpg


PXL_20250605_193046153.jpg


PXL_20250605_193014072.jpg
 
Last edited:
Dane, it was great to meet you today. The pictures and descriptions don’t do justice to the build that you’ve got together. A very striking and capable vehicle.
 
Many thanks! Good times. I'm going to the 12 June event as well. See you there?


Dane! Your build is exceptional! I cant wait to see the "Lobster" ... I pronounce it "Lobstah"....LOL!

We will definitely be there on the 12th! I spoke with Rachel at Red Noland and as of YESTERDAY...there are 7 vehicles, including ours, headed out for the FUN! My wife and our two dogs will be there!

Looking forward to the trail run! I haven't done Longwater in about 4 years so it will be fun to do it again!

We spent the day wheeling around Rampart Range Road/Mt Herman today and had some fun! LOTS of logging/clearing going on in my neck of the woods (aka Mt Herman Road/Rampart Range road) today and I was amazed at the equipment and dedication the folks have put in over the past couple of years.

Will see you on the 12th!
 
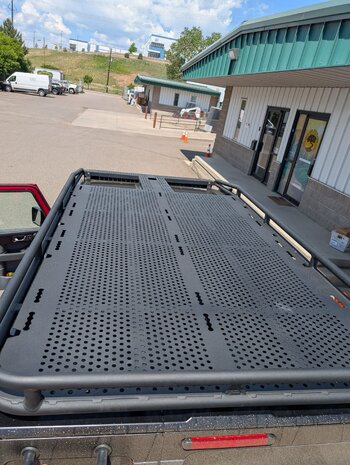
The Benchmark Vehicles roof rack is installed and it's pretty great. I went for a Baja Designs S8 in white driver/combo as a lightbar. The OnX6+ they offer as the default on this configuration would require some more complicated wiring as it draws more than 25A on high. I also didn't want to add any interior switches and the S8 is more than enough light for me. There is definitely some wind noise. It's loudest at 30-35 mph where it has a bit of a whispering sound, higher than that you just hear a bit of turbulent air. It's nothing I can't live with.

PXL_20250613_171904199.jpg


PXL_20250613_172001525.jpg


I also mounted the Stedi Micro Touch lights. You can't buy these on the US store, but you can from AUS or UK. I sent an email and ordered from AUS. The sides are 13.9 inches and the back pair are 7.8 inches. These lights are ideal because they have controls on the light face for on/off, white, amber, dimming, and they remember what the last setting was when powered off. It was late and I was tired so I didn't do a proper light test in a dark area, but they're brighter than hell on full. At some point I'll find a dark area and take some pictures. The idea is to have four main situational configurations:
  1. Reverse: sides off and rears bright white (this will be what I mostly leave them in)
  2. Chase Lights: sides off and rears medium amber
  3. Ditch Lights: sides bright white, rears as required
  4. Scene Lights: all dim amber, or as the situation dictates

PXL_20250614_044617664.jpg


PXL_20250614_044601483.jpg


PXL_20250614_044544619.jpg


PXL_20250613_212026374(1).jpg


The side lights are mounted on 22-30mm bull bar clamps and the rears on roof rack light brackets, both offered by Stedi. Access under the rack is pretty tight for getting a nut on the end of bolts; I ordered a rooftop box and the mount for that is going to be a challenge. I had to turn the bull bar clamps around and use longer M8 bolts as the lights' provided bolt heads would not fit in the recessed channel. Other than that I just built some wiring harnesses to link the rears up to the back-left Deutsch plug, the left to the front left, and the right to the rear right. I didn't take many pictures of the process as it was a long and I was getting pretty tired of it by the end, but the interior lights I installed were very helpful. If you're going to do this I recommend replacing the Deutsch plug leads provided by Stedi as they used what might be the cheapest tin wire I've ever seen with some pretty questionable terminals. I didn't since I don't have tools for the smaller Deutsch terminals, though I did have to repair a couple of them using what I had.

PXL_20250614_014857595.jpg


PXL_20250614_014925415.MP.jpg
 

Attachments

  • PXL_20250613_172001525.jpg
    PXL_20250613_172001525.jpg
    6 MB · Views: 11
Last edited:
The Benchmark Vehicles roof rack is installed and it's pretty great. I went for a Baja Designs S8 in white driver/combo as a lightbar. The OnX6+ they offer as the default on this configuration would require some more complicated wiring as it draws more than 25A on high. I also didn't want to add any interior switches and the S8 is more than enough light for me. There is definitely some wind noise. It's loudest at 30-35 mph where it has a bit of a whispering sound, higher than that you just hear a bit of turbulent air. It's nothing I can't live with.

View attachment 7899699

View attachment 7899701


I also mounted the Stedi Micro Touch lights. You can't buy these on the US store, but you can from AUS or UK. I sent an email and ordered from AUS. The sides are 13.9 inches and the back pair are 7.8 inches. These lights are ideal because they have controls on the light face for on/off, white, amber, dimming, and they remember what the last setting was when powered off. It was late and I was tired so I didn't do a proper light test in a dark area, but they're brighter than hell on full. At some point I'll find a dark area and take some pictures. The idea is to have four main situational configurations:
  1. Reverse: sides off and rears bright white (this will be what I mostly leave them in)
  2. Chase Lights: sides off and rears medium amber
  3. Ditch Lights: sides bright white, rears as required
  4. Scene Lights: all dim amber, or as the situation dictates

View attachment 7899702

View attachment 7899703

View attachment 7899704

View attachment 7899706


The side lights are mounted on 22-30mm bull bar clamps and the rears on roof rack light brackets, both offered by Stedi. Access under the rack is pretty tight for getting a nut on the end of bolts; I ordered a rooftop box and the mount for that is going to be a challenge. I had to turn the bull bar clamps around and use longer M8 bolts as the lights' provided bolt heads would not fit in the recessed channel. Other than that I just built some wiring harnesses to link the rears up to the back-left Deutsch plug, the left to the front left, and the right to the rear right. I didn't take many pictures of the process as it was a long and I was getting pretty tired of it by the end, but the interior lights I installed were very helpful. If you're going to do this I recommend replacing the Deutsch plug leads provided by Stedi as they used what might be the cheapest tin wire I've ever seen with some pretty questionable terminals. I didn't since I don't have tools for the smaller Deutsch terminals, though I did have to repair a couple of them using what I had.

View attachment 7899697

View attachment 7899698
That's exactly the Roof Rack I have decided to get. I think it matches my Owl Rock Sliders the best and allows the required Safari window access. Good to see your comment about wind noise. I double there is one out there that goes unheard. Excessive sound would be a drag.
 
This first post will serve as an overview for the build that I’ll update as I go along. Most of this will just be me installing what my betters have built, or in some instances paying someone to do that, too. Here’s what I’m planning and what is done so far.

View attachment 7898044

View attachment 7899705


Completed:
Exterior Armor:
  1. PPF wrap (final items and Grenadier USA Hood Badge)
  2. GP Factor Fender Plate Kit
  3. Abenteuer 4x4 Rock Sliders
  4. Black Sheep Rear Skid Plate
  5. NATO plug water ingress protection
Exterior Utility:
  1. Benchmark Safari Roof Rack
  2. Grenadier USA black anodized aluminum roof grab handles
  3. Agile Offroad Spare Tire Carrier Relocation Bracket
  4. Le Tech Ladder w/Jerry Can Storage
  5. Mickey Thompson Baja Boss 255/85R17
  6. Method 703 in Gloss Titanium (17x7.5 | 6x130 | 50/6.20")
Lighting
  1. Baja Designs S8 50" Light Bar, White Driver/Combo
  2. Stedi Micro Touch scene and chase/reverse lights
  3. Kingpin Equipped 12" F-Series Lights w/Rotary Dimmer Switch and Search Mount Kits
  4. Grenadier Works License Plate Light Shrouds
Interior:
  1. Sound Shield Sound Deadening
  2. Custom audio upgrade (second post)
  3. Grenadier USA Overhead Cockpit Shelf
  4. Wolfbox G900 Pro on 67 Designs mount
  5. Owl Vans Rosen Visors
  6. Black Sheep Innovations Anti-Glare Cover
  7. Owl Vans Dashboard Accessory Mounting Rail
  8. Grenadier USA Oversized Cup Holder Center Console Replacement
  9. Agile Offroad Fire Extinguisher Bracket Kit w/Range Industries Quick Release Mount (second post)
  10. Bison Gear Ceiling Shelf w/Under Shelf Compartment
  11. Bison Gear Left Cargo Basket (modify to fit)
  12. Grenadier Works Rear Gate Interior Pull Handle
  13. GP Factor Tailgate Table (w/National Luna light)
  14. Air Down Gear Up rear cargo drawer and Dometic drawer fridge
  15. Grenadier USA Rear Door Handle


In the Queue:
Exterior Armor:
  1. Owl Vans Pro-Line skid plates
  2. Agile Offroad Shift Cable Support Bracket Kit
  3. Front bumper w/winch and bull bar – considering Dissent Offroad
Exterior Utility:
  1. ClimAir Window Wind Deflectors
  2. Suma Performance Convex Side Mirrors
Lighting:
  1. Agile Offroad in-grill offroad light Baja Designs upgrade kit
Interior:
  1. Octodyne Steering Wheel Button Guards


Unfixed Grenadier Accessories:
  1. Roam 128L Rolling Rugged Case and Rugged roof rack mounts
  2. Overland Gear Guy Safari Window Mesh Screens
  3. Owl Vans Safari Window Covers
  4. Overland Gear Guy Open Top Door Storage
  5. Modify Viair 450P air compressor to optionally use either the NATO plug or terminal clamps (NATO to Anderson adapter)

View attachment 7891792
Did you add a lift, or are you still running the stock suspension?
 
Back
Top Bottom