The Grenadier Forum

Register a free account today to become a member! Once signed in, you'll be able to contribute to the community by adding your own topics, posts, and connect with other members through your own private inbox! INEOS Agents, Dealers or Commercial vendors please use the contact us link at the bottom of the page.

Running an air compressor from the NATO Plug

TexasCrane

Grenadier Owner
Local time
2:09 AM
Joined
Dec 22, 2024
Messages
35
Location
Texas, USA
Hi,
I recently picked up a Morrflate setup for airing up/down. I've got their 4 wheel hose, their new Air Hub, and the FiveSix portable compressor. I really, really like this set up. It's super fast and easy to air up/down. This is my first vehicle without onboard air. I prefer it to the onboard ARB compressors I've had in the past.

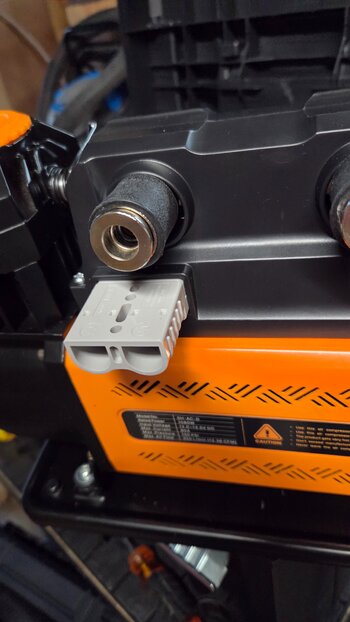
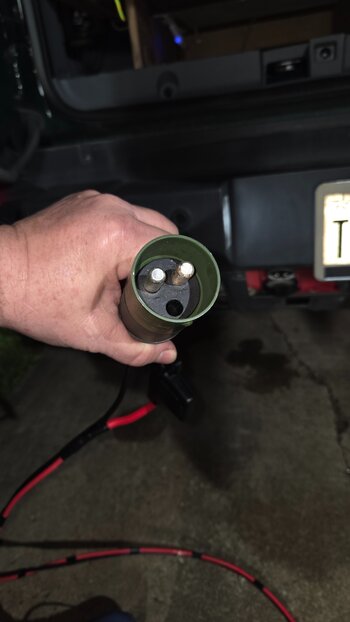
One thing that I learned very quickly however is that when you pop the hood to hook up the compressor, you immediately have folks stopping to check on you thinking that you've got mechanical problems with the truck. I was thinking it would be pretty slick (and actually more convenient) to power the compressor from the rear NATO plug.

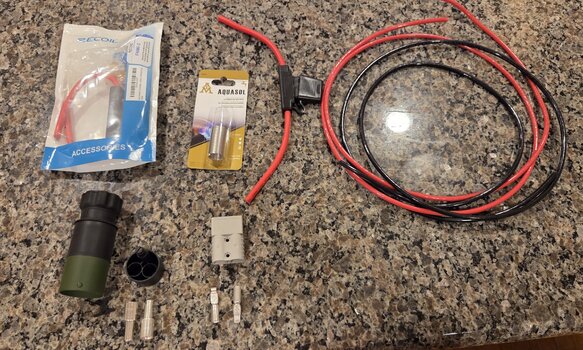
In my ideal scenario, I'd cut the gator clamps off the compressor and add some kind of connector that allows me to either use the gator camps or a nato plug with a pigtail coming off of it. It seems like that should be doable, but I'm honestly out of my depth when it comes to 12V wiring that can support 70+ peak amps (40 continuous) and have no idea what connectors I need to make that happen. I've got plenty of experience with Anderson plugs for much lower amp applications and wiring up "normal" vehicle stuff like lights and ham radios. Can anybody point me in the right direction as to what I need to make this happen? Thanks!
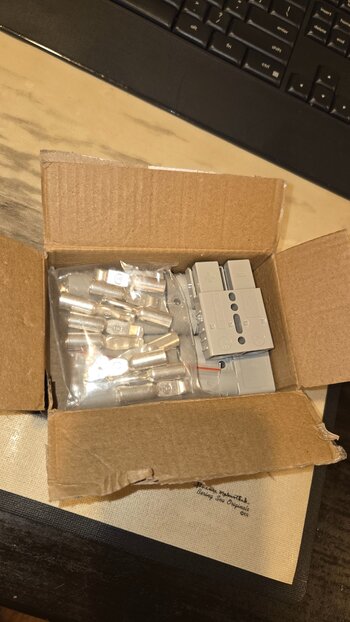
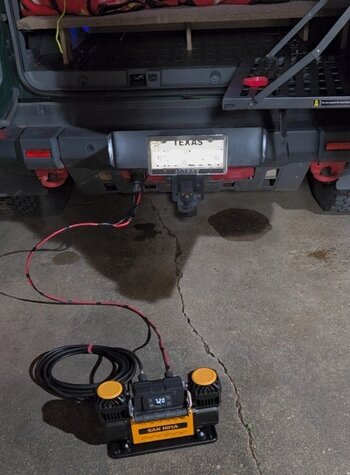
 
I run a similar setup and use the rear cargo 12v cigarette plug. I cut the battery clamps off the leads and made anderson connections between everything.
  • 12v cigarette to anderson
  • NATO to anderson
  • battery clamps to anderson
  • anderson to compressor
And after giving myself all the options I've never used anything but the cigarette plug to the compressor... works great! [edit note: compressor is single cylinder 20a, I've not yet blown the 15a fuse]
 
Last edited:
I run a similar setup and use the rear cargo 12v cigarette plug. I cut the battery clamps off the leads and made anderson connections between everything.
  • 12v cigarette to anderson
  • NATO to anderson
  • battery clamps to anderson
  • anderson to compressor
And after giving myself all the options I've never used anything but the cigarette plug to the compressor... works great! [edit note: compressor is single cylinder 20a, I've not yet blown the 15a fuse]
Can you post any pics? looking to do something similar
 
I’m powering my dual ARB compressor from the NATO outlet.
Compressor is bolted in with Black Sheep hardware.
Wires are fused and reach to the NATO plug, even with door open.
It coils up and fits into the external rear tire compartment.

natoarb.jpg
 
Last edited:
I’m powering my dual ARB compressor from the NATO outlet.
Compressor is bolted in with Black Sheep hardware.
Wires are fused and reach to the NATO plug, even with door open.
It coils up and fits into the external rear tire compartment.

View attachment 7891649
I like your color combination. Is it the Sela green with a beige roof? Or is that lime green? Do you have a photo of the Grenadier from the side?
 
I’m powering my dual ARB compressor from the NATO outlet.
Compressor is bolted in with Black Sheep hardware.
Wires are fused and reach to the NATO plug, even with door open.
It coils up and fits into the external rear tire compartment.

View attachment 7891649

That's almost exactly what I want to build. Do you have a part/tool list?
 
I like your color combination. Is it the Sela green with a beige roof? Or is that lime green? Do you have a photo of the Grenadier from the side?
Yup, Sela Green with Scottish White roof. There should be a side view pic at the top of my user profile if you click on my name. I like the colour a lot. The green looks extremely different under different lighting conditions. It looks good clean but, obviously, it looks best when freshly dirty. :ROFLMAO:
 
That's almost exactly what I want to build. Do you have a part/tool list?
Black Sheep mounting kit

NATO plug

I used the original ARB wiring harness and fuses. I added some heat shrink tubing to keep things tidier around the fuses and plug. And some strain relief with zip ties. Solder. Iron. Wire cutters and stripper. A hex driver or two. And I think that's about it.\

Depending on the hose or inflation setup you're using, you may need to add a quick release chuck onto the compressor. You see mine there. I use a Morrflate quad 4-tire hose but I guess they're probably all the same. If the chuck is too long, the compartment door may struggle to close.
 
Yup, Sela Green with Scottish White roof. There should be a side view pic at the top of my user profile if you click on my name. I like the colour a lot. The green looks extremely different under different lighting conditions. It looks good clean but, obviously, it looks best when freshly dirty. :ROFLMAO:
Ok. Thank you. In the last photo, the white looked as if it had a proportion of green. But that was due to the reflection. It could have been that you had the roof painted a special color.
 
Did someone already ask, how do you change a tire? Must be a quick release on the wiring and the mount?
 
I’m powering my dual ARB compressor from the NATO outlet.
Compressor is bolted in with Black Sheep hardware.
Wires are fused and reach to the NATO plug, even with door open.
It coils up and fits into the external rear tire compartment.

View attachment 7891649
What’s the mount like with the Blacksheep setup? Is it fast/easy to remove? Just wondering in case of tire change - also I swap my wheels every winter (don’t need the compressor in winter), so didn’t want something that was fiddly to take off when I remove the spare to swap.
 
What’s the mount like with the Blacksheep setup? Is it fast/easy to remove? Just wondering in case of tire change - also I swap my wheels every winter (don’t need the compressor in winter), so didn’t want something that was fiddly to take off when I remove the spare to swap.

Yes, this is a consideration. I'll test my installation memory recall here ... There are three, maybe four, hex bolts to remove ... I forget the size but in the usual 4/5/6mm range. A long reach hex key will work better than a little fold-up tool (i.e. not bicycle style) so that's a tool in the bag that should probably be there anyways. If I recall, one of those bolts is low and you're working a bit blind, behind the lower half of the plastic tire cover. Once those are removed, the whole bracket and compressor slide out cleverly in one piece and it's exactly a stock setup again. That part is slick at least; the compressor never leaves the bracket.

I don't love the idea of extra time and steps when it comes time to change or rotate a tire. But I reckon if I'm staring at a slow and methodical tire change anyways, these bolts don't add much time in the big picture. But is it fiddly? Yes, a bit.

Ask me how much I hate the setup again in the next month or so when I pull the bracket for tire rotation! Lol.
 
Inspired by others posting their versions, I assembled a NATO plug so I can run my compressor from the rear NATO plug without having to raise my hood. First issue was my compressor didn’t have a standard Anderson connector – more like ‘Anderson-type’ of plug. Found the odd ball Anderson size on Aliexpress (go figure on a budget dual compressor :) rated for 80 amp just like the OEM alligator clamp-to-Anderson that came with the compressor. Next challenge was finding a NATO plug that was under $100 USD! Holdmybeer on the forum pointed me to Eriks Military Surplus and Industrial supply where the new plug was sub $40 (thank you Mr. Beer). Shipping was steep and a bit of a wait for the mail but all in all I got it in hand sub $60. https://www.eriksmilitarysurplus.com/2pl24vo168am1.html Man those NATO plug pins are HUGE! Amazon got me a in-line fuse holder with two 40, 60, 80-amp fuses and picked up two 6-foot 6ga wire in red and black from Home Depot.
All the wire and pins were so big my soldering iron was useless. Dropped and broke my newish push button instant on Benzomatic mapp-gas torch in the late evening when I wanted to work on the cable. Had to bring out my wife’s grandfathers propane torch. I’m not one to get rid of duplicate or older tools and in this case, it paid off. Rocking a label touting the 1980 Lake Placid Olympics, the torch fired up just fine and I got everything assembled. Note – NATO pins were manufactured with small hole at the bottom of the pin bore. So, my idea of partially filling the pin with solder then heating it up and jamming in the cable worked but a LOT of solder came out that hole as I filled up the rest of the pin bore that had to be cleaned up. Next pin, hole was facing up. Used up all the solder in my kit (small boards and leads don’t take that much solder) since every pin and wire was so big. Scrounged around and found that same grand-father-in-law’s old solder roll. Finished up and it works well in home testing. Taking a long ride out to Palo Duro Canyon this weekend and I’ll give the cord a field test. I like the push-in / pull-out NATO plug I got, small raised dimple to hold plug tight, vs the screw on version because the dimple hold plus is very quick to put in and pull out. PS – the oil stains on the driveway are from my 2005 Tundra with 270k miles NOT my Grenny!
 

Attachments

  • 1 Anderson knock off.jpg
    1 Anderson knock off.jpg
    2.7 MB · Views: 0
  • 2 Anderson Fts.jpg
    2 Anderson Fts.jpg
    2.3 MB · Views: 0
  • 3 The Stuff.jpg
    3 The Stuff.jpg
    3.8 MB · Views: 0
  • 4 Backup Torch.jpg
    4 Backup Torch.jpg
    2.7 MB · Views: 0
  • 5 Old Solder.jpg
    5 Old Solder.jpg
    1 MB · Views: 0
  • 6 Cable working.jpg
    6 Cable working.jpg
    196.7 KB · Views: 0
  • 7 Dimple NATO plug.jpg
    7 Dimple NATO plug.jpg
    1.5 MB · Views: 0
Back
Top Bottom