So I installed a Wolfbox this weekend and could not find any good directions on droping the overhead panel or it just says it's "clipped" in and you just pry it out - WRONG There are two little black screws holding the panel up underneath the grey plastic insert.
I apologize that I do not have photos or videos - I was pretty pissed off when I was doing it and I wasn't thinking about photos.
To drop the overhead switch panel you must do the following.
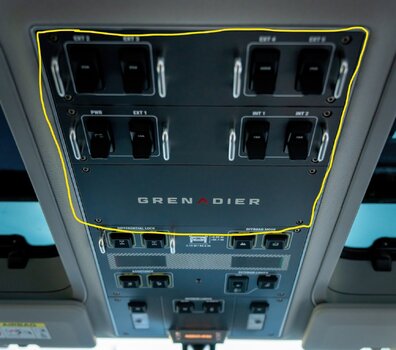
1.) reove the the 8 (maybe 12 I can't remember) little grey screws on the back two panel sections (or three -can't remember) indicated in the photo with the 3 sections outlined in yellow.
2.) the grey insert (the switch surround with switch names) can be pried out. DO NOT pry on the chrome surround peice. That's the main panel backbone that is still screwed into the roof. The grey switch panels are snapped in with clips near the center (not along the edge).
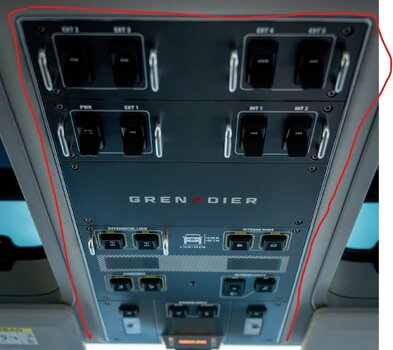
3) once the grey insert is removed you will see two little black screws in panel underneath the grey panel insert in the general location where the two red circles are in the photo.
4.) remove the two screws. Now the chrome trim / full overhead switch panel can be pried out as it is now only held by clips. The panel is hinged on the rearview mirror side.
I apologize that I do not have photos or videos - I was pretty pissed off when I was doing it and I wasn't thinking about photos.
To drop the overhead switch panel you must do the following.
1.) reove the the 8 (maybe 12 I can't remember) little grey screws on the back two panel sections (or three -can't remember) indicated in the photo with the 3 sections outlined in yellow.
2.) the grey insert (the switch surround with switch names) can be pried out. DO NOT pry on the chrome surround peice. That's the main panel backbone that is still screwed into the roof. The grey switch panels are snapped in with clips near the center (not along the edge).
3) once the grey insert is removed you will see two little black screws in panel underneath the grey panel insert in the general location where the two red circles are in the photo.
4.) remove the two screws. Now the chrome trim / full overhead switch panel can be pried out as it is now only held by clips. The panel is hinged on the rearview mirror side.