The Grenadier Forum
Register Now for enhanced site access.
INEOS Agents, Dealers or Commercial vendors please contact admin@theineosforum.com for a commercial account.

Installed my boot rubber mat

emax

Photo Contest Winner
Grenadier Owner
Lifetime Supporter
Local Group Moderator
Local time
8:51 PM
Joined
Feb 23, 2022
Messages
5,419
Reaction score
8,796
Location
Germany
Today, I installed my boot rubber mat.

A trivial job, but I'll share my work anyway.

Why:
I have a utility with a dark grey liner in the boot. Right after the first transport of an 8 Kg "Böller" (saluting gun) the liner had the first ugly scratches, although I had strapped the thing quite well. The scratches might be normal for the use case. But the dark liner has only a dark surface but is bright inside. So any damage of the surface, even if very light, will be very visible. So I decided to install a rubber mat.

I bought a so-called SBR rubber mat, which is soft and heavy and can take a beating. But when you unwrap it, it stinks like hell, and it literally takes months to go away. I bought it in mid June and had to take it out onto the balcony where it has been in the rain and sun ever since. And now the smell has subsided to a "normal" level.

It is 3mm thick and 130cm x 100cm which is sufficient for a utility boot.I paid 28 € including shipping here: https://www.gummimatte.online/

That's the raw mat on the boot.You can see how soft it is and will thus stay flat after a while:

010_20230819_113748_UTC_1440x1080.jpg


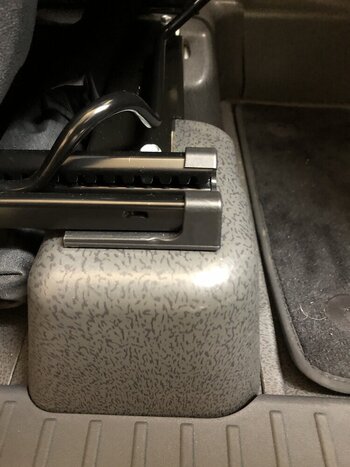
This job is of course a Makita party, as usual:

015_20230819_130252_UTC_1440x1080.jpg

First thing was to remove the rails - I thought.
But later I saw that you can remove the liner by just lifting it over the rails. 🥳
But it definitely helped as I wasn't sure yet whether to mount the rails directly over the rubber or trim it to fit around the rails. After I removed them, it was clear that cutting is better, since the rails are recessed, and thus the rubber in the indentations would have been crumpled.
You need a T45 bit for the screws.

BTW: right to the Makita you see the scratches in the liner which are very clear visible due to the bright inside material of the liner. And the scratches are really not deep.

020_20230819_115328_UTC_1440x1080.jpg

The bare surface without rails:

030_20230819_115629_UTC_1440x1080.jpg

I traced the shape like this. A not too sharp pencil is a good choice as its reflections show up well on the black.
Note that the liner shape is not symmetrical. If you want a specific side of the elastic to face up, you must
place the insert the same way you placed the elastic: both upside down, or both upside up.
Here I have the bottom up for the rubber and also for the liner:
040_20230819_121112_UTC_1440x1080.jpg


As @DCPU has made it the de facto standard on this forum, we always document the part numbers. Here is the part number of the liner:


050_20230819_121739_UTC_1440x1080.jpg

After the first rough cutting:

060_20230819_123055_UTC_1440x1080.jpg

Since the liner has kind of a collar on the top, the mat is still too big:

070_20230819_123308_UTC_1440x1080.jpg

Better so see here. The collar is about 2-3mm which has to be cut off from the mat:

080_20230819_123350_UTC_1440x1080.jpg

The cut is not perfect. But that's just me. Soft materials are not my forte. I'm better with steel.
However, the shape of the liner is also a bit blurry.
090_20230819_123356_UTC_1440x1080.jpg
 
Last edited:

emax

Photo Contest Winner
Grenadier Owner
Lifetime Supporter
Local Group Moderator
Local time
8:51 PM
Joined
Feb 23, 2022
Messages
5,419
Reaction score
8,796
Location
Germany
Part 2:

The fit is reasonable. Now, the rails and some recesses have to be cut out.

100_20230819_130837_UTC_1440x1080.jpg

Some clamps help to handle the liner together with the mat.
110_20230819_131025_UTC_1440x1080.jpg

The same procedure as before: Mat is with top side up, liner is with top side up. Remember the asymmetry ...
120_20230819_131359_UTC_1440x1080.jpg

Again, a pencil (which is black) is best visible on the black underground. 🤔

130_20230819_131805_UTC_1440x1080.jpg

The rails are mounted with three bolts, but there are five threads (of which two are not visible here). I guess this is due to different boot sizes for the utility and the editions.
The green markings seem to be paper washers. There are such papers under the screws for the rails as well. They are probably to prevent electrolytic corrosion since the screws and threads are made of steel while the rails are made of aluminum.

I assume that the paper washers would be exchanged in a workshop. I wasn't expecting that, of course, but mine didn't break, so I left them like that.
140_20230819_131848_UTC_1440x1080.jpg

Here you can see that the utility uses the outer mounting holes for the rails. You can as well see the paper washer under the screw (which is on this picture "parked" in the rail hole).
150_20230819_133137_UTC_1440x1080.jpg

And this is what it looks like in the end after some corrections. It is not perfect. Especially the position of the rail cutouts has magically moved, but I don't care.
It's good enough for me.

160_20230819_141436_UTC_1440x1080.jpg

For the round cuts and the spaghetti works (yes, you always end up with spaghetti cuts) I recommend an old pair of nail scissors. If my wife throws one away, I save it in my tool drawer. I can highly recommend this. The are worth a mint. And they are consumables.

170_20230819_134943_UTC_1440x1080.jpg
 
Last edited:

emax

Photo Contest Winner
Grenadier Owner
Lifetime Supporter
Local Group Moderator
Local time
8:51 PM
Joined
Feb 23, 2022
Messages
5,419
Reaction score
8,796
Location
Germany
If this is a question, I don't understand it.

But maybe this is what you want to know: You can only attach 10 photos. So I made a second posting. And to prevent comments from appearing in between, I first made a place holder for the second posting which i called "Part 2".

It's complete.
 

DaveB

Grenadier Owner
Local time
4:51 AM
Joined
Mar 18, 2022
Messages
6,740
Reaction score
13,690
Location
Toogoom, Fraser Coast Queensland
Part 2:

The fit is reasonable. Now, the rails and some recesses have to be cut out.

View attachment 7824075

Some clamps help to handle the liner together with the mat.
View attachment 7824076

The same procedure as before: Mat is with top side up, liner is with top side up. Remember the asymmetry ...
View attachment 7824077

Again, a pencil (which is black) is best visible on the black underground. 🤔

View attachment 7824078

The rails are mounted with three bolts, but there are five threads (of which two are not visible here). I guess this is due to different boot sizes for the utility and the editions.
The green markings seem to be paper washers. There are such papers under the screws for the rails as well. They are probably to prevent electrolytic corrosion since the screws and threads are made of steel while the rails are made of aluminum.

I assume that the paper washers would be exchanged in a workshop. I wasn't expecting that, of course, but mine didn't break, so I left them like that.
View attachment 7824079

Here you can see that the utility uses the outer mounting holes for the rails. You can as well see the paper washer under the screw (which is on this picture "parked" in the rail hole).
View attachment 7824081

And this is what it looks like in the end after some corrections. It is not perfect. Especially the position of the rail cutouts has magically moved, but I don't care.
It's good enough for me.

View attachment 7824082

For the round cuts and the spaghetti works (yes, you always end up with spaghetti cuts) I recommend an old pair of nail scissors. If my wife throws one away, I save it in my tool drawer. I can highly recommend this. The are worth a mint. And they are consumables.

View attachment 7824083
Mate!!
Fantastic job.
Just a touch of German attention to details there.
Well done.
 

DCPU

Grenadier Owner
Local time
7:51 PM
Joined
Jul 27, 2022
Messages
6,089
Reaction score
13,498
Yes, people need to try and put together a reasonably long post interspersed with photos to see it takes a little time and editing... 👏

Excellent job.

Where to start...well Makita of course...

You bought the handheld vacuum cleaner and I see you have the cyclone but it's not attached. Any reason? Is the cyclone any good?

Does the hammer work in reverse on the drill? I think if you use it regularly as a screwdriver you would be impressed with the impact driver range, especially as they're far smaller and lighter.

I hadn't fully appreciated the paper washers in regard to electrolytic corrosion. 😬. I think I'm going to invest in some plastic washers, maybe even of the shouldered variety.

With regard to the extra threads under the utility rails, I think they are for tie downs when the rail isn't optioned:
Screenshot_20211003_215513_com.google.android.youtube.jpg
 

Wilaspira

Grenadier Owner
Local time
2:51 PM
Joined
May 25, 2022
Messages
199
Reaction score
357
If this is a question, I don't understand it.

But maybe this is what you want to know: You can only attach 10 photos. So I made a second posting. And to prevent comments from appearing in between, I first made a place holder for the second posting which i called "Part 2".

It's complete.
It was a ques because when I posed it nothing other than the words “Part 2” showed on your posting for some reason. I can see it all now
 

RunBikeDive

🔺 🌎 🔺
Grenadier Owner
Lifetime Supporter
Local time
11:51 AM
Joined
Jul 20, 2023
Messages
38
Reaction score
70
Location
USA
Part 2:

The fit is reasonable. Now, the rails and some recesses have to be cut out.

View attachment 7824075

Some clamps help to handle the liner together with the mat.
View attachment 7824076

The same procedure as before: Mat is with top side up, liner is with top side up. Remember the asymmetry ...
View attachment 7824077

Again, a pencil (which is black) is best visible on the black underground. 🤔

View attachment 7824078

The rails are mounted with three bolts, but there are five threads (of which two are not visible here). I guess this is due to different boot sizes for the utility and the editions.
The green markings seem to be paper washers. There are such papers under the screws for the rails as well. They are probably to prevent electrolytic corrosion since the screws and threads are made of steel while the rails are made of aluminum.

I assume that the paper washers would be exchanged in a workshop. I wasn't expecting that, of course, but mine didn't break, so I left them like that.
View attachment 7824079

Here you can see that the utility uses the outer mounting holes for the rails. You can as well see the paper washer under the screw (which is on this picture "parked" in the rail hole).
View attachment 7824081

And this is what it looks like in the end after some corrections. It is not perfect. Especially the position of the rail cutouts has magically moved, but I don't care.
It's good enough for me.

View attachment 7824082

For the round cuts and the spaghetti works (yes, you always end up with spaghetti cuts) I recommend an old pair of nail scissors. If my wife throws one away, I save it in my tool drawer. I can highly recommend this. The are worth a mint. And they are consumables.

View attachment 7824083
Fantastic job ! I'll be doing something similar. Hopefully it turns out looking as good as this ‼️‼️🥇🥇
 

emax

Photo Contest Winner
Grenadier Owner
Lifetime Supporter
Local Group Moderator
Local time
8:51 PM
Joined
Feb 23, 2022
Messages
5,419
Reaction score
8,796
Location
Germany
Yes, people need to try and put together a reasonably long post interspersed with photos to see it takes a little time and editing... 👏
Yes, it's quite a lot of work. Create and upload the photos to the PC. Pick the right ones and put them in the right order. Upload it to the forum and write texts to tell a story with an interesting dramaturgy. Explain what you did, refer to the photos and point out the gotchas. Finally correct incorrect content and typos. It really takes time and if I had more of it I would write posts like this more often as it is a satisfying activity after all.

I have seen many such posts from you which I appreciate very much. So I take this opportunity to thank you for all the depth and dedication you devote to this forum. Not kidding.

Where to start...well Makita of course...

:ROFLMAO:

You bought the handheld vacuum cleaner and I see you have the cyclone but it's not attached. Any reason? Is the cyclone any good?

When you need a strong vacuum, the cyclone gets in the way. This small vacuum cleaner is powerful enough for such work without it. But it really helps when you pick up coarse dust or flakes of dust. Then, almost nothing gets into the dust container. The vaccum cleaner is of course not comparable to our 2 KW Miele and not for large areas or carpets. But it's great for the smaller car cleaning, or catching dirt when drilling a wall or if you spilled the sugar on the kitchen floor. I like it because it doesn't have a cord and because I can quickly get it out of the chamber and use it right away.

Does the hammer work in reverse on the drill?
I have used it a lot for SPAX screws, and only sometimes with the hammer. But in concrete the hammer delivers more noise than effect. I sometimes use it with the hammer, but for serious jobs I have a 230V Bosch which goes through concrete like it was butter. I dind't yet try the hammer in reverse.


I think if you use it regularly as a screwdriver you would be impressed with the impact driver range, especially as they're far smaller and lighter.
Would be a nice contribution to my collection. But I#m afraid I wouldn't use it often enough.

I hadn't fully appreciated the paper washers in regard to electrolytic corrosion. 😬. I think I'm going to invest in some plastic washers, maybe even of the shouldered variety.
The problem with plastic is, that it creeps under pressure away over time.

With regard to the extra threads under the utility rails, I think they are for tie downs when the rail isn't optioned:
I didn't know about them. Thanks for the hint!
 

grenadierboy

Grenadier Owner
Lifetime Supporter
Local time
4:51 AM
Joined
Apr 6, 2022
Messages
1,798
Reaction score
3,281
Location
Armadale Australia
Thanks Emax - a rear rubber mat is on my "Grenadier List" and you have made installation easier for me, although I like the dot look!

Interesting about the smell- I put a 3mm rubber mat in my G wagen years ago and had to drive with the window slightly ajar for a few months it was so strong - same Chinese factory I wonder?Screenshot 2023-08-20 091622.png
 

emax

Photo Contest Winner
Grenadier Owner
Lifetime Supporter
Local Group Moderator
Local time
8:51 PM
Joined
Feb 23, 2022
Messages
5,419
Reaction score
8,796
Location
Germany
Interesting about the smell- I put a 3mm rubber mat in my G wagen years ago and had to drive with the window slightly ajar for a few months it was so strong - same Chinese factory I wonder?
May be, yes. But I don't know where they buy it.

All this low-level chemistry comes from china nowadays. I have another mat here with very similar properties, but it almost doesn't smell at all. It is a different material called TPE, bought in the same shop but around 50€.

It is a light grey and looks good. I finally used the black one now since the smell is now acceptable and will completely vanish in the next time, I think. The grey one is good for my workshop.


tpe.jpg
 

Shaky

Grenadier Owner
Forum Donor
Local time
2:51 PM
Joined
Apr 28, 2022
Messages
1,212
Reaction score
2,628
Love this Emax thanks.

I have been looking at rubber, marine carpet, and some other marine stuff for pleasure craft that is like a tougher neoprene.

My question is this, has anyone been able to take the matting out of the TM or FM versions ? Is it easily removable to enable a template like Emax did ?
 

grenadierboy

Grenadier Owner
Lifetime Supporter
Local time
4:51 AM
Joined
Apr 6, 2022
Messages
1,798
Reaction score
3,281
Location
Armadale Australia
Hi emax.
Are you happy with the new rubber mat you put into your Grenadier - is it working as you planned?

How does it stay in place over the existing floor?

Now that I have my 5 seater - I think the floor covering in my car looks different to yours (lighter grey and potentially softer).
 

DCPU

Grenadier Owner
Local time
7:51 PM
Joined
Jul 27, 2022
Messages
6,089
Reaction score
13,498
Now that I have my 5 seater - I think the floor covering in my car looks different to yours (lighter grey and potentially softer).
There's at least two versions. The Belstaff editions seem to have the same material as used in the footwells, commercials have a thinner more plastic covering
 

grenadierboy

Grenadier Owner
Lifetime Supporter
Local time
4:51 AM
Joined
Apr 6, 2022
Messages
1,798
Reaction score
3,281
Location
Armadale Australia
There's at least two versions. The Belstaff editions seem to have the same material as used in the footwells, commercials have a thinner more plastic covering
Mine is a 5 seater wagon (but with most option!) but confirm my rear cargo flooring is not soft to touch but certainly not a hard plastic either.

I was thinking of doing what emax has done but now I'm not so sure I need to and anyway - I not sure how it would be held firmly in place anyway.
 

Lollo050968

Grenadier Owner
Lifetime Supporter
Local time
8:51 PM
Joined
Oct 12, 2022
Messages
537
Reaction score
1,264
Location
Germany
I did this:
IMG_5463.jpeg

Rubber with pyramid surface…. but min . 4 weeks outside storage to eliminate the rubber smell.
Now it’s perfect anti slip and protect well, and resistent against all what I carry in the boot
 

grenadierboy

Grenadier Owner
Lifetime Supporter
Local time
4:51 AM
Joined
Apr 6, 2022
Messages
1,798
Reaction score
3,281
Location
Armadale Australia
No.
Same type of vinyl/plastic covering as in drivers/passengers footwell and around base of seat but, not as soft.
 

Attachments

  • IMG_7553.JPG
    IMG_7553.JPG
    114.2 KB · Views: 38

DCPU

Grenadier Owner
Local time
7:51 PM
Joined
Jul 27, 2022
Messages
6,089
Reaction score
13,498
Right that's the second type I've only seen in Euro spec Belstaffs.
 
Back
Top Bottom