The Grenadier Forum
Register Now for enhanced site access.
INEOS Agents, Dealers or Commercial vendors please contact admin@theineosforum.com for a commercial account.

Folding tailgate table protrusion

Gaston the Grenadier

Grenadier Owner
Local time
4:17 PM
Joined
Apr 2, 2023
Messages
141
Reaction score
295
Location
Somerset
Did nationwide windscreens supply your table if so how do you go about getting one.Had a drawer fitted today by APB what a decent bunch.Service like that very rarely found nowadays.Drawer brilliant.far exceeded my expectations.
No, I’m afraid they didn’t.
They collected it from my Ineos supplier (Compass Automotive of Bridgewater) who had ordered my replacement windscreen for Nationwide to fit on behalf of my insurers.
They kindly delivered it and fitted my windscreen.
Took the excellent fitter less time to remove and fit the new screen than I took to install the table. And I’m fairly adept with my spanners.
 

Michael Brindley

Grenadier Owner
Local time
4:17 PM
Joined
Sep 4, 2022
Messages
42
Reaction score
46
Thanks for that,thought that would be the case.
The guys at APB mentioned you had got one from somewhere else and said to ask me you.
I need new windscreen as well,Autoglass struggling to get one.
 

Gaston the Grenadier

Grenadier Owner
Local time
4:17 PM
Joined
Apr 2, 2023
Messages
141
Reaction score
295
Location
Somerset
Thanks for that,thought that would be the case.
The guys at APB mentioned you had got one from somewhere else and said to ask me you.
I need new windscreen as well,Autoglass struggling to get one.
Windscreens currently only available from Ineos.
Importantly, you need to advise the purchasing manager from Autoglass that he needs to order the top rubber seal/strip with the windscreen.
Your Ineos supplier will have the correct part numbers for this.

If Autoglass question the need for a replacement rubber top strip, put them in touch with Tom at Compass Automotive of Bridgewater; he’s the parts manager there, and recommended ordering the strip, having been advised by their long term screen fitter that it was good practice to do so.

Good luck, and let us know how you get on.
 

nzmark

Grenadier Owner
Local time
3:17 AM
Joined
Jul 30, 2023
Messages
25
Reaction score
12
Location
Auckland, New Zealand
This is going to possibly sound really strange, but I' struggling to fit the tailgate table and the "instructions" are a QR code which take me to the Ineos main site.

There are 6 "stand-offs", 3 x long bolts, 2 x medium bolts and 1 x short bold (which barely comes through the stand-off). The stand-offs fit one way into 4 of the 6 holes on the table, with 2 being too large for the holes provided. The other way round, they sit against the door "nicely", but they leave the bolt swimming around in the holes of the table.

Can anyone lend some advice? Thanks in advance.

EDIT: ok ... oops! The spacers (stand-offs) are 2 different sizes! The shorter ones go in the top. I still have a problem that the top 2 outside spacers don't fit in the holes which are provided in the table so will have to stick them in the lathe and take a tiny amount off.
 
Last edited:

Gaston the Grenadier

Grenadier Owner
Local time
4:17 PM
Joined
Apr 2, 2023
Messages
141
Reaction score
295
Location
Somerset
This is going to possibly sound really strange, but I' struggling to fit the tailgate table and the "instructions" are a QR code which take me to the Ineos main site.

There are 6 "stand-offs", 3 x long bolts, 2 x medium bolts and 1 x short bold (which barely comes through the stand-off). The stand-offs fit one way into 4 of the 6 holes on the table, with 2 being too large for the holes provided. The other way round, they sit against the door "nicely", but they leave the bolt swimming around in the holes of the table.

Can anyone lend some advice? Thanks in advance.

EDIT: ok ... oops! The spacers (stand-offs) are 2 different sizes! The shorter ones go in the top. I still have a problem that the top 2 outside spacers don't fit in the holes which are provided in the table so will have to stick them in the lathe and take a tiny amount off.
There should be three spacers of each size and three corresponding bolts for each size as well as six identical washers.

The shorter spacers and bolts are for the top, the longer ones for the bottom.

Line up the table and remove the original screws holding the plastic panel that align with the open holes on the table.

I’m a little surprised that your spacers don’t fit neatly into the holes on the table. Make sure before removing any metal, as I imagine these were turned on a CNC lathe, so should be bang on.

Once you’ve ensured the spacers fit, place one washer through each screw/bolt.
Then beginning with the top central hole, hold the spacer in place from behind (ensuring it slots into the table’s hole) and push the bolt in from the front, aligning with the correct hole. Screw in the bolt enough to get a good purchase on the threads and to enable it to take the weight of the table (or have someone do that instead). DO NOT FULLY TIGHTEN!

Next fit and screw the bottom central spacer and screw, again only loosely winding in the screw/bolt.

Once the table is being held by these two screws, you can now gently nurse each spacer into their correct place and put their screws in.
If you’ve tightened the two central screws too much you won’t get the outer spacers in without a struggle.

Once all spacers and screws are loosely fitted, you can start tightening them up.
The top corner screws will need an angled Allen Key to gain access.

Make sure whilst tightening up the screws that the spacers haven’t dislodged from their slot in the table’s holes.

Keep tightening the screws to a medium tension and once done, go round again and pinch them up to a firm setting.

I hope this makes sense.

I too tried the QR Code and was simply directed to the Ineos website where I found nothing of any use regarding fitting instructions, so I experimented (and guessed), and came to the above solution of how to install the table.

One person can do it, but it might’ve been a bit quicker with two.

Good luck.
 

GPFACTOR

Grenadier Owner
Lifetime Supporter
Supporting Vendor
Local time
11:17 AM
Joined
Nov 28, 2023
Messages
97
Reaction score
279
Location
United States
Hey Guys, if you are interest in another table that is going to be on the market soon, (Pre-Orders in a few weeks and shipping end of Jan 2024) check out our vendor thread:


This table folded sits 2.155" or 54.7mm off the backer the table is mounted on. The backer does not sit as far off the rear tailgate as the plastic factory piece. The Table is 24x14in or 610x355mm in size. We have been making multiple versions of this table for years now and there are thousands of them on the market that are proven. Check it out! Cheers!
~AJ
 

Stereo

Production/Transit
Lifetime Supporter
Local time
8:17 AM
Joined
Oct 2, 2023
Messages
5
Reaction score
4
Location
California, USA
There should be three spacers of each size and three corresponding bolts for each size as well as six identical washers.

The shorter spacers and bolts are for the top, the longer ones for the bottom.

Line up the table and remove the original screws holding the plastic panel that align with the open holes on the table.

I’m a little surprised that your spacers don’t fit neatly into the holes on the table. Make sure before removing any metal, as I imagine these were turned on a CNC lathe, so should be bang on.

Once you’ve ensured the spacers fit, place one washer through each screw/bolt.
Then beginning with the top central hole, hold the spacer in place from behind (ensuring it slots into the table’s hole) and push the bolt in from the front, aligning with the correct hole. Screw in the bolt enough to get a good purchase on the threads and to enable it to take the weight of the table (or have someone do that instead). DO NOT FULLY TIGHTEN!

Next fit and screw the bottom central spacer and screw, again only loosely winding in the screw/bolt.

Once the table is being held by these two screws, you can now gently nurse each spacer into their correct place and put their screws in.
If you’ve tightened the two central screws too much you won’t get the outer spacers in without a struggle.

Once all spacers and screws are loosely fitted, you can start tightening them up.
The top corner screws will need an angled Allen Key to gain access.

Make sure whilst tightening up the screws that the spacers haven’t dislodged from their slot in the table’s holes.

Keep tightening the screws to a medium tension and once done, go round again and pinch them up to a firm setting.

I hope this makes sense.

I too tried the QR Code and was simply directed to the Ineos website where I found nothing of any use regarding fitting instructions, so I experimented (and guessed), and came to the above solution of how to install the table.

One person can do it, but it might’ve been a bit quicker with two.

Good luck.
I just finished the install of the tailgate table and the two outside top spacers did not fit mine either. I then realized it was on purpose and helps with the installation. If you lightly hammer those two spacers into the hole they do not move when you are installing. Easily turns it into a one person job. Hope this helps.
 

pedrogb

Grenadier Owner
Local time
1:17 AM
Joined
Feb 13, 2023
Messages
78
Reaction score
101
Location
Townsville Australia
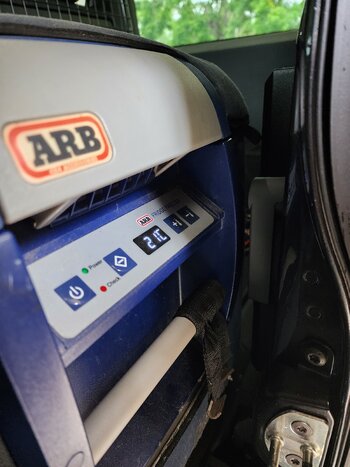
Hi all. It's not the clearest photo. But I finally put my ARB 60l fridge back in the car to see if it fits now I have the table installed.
As the photo shows, there's not much in it.
Just FYI.

Cheers also to the previous owner Les, who contacted me after I had purchased the car from the yard where he traded it. He got the picnic table 6 months after he'd received his car then traded it, so got in touch and shipped it to me!
What a great bloke!.
 

Attachments

  • 20240305_134156.jpg
    20240305_134156.jpg
    1.7 MB · Views: 24

Latest posts

Back
Top Bottom