The Grenadier Forum
Register Now for enhanced site access.
INEOS Agents, Dealers or Commercial vendors please contact admin@theineosforum.com for a commercial account.

Build Thread Bruce's build

Bruce

Global Grenadier #51
Grenadier Owner
Lifetime Supporter
Local time
3:52 AM
Joined
Oct 20, 2021
Messages
832
Reaction score
1,157
Location
Washington, USA

Regalz

Grenadier Ordered
Local time
4:52 AM
Joined
Apr 21, 2023
Messages
77
Reaction score
126
Location
Colorado
What does one do when the wife gives them tasks that keep the fun stuff from getting stuff done on the weekend? You do it Monday. Today I donned my Swazi Hood and Rossi boots and installed the Bullbar. I had planned to have my son start the bolts off, but the top plate of the bar has enough of a plastic shroud that I wasn't too concerned with scratching the bumper, and the bolts go through the front. I masked off the front of the truck with a trusty old Mexican blanket, and set to work. The bar is hefty but not so much that it can't be a one man job. Basically I lifted it onto the bumper and started off the drivers side bolts while leaning against the passenger bracket. Then I moved to the passenger bolts and put those in (the top head stripped but is tight enough that I'm not worried). Torqued those down to the specs in the manual then moved on to the bottom bracket.
View attachment 7841636
These things are assholes. The instructions have you tighten them down before installing the bumper, but there is some lateral adjustability to them and I needed to loosen them up to get the bolts in. Only 3 of the 4 would thread and they aren't like the Urban bumpers that people are using ratchet straps to get on. If I want to get the 4th bolt in I'll probably need to drill out the hole. It's on there solid so I will likely leave it.
View attachment 7841637
Overall even with the hiccups on the bottom brackets it was maybe a 30 minute install plus the 2 minutes Friday night to remove the plastic cover plates to see what it looked like underneath.
View attachment 7841641
View attachment 7841640
Some people asked for pictures of the bar before install. I remembered to take pictures of the brackets (and did a 3d photo scan) but forgot to get one of the whole bar. You can see the bar was pretty well packed with lots of dense foam sheeting.
View attachment 7841642
View attachment 7841643
And now for the finished product and a glamour shot of my trusty Mexican blanket.
View attachment 7841644

View attachment 7841646
View attachment 7841651
Would you mind sharing the torque numbers? The QR code isn’t working for me and I’ve got it all bolted up but I need to torque specs to finish it up. Thanks!
 

Bruce

Global Grenadier #51
Grenadier Owner
Lifetime Supporter
Local time
3:52 AM
Joined
Oct 20, 2021
Messages
832
Reaction score
1,157
Location
Washington, USA
Looks like it got posted in Rupert's thread but let me know if you need more info @Regalz
 

Bruce

Global Grenadier #51
Grenadier Owner
Lifetime Supporter
Local time
3:52 AM
Joined
Oct 20, 2021
Messages
832
Reaction score
1,157
Location
Washington, USA
Long time since my last update. Had a bit of pain from a broken rib which kept me from doing much on the truck, then did some traveling. Big box from Goose Gear arrived today and I should be able to get my drawers put in this week.
 

Bruce

Global Grenadier #51
Grenadier Owner
Lifetime Supporter
Local time
3:52 AM
Joined
Oct 20, 2021
Messages
832
Reaction score
1,157
Location
Washington, USA
Got the drawers installed. Pretty easy for me to do solo having done a set on a previous truck. They come packed in a huge box on a wood fiber pallet. Even though freight is sidewalk drop off, the pallet was slick enough that I was able to push the whole shebang about 4 houses down the street, down the access to the alley, then back up to behind my house without having to use a dolly. On opening things up there was an added bonus of a bamboo cutting board and coaster. Makes me look forward to their camp table.

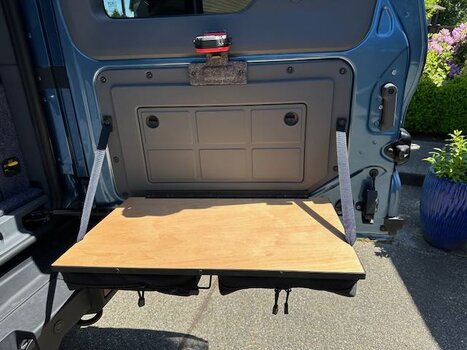
Since the plate install instructions were up on their site but not the drawers, hopefully this is useful. The first step is to remove the floor liner and airline track. 6 T50 bolts and that part is done.

IMG_9558.JPG

After that you pop through or remove the tape from holes 2 and 4 on each side. They're covered from the factory for some reason. There are 10 aluminum spacers in the install kit that go over the holes, then 10 5mm hex bolts to secure the plate down. When I put a plate in my 4Runner I added some generic Dynamat underneath. Skipped that here since I didn't have to remove an insulated/carpeted panel this time. Figure it won't be any louder with this than the simple floor liner.

Plate.jpg

Next I removed the drawers from the cabinet and hefted the box in at an angle. This part was a little tricky and a second pair of hands would be useful. The right hatch trim panel took a couple scratches but those'll get dinged anyway once I start hauling stuff around so no biggie. Once it's in, there are 2 L brackets on each side that you loosen with a 4mm hex, slide in the T-track to move over the pre-drilled holes, then use the 7/16" bolts to secure it to the plate and tighten the 4mm hex back down.

IMG_9562.JPG

Pop the drawers back in and load 'em up. I haven't measured yet but I believe there's enough room behind the right rear passenger to install a radio body vertically, which would make routing power pretty easy and you could go out the back for the antenna to mount on the airline track.

IMG_9564.JPG

I unfortunately misremembered information they posted in their build thread to mean the top plate would be pre-drilled to mount the airline track on top. The base plate can have them mounted on top so you could do a fridge slide or a kitchen unit then the track on the other side, but the holes on the top plate don't line up. No biggie as the drawers are high enough that I don't think the track would be too useful. I may throw some D rings on there but the track might be overkill and would reduce height availability so I'm happy with it as it is. John answered the phone right away when I called for clarification on the rails, and was helpful. He was also great in holding shipping for a week so they wouldn't show up when we were out of town for spring break.

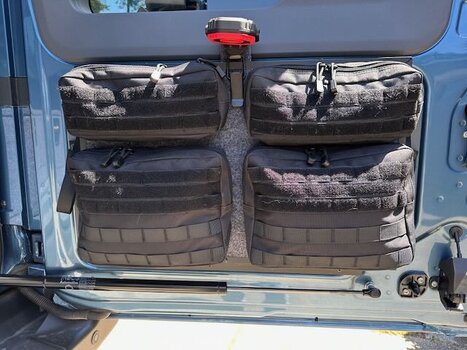
The drawers are smooth, and the extra couple inches over the set in my 4Runner is nice. Things will be easier to pack with the added height. This time around I opted for the 2/3 - 1/3 setup, which makes for a bigger drawer for larger items, but the narrow drawer still fits my Blue Ridge Overland tool roll and recovery bag. Conveniently the locks are keyed to match the cubby (which is probably more a testament to the useless Southco lock than anything else), so it's one less key to fit on the keyring

Overall highly recommend these. Goose Gear makes great stuff.
 
Back
Top Bottom