The Grenadier Forum
Register a free account today to become a member! Once signed in, you'll be able to contribute to the community by adding your own topics, posts, and connect with other members through your own private inbox! INEOS Agents, Dealers or Commercial vendors please use the contact us link at the bottom of the page.
-
Guest submit your best shot for a chance to win the December Photo Contest. Photo Contest Click Here
You are using an out of date browser. It may not display this or other websites correctly.
You should upgrade or use an alternative browser.
You should upgrade or use an alternative browser.
Agile Offroad under bench seat ARB air compressor instructions
- Thread starter Shawnpalmer
- Start date
- Local time
- 5:40 PM
- Joined
- Sep 30, 2021
- Messages
- 425
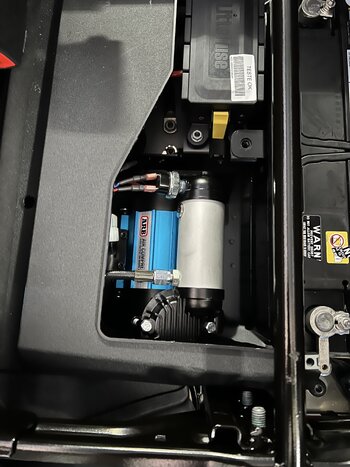
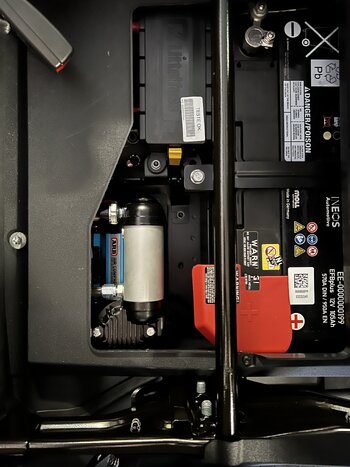
For anyone wondering the instructions and the entire kit is very easy to follow. Hardest part is pulling the granny apart, the compressor and lines are super easy, seriously plug and play for all the wiring.
This is a fantastic instruction manual.ARB Agile Offroad instructions
But, the dismounting is only valid for a single battery Grenadier. Dismounting panel 2 is impossible in the "two-battery" setup. I have a similar setup of the RB compressor (like some others) but I did cut panel 2 in two pieces to be able to dismount it!
Removing the underseat trim panels / accessing or removing the batteries
So further to this post: Post in thread 'Removing the underseat trim panels / accessing or removing the batteries' https://www.theineosforum.com/threads/removing-the-underseat-trim-panels-accessing-or-removing-the-batteries.12412649/post-1333202065 I've now received answers back from CTEK...
- Local time
- 5:40 PM
- Joined
- Sep 30, 2021
- Messages
- 425
I removed the second battery, I think they were 13mm bolts holding the mounts down. The CTek must disconnect power when the positive lead was disconnected because I didn’t have any current, the light turned red and I didn’t burn down the truck or house. Even with no current/voltage read I was nervous as I haven’t had a dual battery setup before. That battery was HEAVY but I got by with just twisting it sideways, didn’t have to pull all the way out.
Well, I was looking at the pictures, and at first sight yes!Sorry, for the dumb question, but the Agile set is useable/mountable with the second battery installed?
[EDITED] But you should know that there are 12V wires available at that location (at least in MY dual battery car, and most others) for a compressor mount, therefore you don't need the 40A fuse of Agile, neither need to connect it as they did.
But their solution is nice!
Last edited:
- Local time
- 5:40 PM
- Joined
- Sep 30, 2021
- Messages
- 425
Any feedback from those who have installed on the heat generated when in use? Any causes for concern? I like the setup however my only concern is the lack of ventilation in this area, and the heat generated alongside the battery (I have factory dual battery setup). Any feedback would be helpful.Their solution is pretty slick. It would be more trouble to not use their setup. Also leaves the 40a for something else. Not sure what yet but I am sure something can use the power.
X2 on feedback please. How long to inflate a 33 from 15 to 35? 
- Local time
- 5:40 PM
- Joined
- Sep 30, 2021
- Messages
- 425
Took about 10 min for stock size 18-36ish. Definitely hot to touch but I didn’t get any readings. I left the seat up when using for the heat. Back of the second battery was warm but definitely not hot. Probably not as warm as a regular under hood battery in Arizona. But again, I don’t have any actual measurements. I did just upgrade to 285/70r17. I’ll time it again. I think I have an infrared for the bbq so I’ll see what I can do.
Took about 10 min for stock size 18-36ish. Definitely hot to touch but I didn’t get any readings. I left the seat up when using for the heat. Back of the second battery was warm but definitely not hot. Probably not as warm as a regular under hood battery in Arizona. But again, I don’t have any actual measurements. I did just upgrade to 285/70r17. I’ll time it again. I think I have an infrared for the bbq so I’ll see what I can
Thanks for this. 10 min for 1 tire or all 4? I assume one…. This is helpful. I had a viaair in my pickup truck that I used for towing to air up the rears when I had the trailer attached. It did a good job but corroded internally some and I had to disassemble / rebuild it.
- Local time
- 5:40 PM
- Joined
- Sep 30, 2021
- Messages
- 425
I am not 100% on the 10 min but it was for all 4. This was for the stock tires. Overall it is a pretty well thought out plug and play kit. Seriously the hardest part was taking the rear panel off to run the lines. I haven’t used my home compressor for anything since installing this.
Has anyone seen any alternatives to this under bench ARB compressor mount? I don't want to do the under front seat or under hood mount locations. I called Agile and they won't split a set to just provide the Mounting Bracket / Hardware. Super disinterested customer service rep. I don't need the compressor and I don't plan to use the outlet location the kit is set up for so most of the kit would be throw away. Can't believe they won't sell me just the bracket with a nice markup!
Here are some options from AU.
AIR COMPRESSOR BRACKETS
AIR COMPRESSOR BRACKETS
- OWL under seat twin ARB Air Compressor mounting kit. The Kit comes in LHD and RHD versions, brackets only or brackets with a supplied the ARB twin air compressor. ***WARNING:*** the new brushless ARB twin air compressors, when using the Owl under seat mount DOES NOT FIT UNDER THE SEAT. It is not known if the same problem arises with other brand under seat brackets, look here;
- Agile Offroad under seat ARB Twin Compressor Mount here, thanks @CrazyOldMan;
- XHQ rear twin air compressor mounting kit (with compressor) here;
- XSPEC under seat twin ARB Twin Compressor Mount Kit here,
- Black Sheep Innovations rear twin ARB Air Compressor mounting bracket here; and
- Custom bracket (rear) from ORS with ORS Drawers, look here;
- SINGLE ARB Compressor Bracket from EURO FLO Expedition Equipment here;
- SINGLE ARB air compressor can be fitted to a rear roof shelf;
- SINGLE CAtuned Off-Road Custom Grenadier TJM Air Compressor and Bracket here; and
- AIR COMPRESSOR ACCESSORIES - MUTLI-TYRE INFLATE OR DEFLATE SYSTEMS look here.
Hey Michael,Here are some options from AU.
AIR COMPRESSOR BRACKETS
- OWL under seat twin ARB Air Compressor mounting kit. The Kit comes in LHD and RHD versions, brackets only or brackets with a supplied the ARB twin air compressor. ***WARNING:*** the new brushless ARB twin air compressors, when using the Owl under seat mount DOES NOT FIT UNDER THE SEAT. It is not known if the same problem arises with other brand under seat brackets, look here;
- Agile Offroad under seat ARB Twin Compressor Mount here, thanks @CrazyOldMan;
- XHQ rear twin air compressor mounting kit (with compressor) here;
- XSPEC under seat twin ARB Twin Compressor Mount Kit here,
- Black Sheep Innovations rear twin ARB Air Compressor mounting bracket here; and
- Custom bracket (rear) from ORS with ORS Drawers, look here;
- SINGLE ARB Compressor Bracket from EURO FLO Expedition Equipment here;
- SINGLE ARB air compressor can be fitted to a rear roof shelf;
- SINGLE CAtuned Off-Road Custom Grenadier TJM Air Compressor and Bracket here; and
- AIR COMPRESSOR ACCESSORIES - MUTLI-TYRE INFLATE OR DEFLATE SYSTEMS look here.
Really appreciate the list. EuroFlo looks like a decent option - hadn't found that before. Has to be the rear undersea to fit the rest of the build out so really narrows the options.
Cheers!
They are based in Queensland Australia.Hey Michael,
Really appreciate the list. EuroFlo looks like a decent option - hadn't found that before. Has to be the rear undersea to fit the rest of the build out so really narrows the options.
Cheers!
Do you have any more details on the custom bracket from ORS. I sent them an enquiry but have not heard backHere are some options from AU.
AIR COMPRESSOR BRACKETS
- OWL under seat twin ARB Air Compressor mounting kit. The Kit comes in LHD and RHD versions, brackets only or brackets with a supplied the ARB twin air compressor. ***WARNING:*** the new brushless ARB twin air compressors, when using the Owl under seat mount DOES NOT FIT UNDER THE SEAT. It is not known if the same problem arises with other brand under seat brackets, look here;
- Agile Offroad under seat ARB Twin Compressor Mount here, thanks @CrazyOldMan;
- XHQ rear twin air compressor mounting kit (with compressor) here;
- XSPEC under seat twin ARB Twin Compressor Mount Kit here,
- Black Sheep Innovations rear twin ARB Air Compressor mounting bracket here; and
- Custom bracket (rear) from ORS with ORS Drawers, look here;
- SINGLE ARB Compressor Bracket from EURO FLO Expedition Equipment here;
- SINGLE ARB air compressor can be fitted to a rear roof shelf;
- SINGLE CAtuned Off-Road Custom Grenadier TJM Air Compressor and Bracket here; and
- AIR COMPRESSOR ACCESSORIES - MUTLI-TYRE INFLATE OR DEFLATE SYSTEMS look here.
This is what ORS did on my car, at my request. Bolted into the rear tie down points on the side. Also gives storage area between the compressor and the window.Do you have any more details on the custom bracket from ORS. I sent them an enquiry but have not heard back
ORS do all things custom.


The setup has been very useful. I added one to the other side of the car to match. I attach canvas bags with Velcro backing and can re-configure what is there, as needed:Looks good, I am keen to get them do to similar for me

Bags like this:

I have a longer write here (see towards the bottom of the page):

Grenadier build – Outback Shakedown changes – Round 2
ABNTR4X4 Rock sliders refinedA metallic noise/rattle/squeak developed about one week after the installation of the rock sliders. Luckily before The Doc went on his Outback trip.The sliders were att…
thedocaus.com
Last edited:
Similar threads
- Replies
- 6
- Views
- 419
- Replies
- 16
- Views
- 1K
- Replies
- 39
- Views
- 2K


