WOLFBOX Bumper Cam install
Hi folks,
As promised I would do a write up on my installation of the Wolfbox Tripro BUMPER cam install.
Before I start I have to give a HUGE shout out to @Loc Nar and @AndyT for their tutorials on getting me started!
I installed the Wolfbox TRIPRO Bumper cam a bit ago but could not do the front bumper cam at the time (life happened). Well I finally ran the wires to the front of the Grenadier.
DISCLAIMER: I am not good at editing photos or videos so please bear with me.
So assuming you have the Wolfbox Tripro Bumper cam and you were wondering how to route things through the firewall, I probably went overboard on panel removal for a US version LHD. ASSUMING you already HAVE the rear and head unit working...this will pick up on installing the front "Bumper Cam" and its wiring and placement.
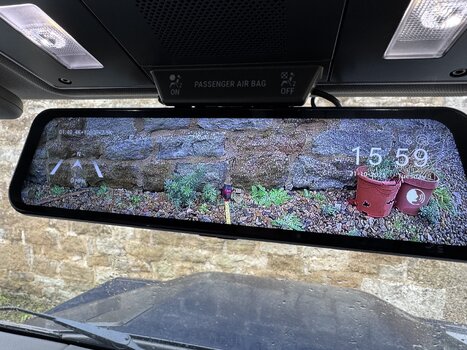
The way I ran the wires from the mirror to the firewall was across the mirror through the gap in the headliner on the windshield along the passenger side (Left hand drive).
From there I routed the wires to the area in the passenger footwell which you can follow from there.
1. Remove the trim pieces from the passenger side. Not entirely necessary because you CAN access the firewall grommet to get to the engine bay but you will have to deal with excess wiring from the included Wolf box bumper camera. I elected to tuck all of the excess wiring to the bumper in the passenger foot well.

2. Once you remove the trim pieces you will find a LARGE foam filler piece that is not attached to any thing and you can toss it in the back seat if you wish (makes things easy).
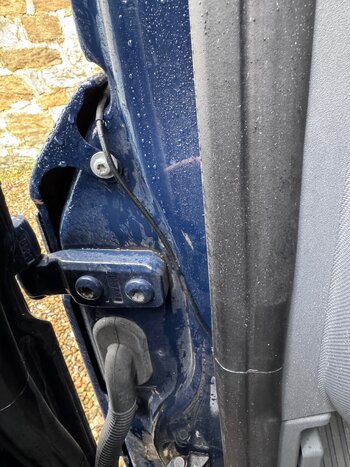
There are a couple of Grommets you can pass the wires thru the firewall. I elected to go through the larger one that I show here. I used a "pick" to feel where would go through the firewall and enter the engine bay. For ME this was the hardest part because you cannot fit your hand down to the grommet in the engine compartment.


For reference in the above pic the red arrow points to the FIREWALL, Green arrow goes to the front, Blue arrow shows the passenger side footwell direction. Orange arrow is where the Fish Tape went through the Grommet that I elected to use. This picture is from the TOP of the vehicle looking down for reference.
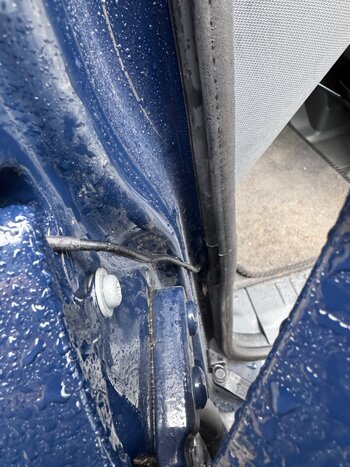
3. Once you have figured out how to maneuver the fish tape through the firewall, you HAVE to get the wire up to a place you can access it. The space is TIGHT! What I had to do is pass the initial wire PUSH through the firewall (I sprayed some Dawn Soap mix to help the fish tape).

When that is done you have to figure out a way to SNAG the fish tape and bring it up so you can actually get it! I used some old Copper Grounding wire to make a "hook" to snag the fish tape. (The red arrow shows where the initial fish tape went through the grommet and I caught it with the copper wire). NOTE: The red arrow above shows where to snag your fish tape. It was a pain to snag the fish tape but once this is done you can route the wires how you want to!

4. The hard part is OVER. Now you can figure out how to wire the bumper cam!
Where the wire comes out after fishing

5. Routing the wires is a personal preference but I did it THIS way!


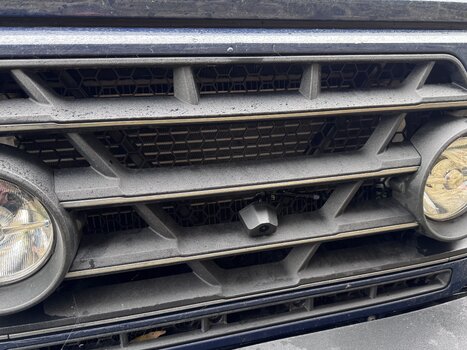
6. Camera Placement....I WANTED to get the "bumper cam" under the metal bumper but could not figure out a way to do so. I tested each of the "levels" on the grill and found out that where I placed it worked best for me.
I heated up a "Pick" with a torch and made a VERY small hole to allow me to use the Wolfbox screw and 3M tape to attach the camera. After TONS of back and forth, this location provided me with the best visibility in the front for rocks and such when I cant see them from the drivers seat position.

7. My final install, after testing each level of the grill I determined the ideal location for me was in this spot. I would have liked to put it lower on the bumper but this it my first iteration of camera placement. I still have some clean up stuff to do. The zip tie on the left of the grill will be fixed in the future but for NOW this works well as a temp solution.

I hope this helps folks in the future for installing a front camera.
If you have any suggestions on hiding some of the wires (aka the zip tie in the front grill) I am open to suggestions!
Cheers!
Hi folks,
As promised I would do a write up on my installation of the Wolfbox Tripro BUMPER cam install.
Before I start I have to give a HUGE shout out to @Loc Nar and @AndyT for their tutorials on getting me started!
I installed the Wolfbox TRIPRO Bumper cam a bit ago but could not do the front bumper cam at the time (life happened). Well I finally ran the wires to the front of the Grenadier.
DISCLAIMER: I am not good at editing photos or videos so please bear with me.
So assuming you have the Wolfbox Tripro Bumper cam and you were wondering how to route things through the firewall, I probably went overboard on panel removal for a US version LHD. ASSUMING you already HAVE the rear and head unit working...this will pick up on installing the front "Bumper Cam" and its wiring and placement.
The way I ran the wires from the mirror to the firewall was across the mirror through the gap in the headliner on the windshield along the passenger side (Left hand drive).
From there I routed the wires to the area in the passenger footwell which you can follow from there.
1. Remove the trim pieces from the passenger side. Not entirely necessary because you CAN access the firewall grommet to get to the engine bay but you will have to deal with excess wiring from the included Wolf box bumper camera. I elected to tuck all of the excess wiring to the bumper in the passenger foot well.
2. Once you remove the trim pieces you will find a LARGE foam filler piece that is not attached to any thing and you can toss it in the back seat if you wish (makes things easy).
There are a couple of Grommets you can pass the wires thru the firewall. I elected to go through the larger one that I show here. I used a "pick" to feel where would go through the firewall and enter the engine bay. For ME this was the hardest part because you cannot fit your hand down to the grommet in the engine compartment.
For reference in the above pic the red arrow points to the FIREWALL, Green arrow goes to the front, Blue arrow shows the passenger side footwell direction. Orange arrow is where the Fish Tape went through the Grommet that I elected to use. This picture is from the TOP of the vehicle looking down for reference.
3. Once you have figured out how to maneuver the fish tape through the firewall, you HAVE to get the wire up to a place you can access it. The space is TIGHT! What I had to do is pass the initial wire PUSH through the firewall (I sprayed some Dawn Soap mix to help the fish tape).
When that is done you have to figure out a way to SNAG the fish tape and bring it up so you can actually get it! I used some old Copper Grounding wire to make a "hook" to snag the fish tape. (The red arrow shows where the initial fish tape went through the grommet and I caught it with the copper wire). NOTE: The red arrow above shows where to snag your fish tape. It was a pain to snag the fish tape but once this is done you can route the wires how you want to!
4. The hard part is OVER. Now you can figure out how to wire the bumper cam!
Where the wire comes out after fishing
5. Routing the wires is a personal preference but I did it THIS way!
6. Camera Placement....I WANTED to get the "bumper cam" under the metal bumper but could not figure out a way to do so. I tested each of the "levels" on the grill and found out that where I placed it worked best for me.
I heated up a "Pick" with a torch and made a VERY small hole to allow me to use the Wolfbox screw and 3M tape to attach the camera. After TONS of back and forth, this location provided me with the best visibility in the front for rocks and such when I cant see them from the drivers seat position.
7. My final install, after testing each level of the grill I determined the ideal location for me was in this spot. I would have liked to put it lower on the bumper but this it my first iteration of camera placement. I still have some clean up stuff to do. The zip tie on the left of the grill will be fixed in the future but for NOW this works well as a temp solution.
I hope this helps folks in the future for installing a front camera.
If you have any suggestions on hiding some of the wires (aka the zip tie in the front grill) I am open to suggestions!
Cheers!
")


")