The Grenadier Forum

Register a free account today to become a member! Once signed in, you'll be able to contribute to the community by adding your own topics, posts, and connect with other members through your own private inbox! INEOS Agents, Dealers or Commercial vendors please use the contact us link at the bottom of the page.

Upgraded the stereo in 3 phases: sharing what I have learned and completed.

I’m struggling to remove the brown 8 pin ISO connector from the back of the factory head unit.
Any tips on how to disconnect it? Can anyone confirm that the brown connector in the picture is correct one to disconnect?
IMG_3841.jpeg
 
Yes the brown one is right. The clips to the left of your pic in the middle of each connector push towards the center.

It was by far the hardest part, but you can eventually push the clip and pull and get it out. Alternatively if you remove the large trim piece below the steering wheel it exposes the head unit and you can remove it and slide forward getting you some more room to work
 
Thanks for the confirmation before I commit 100% to removing that connector. My solution was to detach the black brackets from the side of the factory headunit. Next I removed the heatsink from the left side of the headunit. This allowed me to push it towards the footwell enough that I could see the connector. Last I used a small channel lock tool to pull the connector free.

Thanks to Derek and Eric for outlining a way to upgrade the sound system.
 
Ahhh, I remember the days, going to K-Mart and getting a graphic equalizer/booster and some 6x9 triaxials with 20oz magnets and thinking that was the s**t!
 
Ahhh, I remember the days, going to K-Mart and getting a graphic equalizer/booster and some 6x9 triaxials with 20oz magnets and thinking that was the s**t!

That is because it was the s**t. I got the under dash 8 Track + Cassette Deck for the '79 Sunbird because I was a Player..

1769313382372.jpeg
 
So when installing the after market 6.5 speaker, I assume we can’t use the original speaker mounting holes? The diameter between the holes are about 4mm longer with the oem 6” speaker
 
So when installing the after market 6.5 speaker, I assume we can’t use the original speaker mounting holes? The diameter between the holes are about 4mm longer with the oem 6” speaker
I used 6 1/2" Kickers. I had to open about a 2" strip slightly for the front to mount flush. The rear I used one of the supplied adapter rings as a spacer (about 1/8") then I did not have to adjust the opening.
 
I used 6 1/2" Kickers. I had to open about a 2" strip slightly for the front to mount flush. The rear I used one of the supplied adapter rings as a spacer (about 1/8") then I did not have to adjust the opening.
Did you reuse the speaker holes in the door? So once the speaker sits flush, the hole alignment is still an issue no? I measure about 4mm difference between the diameter of the speaker holes vs door holes
 
Did you reuse the speaker holes in the door? So once the speaker sits flush, the hole alignment is still an issue no? I measure about 4mm difference between the diameter of the speaker holes vs door holes
The holes were pretty close to the OE. I was able to re-use factory screws + plugs on terminals ( I did solder to make sure they stayed on). There was a gap to the door card/ grille which I used Sound Skins speaker rings foam to seal the gap also added a bit of Dynamat on the door card.
 
Did you reuse the speaker holes in the door? So once the speaker sits flush, the hole alignment is still an issue no? I measure about 4mm difference between the diameter of the speaker holes vs door holes
I used the Hertz CK165 kit. The C165 (165mm) door speakers screwed into the original holes with a bit of angling inwards. That's after I opened up the door aperture about 10mm to let the speaker sit in the door. The plastic is very soft. I used a cordless belt file to enlarge the hole.

I used a bit of leftover door draught stopper foam tape to fill the void to the door card.

Factory 6 inch speaker
PXL_20260228_013214844.jpg


Hertz 165mm speaker
PXL_20260228_030335239.jpg


Side by side
PXL_20260228_014119583.jpg


Surgery (with hertz template)
PXL_20260303_015129000.jpg
 
I used the Hertz CK165 kit. The C165 (165mm) door speakers screwed into the original holes with a bit of angling inwards. That's after I opened up the door aperture about 10mm to let the speaker sit in the door. The plastic is very soft. I used a cordless belt file to enlarge the hole.

I used a bit of leftover door draught stopper foam tape to fill the void to the door card.

Factory 6 inch speaker
View attachment 7924327

Hertz 165mm speaker
View attachment 7924328

Side by side
View attachment 7924329

Surgery (with hertz template)
View attachment 7924330
wow. I had no idea the box had a template. I was in the process of throwing it away when I saw the back of it.

The hertz c165 has really poor instructions. The fitment of the tweeter inside the supplied pod was non-obvious. It looks like one has to find a screw to go from the backside into the tweeter, in order for it to stay within the pod.

I also made the mistake of disconnecting the plug that contains the door speaker wires and airbag wires.. Now I have a persistent air bag warning light.

You've probably already figured out that the tweeter snaps into the pod and the pod can be mounted on two different angles depending on which hole set you drill through. From memory I think it is 60 degrees or 30 degrees. Or, don't use the pods and surface mount the tweeters using the brackets and panel clips.
I agree it's not intuitive. Most of the information is there in an IKEA sense and Hertz have done an equally great job obscuring it in multilingual and graphical instructions.

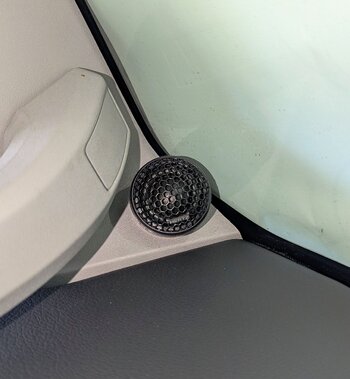
I have used the pods in the upright position. I mounted them at the base of each A pillar cover and pointed them across the cabin so the left side tweeter (RHD pic) is facing the right front seat and the right side tweeter is facing the left front seat. That accords with the Hertz information for location and orientation.
It's quite an aftermarket look but it was the least impactful way of fitting them given I had no idea of how they would sound. I used two small screws to mount each pod versus cutting a big hole to surface mount them. If I didn't like the results it would be easier to hide small screw holes. I might surface mount them next time I'm working in that area.

The upgrade is well worthwhile. It's not a pro system but based on bang for buck with DIY labour I'm happy. It now has some bass instead of muddy noise and the high mounted tweeters lift the sound stage and add clarity to music which was lacking previously. A good result for not a lot of money.
Splicing into the factory harness at those floor plugs so the passive crossovers could be fitted was the biggest PITA. I put the crossovers high up inside each kick panel on some Velcro tape. So far they haven't moved and they don't rattle 🤞🏻

I'm debating upgrading the rear door speakers with Hertz C100 (4 inch). Someone on here did a rear speaker upgrade and said the results were much less than a front speaker upgrade so maybe I'll do it if I have a need to pull the rear door cards off 🤷‍♂️

To the best of my knowledge the only way the airbag light can be reset is via a dealer visit. We're all waiting for an aftermarket solution for this plus the TPMS position reset.
 

Attachments

  • PXL_20260323_051809915~2.jpg
    PXL_20260323_051809915~2.jpg
    1.1 MB · Views: 8
I mis judged clearance of the windshield. My first attempt at positioning the passenger side pod resulted in the pod touching the windshield, so in had to file it down 😡

I am getting less bass than the oem speakers. However I think it’s due to the gap that exists between the new speaker and the mounting surface in the door. I will have to remediate that.
The compound curve of the trim in that spot is tricky to work on. I measured twice before drilling but still managed to get the left side in a slightly different position to the right. Only noticeable if you know about it :rolleyes:

The foam ring seems important to stop sound leaking into the door cavity. I didn't put any other insulation material into the doors. I was more to the left on the effort vs reward graph for this upgrade. I am using the Rock profile in the equaliser which boosts the bass a little more. I tried the tweeters on the +3db setting in the crossover but it was too much. 0db is the go IMO but do try both settings before you mount the crossovers and fit the covers.
 
Back
Top Bottom