The Grenadier Forum
Register Now for enhanced site access.
INEOS Agents, Dealers or Commercial vendors please contact admin@theineosforum.com for a commercial account.

Error Message "Tyre pressure sensor lost"

Jeremy996

Forum Moderator
Grenadier Owner
Lifetime Supporter
Local Group Moderator
Local time
5:51 AM
Joined
Dec 28, 2021
Messages
525
Reaction score
2,168
Location
Melton Mowbray, Leicestershire, United Kingdom
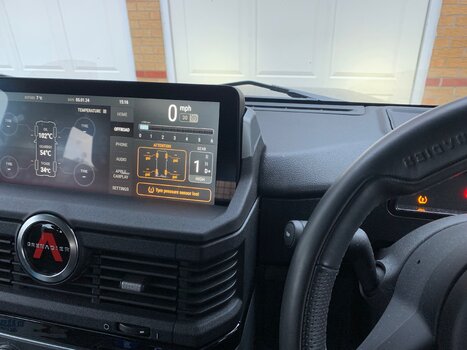
Late in the day and the dashboard lights up with an amber message "Tyre pressure sensor lost". Checking the displays, you can see that all four are lost, so I guess the sensor receiver is disconnected/toast.

The Grenadier is booked in for diagnostics on the 24th January, (Chandlers are busy and short a technician).

It's this sort of dumb failure that drives my desire for the full workshop manual now. This should not be a big mystery; it's either a wire break or a failed unit, it should not need a trip to the dealer for diagnosis and fixing. You don't get this sort of irritation with a LR110CSW 200Tdi, (just cold, wet feet, deafened, vibrated and a little cramped!)

I'll report back on the fix, when I have one.
Gren - tyre problem - 1.jpeg
 
Last edited:

Jeremy996

Forum Moderator
Grenadier Owner
Lifetime Supporter
Local Group Moderator
Local time
5:51 AM
Joined
Dec 28, 2021
Messages
525
Reaction score
2,168
Location
Melton Mowbray, Leicestershire, United Kingdom
The Grenadier is quietly taking the piss; the fault has disappeared after a day and several starts and stops.

I'll have to ring Chandlers to see what to do next. Finding intermittent faults, especially if they aren't currently presented, is a real pain in the ass!
 

RAS

Grenadier Owner
Local time
10:51 AM
Joined
Jan 7, 2024
Messages
7
Reaction score
37
Location
Scotland, UK
Hi, I took each wheel off in turn for about an hour to put a bit more rust proofing around the exposed parts (Dinitrol 4941 - looks good but probably not necessary - makes me feel better) plus grease around the mating surfaces. Wheel was about 3m max from vehicle. Took it out the garage and all the readings were frozen and looked like defaults. After about 5 miles they all switched to "--" in quick succession and the error message came up. Did not touch it for a few days and took it out again about a week later. One by one the readings came back.

Last weeks I took the right front wheel off for several hours to see how the front bumper can come off but this time kept the wheel very close. No problems with TPMS this time.

Tried to raise this with Ineos CS as a possible software fault but they directed me to dealer. No response from dealer so far.

Richard
 

Logsplitter

Grenadier Owner
Lifetime Supporter
Local time
10:51 AM
Joined
Oct 31, 2022
Messages
2,313
Reaction score
8,543
Location
🇬🇧
Hi, I took each wheel off in turn for about an hour to put a bit more rust proofing around the exposed parts (Dinitrol 4941 - looks good but probably not necessary - makes me feel better) plus grease around the mating surfaces. Wheel was about 3m max from vehicle. Took it out the garage and all the readings were frozen and looked like defaults. After about 5 miles they all switched to "--" in quick succession and the error message came up. Did not touch it for a few days and took it out again about a week later. One by one the readings came back.

Last weeks I took the right front wheel off for several hours to see how the front bumper can come off but this time kept the wheel very close. No problems with TPMS this time.

Tried to raise this with Ineos CS as a possible software fault but they directed me to dealer. No response from dealer so far.

Richard
Have you worked out how to take the bumper off yet 🤔. I would like some tips of how to dismantle the U.K./Euro spec bumper Incase I have to fix the small radiator fixings again 👍🏼
 

RAS

Grenadier Owner
Local time
10:51 AM
Joined
Jan 7, 2024
Messages
7
Reaction score
37
Location
Scotland, UK
Not completely taken it off but have had the centre and right sections loose. Going from memory......

Unscrew the two covers over the joins between the centre and left/right sections. Under here are 6 screws that hold the side section to the centre section. If taking the whole lot off these should probably be left together as you cannot remove the sections piece by piece because of the sensor loom running from from the centre sections and terminating in the side sections behind the coolers.

Next take off the right grill inside the wheel arch behind the cooler. I took out the arch liner and arch extender but I don't think this is necessary now. Lets you have a good look at the steering mechanism. There's a couple of press fixings that are just under the arch liner edge that could probably be removed with the arch liner in place. You'll then see a multi-plug for the sensor loom and a plug for the right bumper indicator plus a few cable guides. These are all fixed to a skeleton bracket that runs from the chassis to the bumper side. Down the side of the cooler there are 3 screws that hold the right section to the metal "real" bumper plate that runs across the three sections in front of the coolers. With a long enough torx drive you can get to these with the bracket in place.

You can then remove the number plate showing 3 male torx bolts and then behind each joint covers are another 2 torx male bolts and these are the main bolts fixing the bumper backer plates to the "real" bumper. I loosened these and the whole thing looked like it would come off once I had disconnected the connectors and presumably done the same on the other side. This is as far as I took it this go. Base camp.

If you remove the 2*6 screws under the join covers and the three torx bolts, the front section will pull forward and hang on the loom allowing you to get to the bash guard upper fixing bolts. Removing this so that I could spray the bash guard black with Dinitrol inside and out was my first aim - looks way better that silver for a donny grey vehicle. I planned to drop the whole bumper off and then Dintrol the whole lot to death but its been so damp and cold here in Aberdeenshire that the surfaces would not dry off even when inside the garage for a few days. Will leave this until later in the year.

A couple of points - there is a little yellow plastic clip on the join covers want to pop off and fall into the bumper. Gave up fishing and one is still in there somewhere but you don't really need it. Hopefully it will still be there when I fully remove the bumper.

The main torx bolts also tend to drop into the bumper easily and you have to fish them out. The access holes are just big enough to get my hand in but there was a few scary moments when my hand would not come out and my phone was on the bench 7 ft away.

Richard
 

Logsplitter

Grenadier Owner
Lifetime Supporter
Local time
10:51 AM
Joined
Oct 31, 2022
Messages
2,313
Reaction score
8,543
Location
🇬🇧
Not completely taken it off but have had the centre and right sections loose. Going from memory......

Unscrew the two covers over the joins between the centre and left/right sections. Under here are 6 screws that hold the side section to the centre section. If taking the whole lot off these should probably be left together as you cannot remove the sections piece by piece because of the sensor loom running from from the centre sections and terminating in the side sections behind the coolers.

Next take off the right grill inside the wheel arch behind the cooler. I took out the arch liner and arch extender but I don't think this is necessary now. Lets you have a good look at the steering mechanism. There's a couple of press fixings that are just under the arch liner edge that could probably be removed with the arch liner in place. You'll then see a multi-plug for the sensor loom and a plug for the right bumper indicator plus a few cable guides. These are all fixed to a skeleton bracket that runs from the chassis to the bumper side. Down the side of the cooler there are 3 screws that hold the right section to the metal "real" bumper plate that runs across the three sections in front of the coolers. With a long enough torx drive you can get to these with the bracket in place.

You can then remove the number plate showing 3 male torx bolts and then behind each joint covers are another 2 torx male bolts and these are the main bolts fixing the bumper backer plates to the "real" bumper. I loosened these and the whole thing looked like it would come off once I had disconnected the connectors and presumably done the same on the other side. This is as far as I took it this go. Base camp.

If you remove the 2*6 screws under the join covers and the three torx bolts, the front section will pull forward and hang on the loom allowing you to get to the bash guard upper fixing bolts. Removing this so that I could spray the bash guard black with Dinitrol inside and out was my first aim - looks way better that silver for a donny grey vehicle. I planned to drop the whole bumper off and then Dintrol the whole lot to death but its been so damp and cold here in Aberdeenshire that the surfaces would not dry off even when inside the garage for a few days. Will leave this until later in the year.

A couple of points - there is a little yellow plastic clip on the join covers want to pop off and fall into the bumper. Gave up fishing and one is still in there somewhere but you don't really need it. Hopefully it will still be there when I fully remove the bumper.

The main torx bolts also tend to drop into the bumper easily and you have to fish them out. The access holes are just big enough to get my hand in but there was a few scary moments when my hand would not come out and my phone was on the bench 7 ft away.

Richard
Thanks. I’ve copied and stored your instructions ready for the next time I need them. 👍🏼
 

bbq4133

Grenadier Owner
Lifetime Supporter
Local time
5:51 AM
Joined
Feb 20, 2024
Messages
175
Reaction score
248
Location
Delaware, USA
Just had this happen to me tonight; any known fix beyond just waiting it out?
 

TheDocAUS

Grenadier Owner
Lifetime Supporter
Local time
7:51 PM
Joined
Mar 8, 2023
Messages
1,490
Reaction score
2,816
Location
Eromanga
Just had this happen to me tonIt has been reported to INight; any known fix beyond just waiting it out?
INEOS has been informed. Only known solution so far is turn off car over night, then drive in the morning. Error normally disappears about 6o seconds after you started driving, just starting and idling the car is not enough.
 

bbq4133

Grenadier Owner
Lifetime Supporter
Local time
5:51 AM
Joined
Feb 20, 2024
Messages
175
Reaction score
248
Location
Delaware, USA
INEOS has been informed. Only known solution so far is turn off car over night, then drive in the morning. Error normally disappears about 6o seconds after you started driving, just starting and idling the car is not enough.

Yeah, my dealer claims a software fix is on the way. Appreciate the response!
 

Grapa

Grenadier Owner
Local time
5:51 AM
Joined
Dec 18, 2023
Messages
20
Reaction score
31
Location
USA
The Grenadier is quietly taking the piss; the fault has disappeared after a day and several starts and stops.

I'll have to ring Chandlers to see what to do next. Finding intermittent faults, especially if they aren't currently presented, is a real pain in the ass!
Same thing happened to my Grenadier, so the fix is let the car sleep overnight? Thanks for saving me 80 mile drive to the dealership
 

TheDocAUS

Grenadier Owner
Lifetime Supporter
Local time
7:51 PM
Joined
Mar 8, 2023
Messages
1,490
Reaction score
2,816
Location
Eromanga
Same thing happened to my Grenadier, so the fix is let the car sleep overnight? Thanks for saving me 80 mile drive to the dealership
Yes, and then drive the car, after a minute or two the error will go away.
 
Back
Top Bottom