Stops rodents causing havoc with cable insulation too, bonus!
A community driving the extraordinary.
Welcome to Global Grenadiers — the worldwide community for INEOS Grenadier and Quartermaster owners and enthusiasts. Register free to join the conversation. Share your build and adventures, access technical guides, join your regional social group, get help on the trail, and receive our monthly newsletter.
INEOS Agents, Dealers or Commercial vendors — please use the Contact us link at the bottom of the page.
ThanksThe 385mm option
Well done fixing that one. Luckily no damage to auxiliary rad or oil cooler pipes.Stone wall came out of nowhere and pushed my bumper corner back towards the wheel. Had a fun couple of hours with my daughter bashing it back into shape!
The outer bumper corner supports are really flimsy - I'm sure the wall would have been less successful against my old defender.
View attachment 7920025View attachment 7920026View attachment 7920027

Sadly, we are not allowed vehicles that have bumpers to protect the car nowadays
Bumpers are there to protect the cyclist & pedestrians

Cyclists need bumpers. Roos need ADAS. Crazy world.Sadly, we are not allowed vehicles that have bumpers to protect the car nowadays
Bumpers are there to protect the cyclist & pedestrians
Nice keeping the kids involved!Stone wall came out of nowhere and pushed my bumper corner back towards the wheel. Had a fun couple of hours with my daughter bashing it back into shape!
The outer bumper corner supports are really flimsy - I'm sure the wall would have been less successful against my old defender.
View attachment 7920025View attachment 7920026View attachment 7920027
Rainy wet and humid Australia day, so....Nice one Greg. I have no clue about 3d printing. I wish I did.
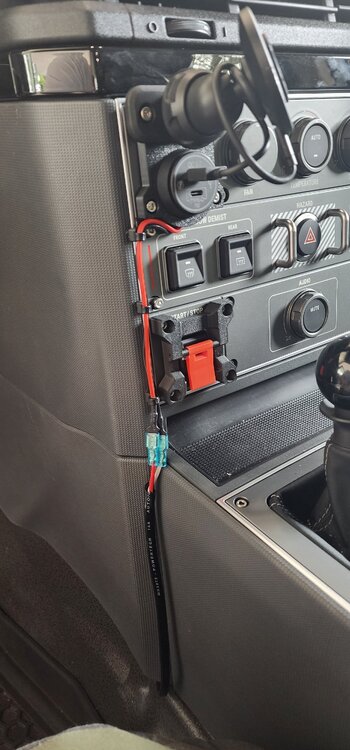
I did recently however, get in touch with someone who does know something about it. I purchased a surface mount usb charger with ideas of attaching it to the LHS internal power supply and mounting for front passenger use. But I also bought the start stop switch isolator (and the multifocal wearing old man eye assist system that you made yourself) from Justin at Euroflo. Then I thought that a similar size panel (as the start stop) with an appropriately sized hole would hold the charger and would also hold my quad lock phone mount with mag charger.
A phone call and a few messages and designs to Justin, who was very helpful. A few days went by and this 3d printed mount turned up. It's very good and does the job perfectly.
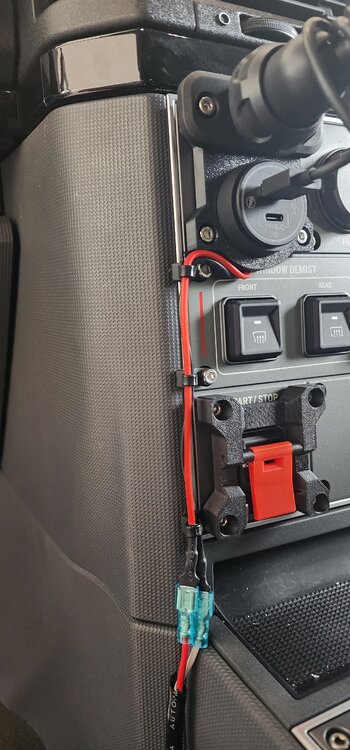
Can't quite work out where to run the power. I think it would be easier for the cable to go up, a slight hole in the shiny black strip and the plastic behind would hide it. I could mount it upside down, but that could limit the angle the phone sits at due to plug poking out.
I'm still playing with where the cable would go best. Trying to not drill holes.
But the primary goal was get rid of cable coming out of console box.
Very happy.
Thanks Justin
Pedro
You could do a lot with that rugged steel tent pole @Tazzieman.Picked up an adjustable tent pole, a rugged steel one. For levelisation purposes.View attachment 7920049
A warm Australia Day here in Adelaide 45.5 Centigrade, 114 Fahrenheit, first time Roland our Irish Wolfhound has enjoyed being washed, in fact 15 minutes was not long enough, did not even have to use a lead.Rainy wet and humid Australia day, so....
First prototype of the usb socket done - sadly had to mount the socket upside down to get the wires running out the top.
I think there is enough gap to get wires between shiny bit and the panel. I will see once i can figure out how to take the shiny bit off.
But that will have to wait until the humidity drops under 90%
View attachment 7920054
I wanted titanium but hey, 'twas the best Anaconda could do...
This is my solution at the moment. Some cable ties with a mount point on the end. Upside down into the existing holes with a longer bolt. One was modified to go behind the start stop switch. I will shrink some fancy shrink wrap onto it when I can borrow a heat gun. I like your solution. It looks the part. It's easy to get the shiny black strip out, but the existing holes behind it are all taken up with clips, so some mod will be needed. Well done.Rainy wet and humid Australia day, so....
First prototype of the usb socket done - sadly had to mount the socket upside down to get the wires running out the top.
I think there is enough gap to get wires between shiny bit and the panel. I will see once i can figure out how to take the shiny bit off.
But that will have to wait until the humidity drops under 90%
View attachment 7920054
Actually we are allowed to fit metal bumpers. It's just that Ineos can't fit them.Sadly, we are not allowed vehicles that have bumpers to protect the car nowadays
Bumpers are there to protect the cyclist & pedestrians
Is that aftermarket bumpers rather than factory fit? We can't fit bull-bars anymore, what's the workaround with the bumpers?Actually we are allowed to fit metal bumpers. It's just that Ineos can't fit them.