Thanks for the heads up. Most of what I find on FB has been from Australia. I haven't found much in the US yet.I'm not aware what the community support is like for Lifestyle campers in the USA but this Australian FB group is good. 8000 members and 10 years old.
I have a Lifestyle Breakaway Ultra which is a grandparent of the Fusionn.
Log into Facebook
Log into Facebook to start sharing and connecting with your friends, family, and people you know.www.facebook.com
The Grenadier Forum
Register a free account today to become a member! Once signed in, you'll be able to contribute to the community by adding your own topics, posts, and connect with other members through your own private inbox! INEOS Agents, Dealers or Commercial vendors please use the contact us link at the bottom of the page.
-
Guest submit your best shot for a chance to win the December Photo Contest. Photo Contest Click Here
You are using an out of date browser. It may not display this or other websites correctly.
You should upgrade or use an alternative browser.
You should upgrade or use an alternative browser.
What did you do with your Grenadier today?
- Thread starter Stu_Barnes
- Start date
-
- Tags
- grenadier
Beautiful. I know your in America but you could almost be in Namibia 
It is fairly straight forward.Damn, I know I waked right past because I remember Lensun. I was on a mission though, looking for an off-road trailer. Ended up putting a deposit down on a Lifestyle Campers Fusionn. Now I'm headed down the rabbit hole reading on how to wire a DC to DC connection for the trailer.
I run a 50 amp Anderson circuit (fused at 40 amps) direct from the aux battery to the rear of the car. The van plugs into the grey Anderson plug (Red is for external solar blanket into the car). Power from the IG to the van and all the DC to DC smarts are in the van. Just make sure the cable is thick enough for the lenght of the cable run.

My Vista RV Crossover has a 30 amp REDARC Project Manager 30 (which can handle DC, AC and solar input). I did not run an ignition source with the Anderson circuit, as the REDARC picks that up from the trailer electrics (which are different in AU). The REDARC Project Manager 30 is connected to a REDARC Prime TVMS and Rogue TVMS.
Your Fusionn has a similar setup using a Victron 30 amp DC to DC. Just plug the van in (after checking the van's DC power circuit uses a 50 amp Anderson plug - they do in AU).
There are wiring kits for this, for example (I installed one onto my nephew's Nissan Patrol).

Dual Battery Wiring Kits
Equip your vehicle with a KickAss dual battery wiring kit, designed to meet the demands of Australian adventurers. Our wiring kits provide a seamless and reliable connection between your primary and auxiliary batteries, ensuring consistent power distribution for all your 12V appliances. Whether...
Last edited:
- Local time
- 4:19 PM
- Joined
- Dec 28, 2021
- Messages
- 1,137
Fitted my Grenadier Works goodies - fresh from the USA, that turned up at lunchtime. Took all of 10 minutes, most of that finding the right tools.

Described to me as "a gamechanger". The big handle works really well.

The reversing light shrouds were already an essential, so far as I am concerned.

The interior light shades were novel to me - again, a fix I did not know I needed.
Let's see how long it takes my wife to notice!
Described to me as "a gamechanger". The big handle works really well.
The reversing light shrouds were already an essential, so far as I am concerned.
The interior light shades were novel to me - again, a fix I did not know I needed.
Let's see how long it takes my wife to notice!
Last edited:
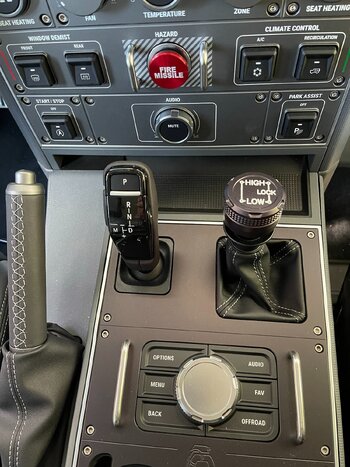
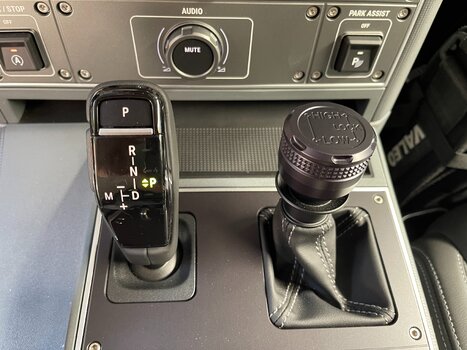
That looks awesome! Where did you get the transfer case knob???Painted the lettering on the transfer case knob. IMHO looks better than the unpainted version which looks somewhat unfinished. I think that's a wrap on this section of the interior!
View attachment 7910278View attachment 7910279
looks great, what paint did you use and was it easy?Painted the lettering on the transfer case knob. IMHO looks better than the unpainted version which looks somewhat unfinished. I think that's a wrap on this section of the interior!
View attachment 7910278View attachment 7910279
Got the transfer case knob from Grenadier USA - they still have some in stock.That looks awesome! Where did you get the transfer case knob???
I used a white touch-up paint - (dries quick) and I used an acrylic paint thinner to clean off the excess/over paint. I purchased a set of really really fine paint brushes (artist type brushes) and using a magnifying glass I painted within the entirety of the letters/lines. Then I used a Q-tip dipped in the paint thinner to wipe off the excess. It took some time to figure out how to effectively wipe off the over-paint while not rubbing out the paint within the letters/lines but after some trial and error I figured out an approach that worked well for me. There was a you-tube video that provided an overview of doing it but honestly its trial and error to get the right approach.looks great, what paint did you use and was it easy?
Looks great. Looks good with the new shifter. Subtle upgrades….Got the transfer case knob from Grenadier USA - they still have some in stock.
I used a white touch-up paint - (dries quick) and I used an acrylic paint thinner to clean off the excess/over paint. I purchased a set of really really fine paint brushes (artist type brushes) and using a magnifying glass I painted within the entirety of the letters/lines. Then I used a Q-tip dipped in the paint thinner to wipe off the excess. It took some time to figure out how to effectively wipe off the over-paint while not rubbing out the paint within the letters/lines but after some trial and error I figured out an approach that worked well for me. There was a you-tube video that provided an overview of doing it but honestly its trial and error to get the right approach.
Lost the agile control arm skid while on 7 mile rim trail in Moab. They did their job though - RIP


I have been known to use a paperclip for this same painting job.Might be the same thing but Pentel Micro Correction pens or similar (liquid paper / white out correction pens to) would be perfect. 3 for £8 or so on Amazon in the UK.
We mark up lots of things on vehicles with them - writing the installation dates on batteries / alternators / cam belt covers etc. They seem to last for years in the engine bay and even on the outside of vehicles. I know this as my children used to write the initials of the sibling that caused the dent in the bodywork of our cars and 10 years later they are still very visible.
EDIT: This one was re-enameled using a strand of wire to place the paint.
Last edited:
- Local time
- 4:19 PM
- Joined
- May 19, 2022
- Messages
- 2,333
That's no longer Land Rover. That's no longer my world. That's why I stopped buying from the brand after my LR4. It's a shame. I'll always remember the good old days. I still remember the Heritage Run in 2008 well. The badge hangs in my workshop as a memento. I had goosebumps back then when I drove the Lode Lane with hundreds of others in a convoy from the shadow factory to the BMM in Gaydon. Back then, we still ate together with the Land Rover bosses and had a good chat on equal terms.Drove down Lode Lane today past Land Rover what a terrible sign you couldn't miss the green oval now its just grey and non descript managed to get out unscathed.View attachment 7910343
View attachment 7910343
Last edited:
- Local time
- 4:19 PM
- Joined
- May 19, 2022
- Messages
- 2,333
I like these badges. I still have a few mounted on my Series 2a. They remind me of a wonderful time. I will probably keep the Series 2a as my last Land Rover. Especially since it has such an outstanding history.I have been known to use a paperclip for this same painting job.
EDIT: This one was re-enameled using a strand of wire to place the paint.
View attachment 7910351
Last edited:
Looks really nice. Very tempting!Painted the lettering on the transfer case knob. IMHO looks better than the unpainted version which looks somewhat unfinished. I think that's a wrap on this section of the interior!
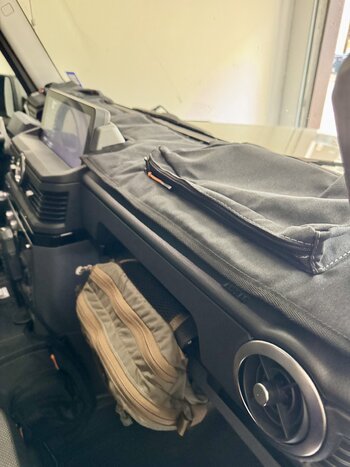
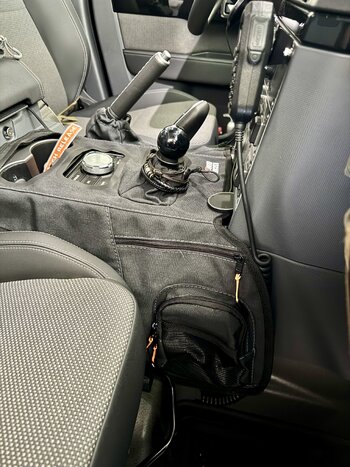
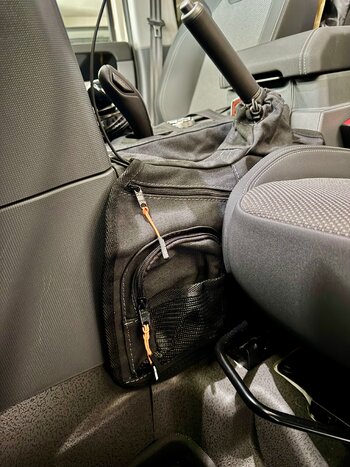
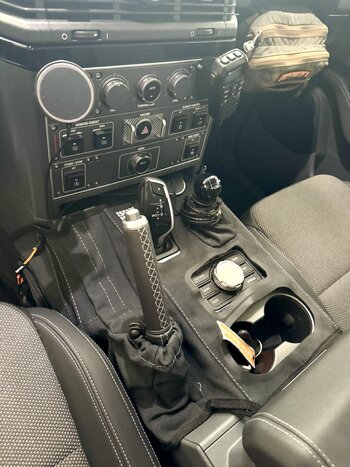
Recently got the dash / transmission cover from Escape Gear. Really like how they look / function. Plenty of organization pockets from the transmission cover. I'm letting them settle a bit more before attaching the 3M velcro, we'll see how well that holds - I don't really think I'll need to attach the transmission cover though, it sits very much like a saddle.
Shipping from SA didn't take much time at all either! Highly recommend checking them out .
Shipping from SA didn't take much time at all either! Highly recommend checking them out .
Attachments
Let me know if you'd like to order a set!Can kick myself for not just bitting the bullet for under body armor while you work working on it. LOL
If J Peterman is looking for someone to write copy. All details true and from this morning.
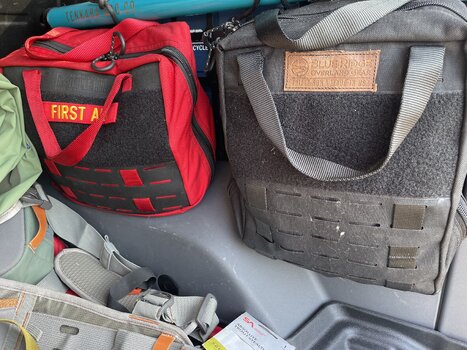
“Trout season closes in four days. Today is your last chance on the water. You get to your spot before dawn - everyone will have the same idea on this last weekend of the season. You assemble your rod and reel, and set it next to Baron Bigglesworth, your trusty Grenadier. Light drizzle, 51 degrees - it’s going to be a perfect day. Wading boots on, sling bag on, you grab your rod. By now it is just light enough to see, but you hear a slurp. Your rod and reel are lying in a pile of human feces. One day old - you know because of the slurp. Fortunately, you have the Blue Ridge Triple Run IFAK bag in back. Plenty of room for surgical gloves and antiseptic wipes. 30 minutes of disinfecting and dry-heaving later, and you’re on the water. You catch one brookie, who jumps the hook just as you reach for your net. You can hear the distinct laugh of contempt as he breaks off. It’s going to be a long, dark winter. Blue Ridge Triple Run IFAK bag; $159.99. Might not stop a bullet, but can patch you up if you stop it.”
“Trout season closes in four days. Today is your last chance on the water. You get to your spot before dawn - everyone will have the same idea on this last weekend of the season. You assemble your rod and reel, and set it next to Baron Bigglesworth, your trusty Grenadier. Light drizzle, 51 degrees - it’s going to be a perfect day. Wading boots on, sling bag on, you grab your rod. By now it is just light enough to see, but you hear a slurp. Your rod and reel are lying in a pile of human feces. One day old - you know because of the slurp. Fortunately, you have the Blue Ridge Triple Run IFAK bag in back. Plenty of room for surgical gloves and antiseptic wipes. 30 minutes of disinfecting and dry-heaving later, and you’re on the water. You catch one brookie, who jumps the hook just as you reach for your net. You can hear the distinct laugh of contempt as he breaks off. It’s going to be a long, dark winter. Blue Ridge Triple Run IFAK bag; $159.99. Might not stop a bullet, but can patch you up if you stop it.”
Attachments
Similar threads
- Replies
- 2
- Views
- 314
- Replies
- 0
- Views
- 47
- Replies
- 58
- Views
- 2K
- Replies
- 12
- Views
- 488


