The Grenadier Forum

Register a free account today to become a member! Once signed in, you'll be able to contribute to the community by adding your own topics, posts, and connect with other members through your own private inbox! INEOS Agents, Dealers or Commercial vendors please use the contact us link at the bottom of the page.

What did you do with your Grenadier today?

The plan was to add a couple USB ports on the center sides of the front footwells that were tied into Int 2 switch. I never realized it was one overlapping panel after the next. It was like each one had that 1 screw hidden below a panel above it. I have to admit though, they certainly designed these to be taken apart.

Got the two wired but using double sided tape to make sure I like the location before drilling into the panels. Would like to move them up somewhere by the circles, but can't figure out how to get that panel off.

USB.jpg
 
Doing what I can to prevent problems; the cracked windscreen thread threw up this idea ; every bit helps and it seems quite a few chips happen at the lower edge.
Cut the red backing tape in the middle, peel off and apply the LHS first, then move to the other side and repeat.
Or the opposite if you're left handed!
Trim piece

View attachment 7887161
Did a Tazzie and stuck some rubber around the edges. Perhaps not the neatest of jobs but I'm normally inside looking out!

I also stuck some Denso 16" wiperblades on the front as recommended by another forum member. Apologies forgot who. Not tested them yet as miraculously we have no rain at the moment. Motor does seem to have to work a bit more.
 

Attachments

  • IMG_3392.jpeg
    IMG_3392.jpeg
    4 MB · Views: 93
My daughter will now be happier - charging ports installed on both sides. Did my best to make a wiring harness to plug into "Int 2" so things can be swapped out without clipping wires. Next job will be the footwell lights but already put bare wires into this harness to wire them up.

IMG_1962.jpeg
IMG_1963.jpeg
 
Not sure How I feel about these yet. Originally going for Owl Talon White, but they are out of stock indefinitely - Did not want black, and gun metal may have been a better look. Installed them leaving the H&R spacers on. No Rubbing. ET +38 AND 33mm spacers each side. 1 rim came bent, so spare will be replaced soon.
IMG_2711.jpeg
IMG_2734.jpeg
IMG_2744.jpeg
IMG_2750.jpeg
IMG_2756.jpeg
IMG_2759.jpeg
IMG_2763.jpeg
IMG_2743.jpeg
IMG_2737.jpeg
IMG_2733.jpeg
 
Not sure How I feel about these yet. Originally going for Owl Talon White, but they are out of stock indefinitely - Did not want black, and gun metal may have been a better look. Installed them leaving the H&R spacers on. No Rubbing. ET +38 AND 33mm spacers each side. 1 rim came bent, so spare will be replaced soon.
View attachment 7891655View attachment 7891656View attachment 7891657View attachment 7891658View attachment 7891659View attachment 7891660View attachment 7891661View attachment 7891662View attachment 7891663View attachment 7891664
Why use spacers? The rim offset of +38mm is already 17mm less than the factory wheels and spacers are definitely not needed to provide clearance for the tires as shown.
 
Why use spacers? The rim offset of +38mm is already 17mm less than the factory wheels and spacers are definitely not needed to provide clearance for the tires as shown.
Had spacers from the 55 offset Steelies and wanted to see how it looks. Wasn’t about clearance, originally was for filling out wheel well from tucked in look. It doesn’t look like old mini truck kick outs.
IMG_2774.jpeg

IMG_2773.jpeg

IMG_2771.jpeg
IMG_2767.jpeg
IMG_2766.jpeg
IMG_2765.jpeg
 
I did the thing that makes me a valid participant in this thread today:


And before you ask, no news on software updates. Also doesn't look like they've changed the front driveshaft on the MY25s.
So the 25 still has the ADAS bong set to on as default?
 
Got around to finishing the install of my Tougher seat covers, and dash mat. Quality bit of kit, and Staffy and Chihuahua approved! Ordered directly from Tougher in SA as I wanted the 2 tone covers to be similar to the cloth seat colours.
 

Attachments

  • IMG_1359.jpeg
    IMG_1359.jpeg
    4 MB · Views: 55
  • IMG_1360.jpeg
    IMG_1360.jpeg
    4.5 MB · Views: 58
  • IMG_1362.jpeg
    IMG_1362.jpeg
    4.3 MB · Views: 59
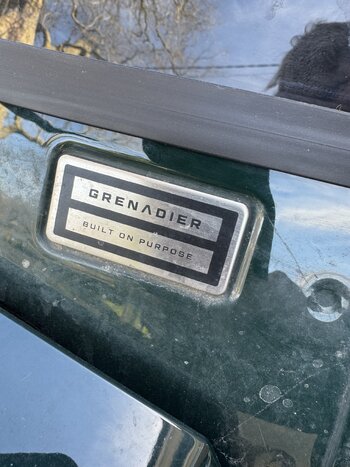
Made for purpose in Australia

I picked up my Grenadier after having it's 45k klms service and 4 warranty claims sorted out. In order of alerting the agent of the issues.

1st was the indicator on the highrise air intake which had fallen off due to bad quality 3D printed housing...looks like a proper moulded piece now.

2nd was the side steps that had started to show surface rust after gravel had chipped the paint off the cross member in the middle of the steps...I am in the process of sourcing protection to stop it from going that way again.

3rd was the oil leak from the high pressure turbo oil supply line...replaced

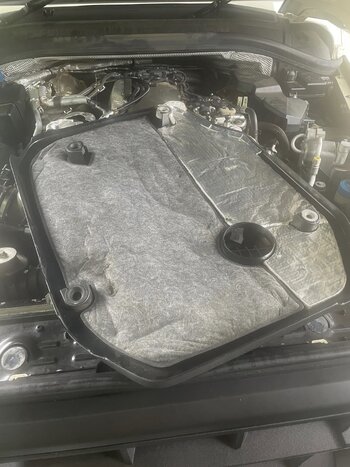
4th was the diesel soot leak, failure of the EGR Exhaust Gas Recirculation...replaced EGR assembly.

All is good again.
I was also informed that the agent is waiting on parts for two recalls...

1st is the door buttons/mechanism

2nd is strangely the diesel engine cover that apparently fails in the environment in which I live...the underneath material fails and breaks down.

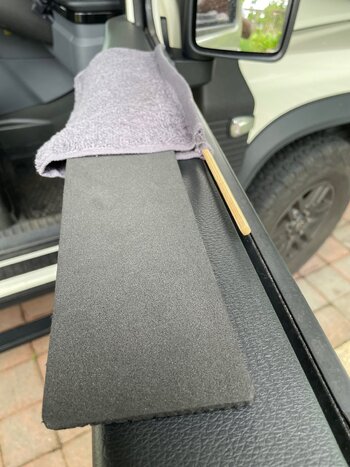
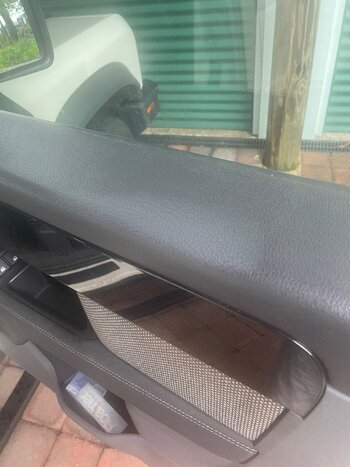
It is interesting to live in sub tropical conditions and see what effects body sweat can do to the arm rest surface material on the door.
I have a pic attached where you can see the change in tone where my elbow sits while driving. That also has changed the surface tension going from a shiney surface to a dull flat soft finish. I have cleaned it with all but the kitchen sink, no change. The agent said they will watch the outcome.

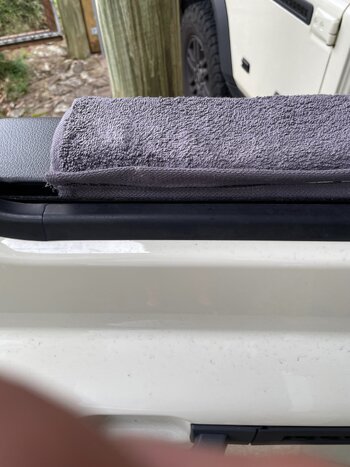
Meanwhile I have repurposed a facewasher, a chopstick and foam rubber. Sow the facewasher together inside both end hems...the chopstick slides into one of the hems and is pushed into the space between the armrest and the rubberized felt window seal, when the window is closed after insertion it holds the chopstick in place and the foam rubber just slides in between and adds more comfort for my boney elbow 💪
 

Attachments

  • Indicator.jpg
    Indicator.jpg
    1.1 MB · Views: 71
  • Engine cover.jpg
    Engine cover.jpg
    1.6 MB · Views: 75
  • Face Foam chop.jpg
    Face Foam chop.jpg
    1.4 MB · Views: 77
  • IMG_7567.jpg
    IMG_7567.jpg
    4.8 MB · Views: 72
  • Facewasher inplace.jpg
    Facewasher inplace.jpg
    1.5 MB · Views: 71
  • Chopstick slot.jpg
    Chopstick slot.jpg
    1.2 MB · Views: 67
Last edited:
Back
Top Bottom