Welcome to anybody that takes an interest in following Earl's build progress.
Who/What is Earl?
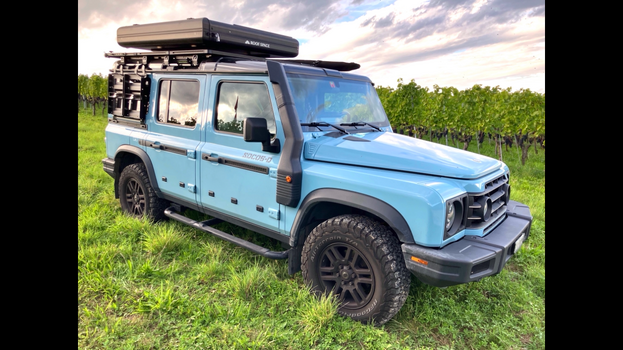
Vehicle Basics -
Usage -
What does the build look like?
I don't have a deadline for any of this outside of a winch and moving the Bluetti fast charger. Those things need to be in place by spring when I usually take my first trip. In the meantime, I'm just getting acquainted with Earl and researching aftermarket gear.

Who/What is Earl?
- I live in the Houston area and when a family member saw my IG for the first time, her first comment was "I love the Oiler blue." I grew up in Austin and some of my earliest football memories are going to games and watching Earl Campbell play. Even a youngster could understand you were witnessing something special. So, since Earl played for the Oilers... Earl seemed like a fitting name.
- 2025 Grenadier, Base Model in Eldoret Blue, Black Roof, and Steelies.
- Purchased 2025-Oct-08
- I only had 4 requirements: Front & Rear Lockers, additional AUX package, Heated Seats, and steelies.
- Earl is an off-roader with a secondary daily driver requirement. Meaning, the offroad capabilities are more important than modern luxuries.
- I enjoy taking trips in the mountains. I'm there for the scenery and solitude. It isn't important to me to challenge my build, but it is important to me to have a build that will take me where I want to go.
- Self-recovery is important so I will likely prioritize a winch as the first big expense
- Suspension upgrade of the basics, such as a lift, larger tyres, offset wheels, and appropriate shocks.
- Onboard Air - I permanently mounted a Morrflate system in my Gladiator bed, but I think I can make better use of space by going with an under-seat option.
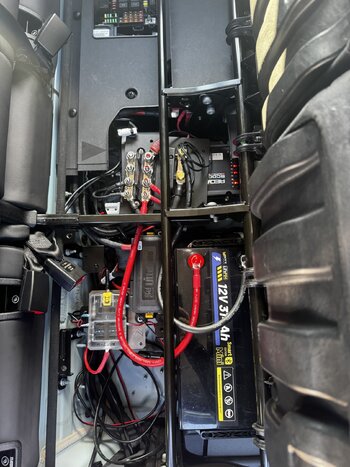
- For electrical I will transfer my Bluetti power station and Charger 1 from my old Jeep Gladiator. This is enough for me and my current use requirements for now.
- Communications - I have Starlink, Garmin InReach, and hand-held GRMS
- Body Armor - skid plates and rock sliders
- Cargo management is still in the thinking stage. I'm not against a rear seat delete, but for now I'm only concerning myself with the rear cargo area
- Exterior lighting - I prefer to have the bare minimum of exterior lighting, such as forward light bar or bumper mounted lamps. I will also add chase lights to the rear. For camp lighting I've always been happy with a headlamp and something like the Devos Light Ranger.
- Camp Kitchen - I'm pretty happy with the basics like a Fridge, Jet Boil, and a skottle if I'm going to be out for a while. Oh, and my small Nespresso machine and frother because I like to have lattes like the pioneers did.
- Tent or RTT - I typically will plan routes where I pop out to civilization around dinner time and stay in a hotel for the night. When I hit the longer trails, I have been happy with a simple ground tent. However, if the Grenadier is everything I hope it to be, I would likely do a roof conversion to the Alu-Cab setup.
I don't have a deadline for any of this outside of a winch and moving the Bluetti fast charger. Those things need to be in place by spring when I usually take my first trip. In the meantime, I'm just getting acquainted with Earl and researching aftermarket gear.