
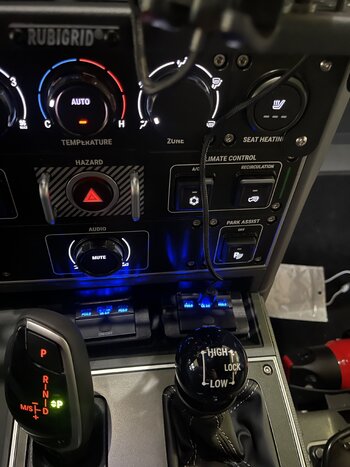
One of the misses on the Gren for me is the lack of USB ports on the center stack. I had seen lots of units let into the panel either side of the stack but think they may be a little vulnerable to knees etc. I decided to take a look at the tray in front of the shifter and this is the result. I bought the units from Amazon. I put this up on Facebook and was asked to detail the process, so here we go.
1. Remove the rubber mat from the tray, it just pops up
2. Remove 16 Allen head bolts from the 3 covers on the center console.
3. Remove the three covers, they are held by clips, the one on the cup holder and the shifter the clips are on the left and right, the one around the control knob they are in the center so be careful and pull up from the center not the sides. The cupholder will now pop out
4. Remove the right and left console lower kick panel, I just rotated them around out of the way.
5. On each side you will see 2 T27 screws at the front of the center console side panels. Remove those screws.
6. Slide both seats as far back as possible.
7. The console side panels are held by clips, I popped these off until I could gently pull the panels back without removing them. Behind the panel on the passenger side there are 3 T27 screws and on the right side there are 4 T27 screw holding the top panel of the center console
8. With the screws removed pull up on the top panel it is also held by clips. It releases from the front first. It will not fully release from the rear without removing the console glove box, but lifting from the front gives enough room.
8. Looking down at the cavity left under the cupholder you will see a blue wire and a black wire going to the 12V receptacle inside the console box. I decided to tap into there. You could also tap into the power take offs in the footwell but I wanted to keep those for other things.
9. I made up a 2 wire harness ( I used red for power and black for ground) about 12 inches long inside flex conduit. At the end going to the new USB’s I added a second power and ground to go to the Second USB port. Lift up the front of the console panel from the passenger side. You will see the Tcase shifter and look underneath the panel, towards the drivers side you will see a ‘tower’ where the top panel clips in. I routed the harness from the cupholder area down the center, behind the tower and forwards under the tray. I did this to avoid any interference with the tcase shifter.
10. I chose the locations for the USB ports and carefully drilled 2 holes with a 3/8 drill using my right angled drill. I then did the same with the rubber mat.
11. Remove connector from the 12V receptacle, cut back the black insulation and make connections to your harness. The blue wire is power and the black is ground. Check at tray end of wiring that both connections have 12v to them.
12. At the tray end poke the harness wires one red one black through each drill hole remembering to put through rubber mat as well! ( I didn’t the first time….)
13 Make connections red to red, black to black on USB ports. Feed wires through into cavity below the tray so that USB ports sit flush on rubber mat. Test to make sure USB ports turn on (ignition must be on)
14. Push top console panel down so clips engage and screw holes line up.
15. Using short self tap screws attach USB ports to rubber mat/tray
16. Clip in cup holder, you may need to move the new conduit slightly to get the cupholder to sit flush.
17. Place all 3 top panels in position before replacing all 16 Allen heads (stops them from dropping down below panel! ( don’t ask…)
18. Replace T27 screws in side panels and clip back into place.
19. Reclip kick panels and you are done!
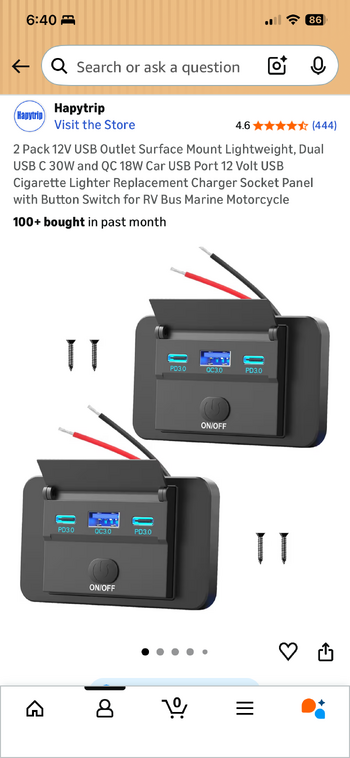
FYI you have to use surface mount USB ports. There is not enough room below the tray for flush mount units.
I hope this is helpful!
1. Remove the rubber mat from the tray, it just pops up
2. Remove 16 Allen head bolts from the 3 covers on the center console.
3. Remove the three covers, they are held by clips, the one on the cup holder and the shifter the clips are on the left and right, the one around the control knob they are in the center so be careful and pull up from the center not the sides. The cupholder will now pop out
4. Remove the right and left console lower kick panel, I just rotated them around out of the way.
5. On each side you will see 2 T27 screws at the front of the center console side panels. Remove those screws.
6. Slide both seats as far back as possible.
7. The console side panels are held by clips, I popped these off until I could gently pull the panels back without removing them. Behind the panel on the passenger side there are 3 T27 screws and on the right side there are 4 T27 screw holding the top panel of the center console
8. With the screws removed pull up on the top panel it is also held by clips. It releases from the front first. It will not fully release from the rear without removing the console glove box, but lifting from the front gives enough room.
8. Looking down at the cavity left under the cupholder you will see a blue wire and a black wire going to the 12V receptacle inside the console box. I decided to tap into there. You could also tap into the power take offs in the footwell but I wanted to keep those for other things.
9. I made up a 2 wire harness ( I used red for power and black for ground) about 12 inches long inside flex conduit. At the end going to the new USB’s I added a second power and ground to go to the Second USB port. Lift up the front of the console panel from the passenger side. You will see the Tcase shifter and look underneath the panel, towards the drivers side you will see a ‘tower’ where the top panel clips in. I routed the harness from the cupholder area down the center, behind the tower and forwards under the tray. I did this to avoid any interference with the tcase shifter.
10. I chose the locations for the USB ports and carefully drilled 2 holes with a 3/8 drill using my right angled drill. I then did the same with the rubber mat.
11. Remove connector from the 12V receptacle, cut back the black insulation and make connections to your harness. The blue wire is power and the black is ground. Check at tray end of wiring that both connections have 12v to them.
12. At the tray end poke the harness wires one red one black through each drill hole remembering to put through rubber mat as well! ( I didn’t the first time….)
13 Make connections red to red, black to black on USB ports. Feed wires through into cavity below the tray so that USB ports sit flush on rubber mat. Test to make sure USB ports turn on (ignition must be on)
14. Push top console panel down so clips engage and screw holes line up.
15. Using short self tap screws attach USB ports to rubber mat/tray
16. Clip in cup holder, you may need to move the new conduit slightly to get the cupholder to sit flush.
17. Place all 3 top panels in position before replacing all 16 Allen heads (stops them from dropping down below panel! ( don’t ask…)
18. Replace T27 screws in side panels and clip back into place.
19. Reclip kick panels and you are done!
FYI you have to use surface mount USB ports. There is not enough room below the tray for flush mount units.
I hope this is helpful!
")