
About the CTEK 120S and the 250SE
The CTEK SMARTPASS 120S is the charger installed in the INEOS Grenadier if you choose the aux power option. The full CTEK Manual can be downloaded here. It has lots of information about installation. In the first half of 2024 there are reports of an unbranded version of the CTEK 120S being installed into the Grenadier. It is not known how it differs (if at all) from the branded version of the CTEK120S.
You can buy and install a CTEK 250SE, which is a DC to DC charger which mates with the CTEK 120S. The combination has 140 amps of charging power and a solar input.
The CTEK SMARTPASS 120S is the Lithium version (plus other chemistries) installed on the INEOS. The CTEK SMARTPASS 120 (no S) is the non-lithium version. Add S for Lithium.
The CTEK 250SE is the Lithium version (plus other chemistries) of the DC to DC charger, the non-Lithium version being the 250SA. Yep, only the last letter changes A or E.
The CTEK 250SE also gives you a solar input.
Important warnings from the CTEK Manual
The INEOS Grenadier’s aux battery chemistry is EFB not lithium
The INEOS Grenadier’s aux battery is not lithium, but with the 120S and the 250SE you can install a Lithium battery later and not have to buy new chargers (you do need to make some minor wiring changes).
So the best combo, in terms of features and battery chemistry, is the 120S with the 250SE (although the image below shows the 120). The combination looks like this:


Dual mounting bracket
At present, only Black Sheep Innovations has a bracket for sale allowing you to mount the CTEK 120S and 250SE together in the INEOS' battery compartment. Other brackets are under development. Warning: at least one owner of a 2 seater version has reported an issue with fitting the Black Sheep Bracket, he managed to install the bracket by reversing it on his 2 seater.
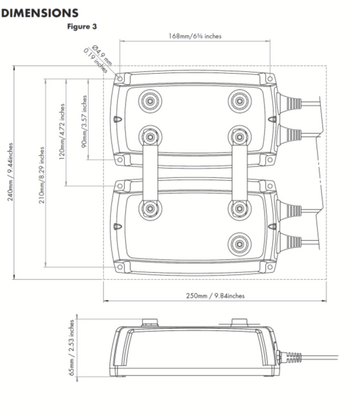
Bell Auto Services has generously made these diagrams available of their dual mounting bracket for others to freely use.
The CTEK Manual says to secure the connector plates between the two units first. Then secure both units to the Dual Mounting Bracket (see page 6 of the CTEK Manual).
So, secure the connector plates and torque the nuts on the terminal post with a 5mm Allen Key to 8 Nm/71 lb-in of torque (see Figure 2 on page 6 of the CTEK Manual).
Then secure both units to the Dual Mounting Bracket using M4 or ST4.2 screws/bolts, in each of the four corners. Each screw/bolt is torqued to 2 Nm/18 lb-in (see Figure 1 on page 6 of the CTEK Manual). I would use bolts, not screws, to secure both units to the Dual Mounting Bracket.
Tip: once both units are fixed to the Dual Mounting Bracket and the bracket is installed into your INEOS, I would re-torque all the nuts and bolts.
Looking at the Figures below should clear up any misunderstanding.

Connector plates (aka busbars, cables with lugs, etc.)
The connector plates are the two black plates (sometime grey) connecting the two units together in the above images.
The connector plates come in the retail packet of the CTEK 120S, but not the “retail box” that comes with the INEOS Grenadier. CTEK does not sell the connector plates as a separate item. You will need to make you own or buy a pre-made set - someone stuffed up there!
Page 5 of the CTEK Manual gives the requirements for the connector plates, basically a 4mm2 cable (or 12 AWG) and a lug with an M8 size hole, if they are mated next to each other.

Making your own connector plates (or busbar)
I made some connector plates based on @bakepl measurements here. Here they are:

My steps:
Using both the CTEK 120S and the 250SE together
This following summerises additional key information from this CTEK instructional video. It is not a substitute for watching the video and reading the manual. It merely summerises key information to help an install.
Fuses
Two 300 amp fuses are needed (but one or both may already be installed on your INEOS).
One 300 amp between the Start Battery (aka main battery) and the CTEK 120S. I believe this is done via a battery fuse on one of the INEOS busbars, known as a MEGA range ZCASE® fuse.
A second 300 amp fuse between the CTEK 120S and the Service Battery (aka auxiliary battery). If you have selected the INEOS aux power pack INEOS uses an inline MEGA fuse in the Midi style (which are not MEGA range ZCASE fuses). I believe, but cannot be certain, this is the Littelfuse fuse holder used in the INEOS.
Warning: you must look at your car’s set up is before doing work, because set ups may vary between countries and models. Do not make assumptions! You may already have one or both fuses already installed.
Fuses used and cable length
Page 5 of the CTEK Manual lists the fuse ratings and cable requirements for your install (see extract above). Cable size can vary depending on the length of a cable run. What cables to use may vary between the CTEK 250SE and 120S. The CTEK supplied Table, extracted above, tells you both. So use it.
More fuse information
This thread has more detailed information on the fuses used in the INEOS.
Terminal screws/nuts on units
Use a 5mm Allen Key on the terminal screws (nuts) and tighten to 8 Nm/71 lb-in of torque (see Figure 2 on page 6 of the CTEK Manual). Tightening by hand is not good enough, as the connector plates and cables will come loose.
The unit itself can be secured using M4 or ST4.2 screws or bolts, in each of the four corners. The screw or bolt is torqued to 2 Nm/18 lb-in (see Figure 1 on page 6 of the CTEK Manual).
Solar panel for the CTEK 250SE
The CTEK 250SE charger is designed for unregulated solar panels:
Installing lithium batteries – cabling changes required
If you install an auxiliary Lithium battery consult the CTEK Manual because you need to make some minor cabling changes. See page 7 of the CTEK Manual. Note: you need to have the CTEK 120S and 250SE to install an auxiliary Lithium battery.
Additional resources
CTEK Support pages with Guides and Videos here.
Full CTEK Manual attached to post here.
View: https://youtu.be/kTRiqyzK9zA

The CTEK SMARTPASS 120S is the charger installed in the INEOS Grenadier if you choose the aux power option. The full CTEK Manual can be downloaded here. It has lots of information about installation. In the first half of 2024 there are reports of an unbranded version of the CTEK 120S being installed into the Grenadier. It is not known how it differs (if at all) from the branded version of the CTEK120S.
You can buy and install a CTEK 250SE, which is a DC to DC charger which mates with the CTEK 120S. The combination has 140 amps of charging power and a solar input.
The CTEK SMARTPASS 120S is the Lithium version (plus other chemistries) installed on the INEOS. The CTEK SMARTPASS 120 (no S) is the non-lithium version. Add S for Lithium.
The CTEK 250SE is the Lithium version (plus other chemistries) of the DC to DC charger, the non-Lithium version being the 250SA. Yep, only the last letter changes A or E.
The CTEK 250SE also gives you a solar input.
Important warnings from the CTEK Manual
- The D250SE and 120S are not protected against reversed polarity. Disconnect the battery terminal posts before installation.
- The D250SE and 120S are not spark-free. Ensure good ventilation.
- Modified cabling is required for any auxiliary Lithium battery.
- The combined height of lugs, on a given terminal post, should not exceed 6 mm (see Figure 5 on page 6 of the Manual). Tip: you need to be careful how many cables you install on any terminal post, to ensure their combined thickness does not exceed 6mm or the nut will not properly tighten on the terminal post (see Figure 5 on page 6 of the CTEK Manual). I have two large lugs measuring 35-8 and their combined thickness is 6mm. That is a hefty lug, so smaller lugs will allow more cables. 35-8 means 35mm2 (or AWG2) wire size and 8mm hole size.
The INEOS Grenadier’s aux battery chemistry is EFB not lithium
The INEOS Grenadier’s aux battery is not lithium, but with the 120S and the 250SE you can install a Lithium battery later and not have to buy new chargers (you do need to make some minor wiring changes).
So the best combo, in terms of features and battery chemistry, is the 120S with the 250SE (although the image below shows the 120). The combination looks like this:
Dual mounting bracket
At present, only Black Sheep Innovations has a bracket for sale allowing you to mount the CTEK 120S and 250SE together in the INEOS' battery compartment. Other brackets are under development. Warning: at least one owner of a 2 seater version has reported an issue with fitting the Black Sheep Bracket, he managed to install the bracket by reversing it on his 2 seater.
Bell Auto Services has generously made these diagrams available of their dual mounting bracket for others to freely use.
The CTEK Manual says to secure the connector plates between the two units first. Then secure both units to the Dual Mounting Bracket (see page 6 of the CTEK Manual).
So, secure the connector plates and torque the nuts on the terminal post with a 5mm Allen Key to 8 Nm/71 lb-in of torque (see Figure 2 on page 6 of the CTEK Manual).
Then secure both units to the Dual Mounting Bracket using M4 or ST4.2 screws/bolts, in each of the four corners. Each screw/bolt is torqued to 2 Nm/18 lb-in (see Figure 1 on page 6 of the CTEK Manual). I would use bolts, not screws, to secure both units to the Dual Mounting Bracket.
Tip: once both units are fixed to the Dual Mounting Bracket and the bracket is installed into your INEOS, I would re-torque all the nuts and bolts.
Looking at the Figures below should clear up any misunderstanding.
Connector plates (aka busbars, cables with lugs, etc.)
The connector plates are the two black plates (sometime grey) connecting the two units together in the above images.
The connector plates come in the retail packet of the CTEK 120S, but not the “retail box” that comes with the INEOS Grenadier. CTEK does not sell the connector plates as a separate item. You will need to make you own or buy a pre-made set - someone stuffed up there!
Page 5 of the CTEK Manual gives the requirements for the connector plates, basically a 4mm2 cable (or 12 AWG) and a lug with an M8 size hole, if they are mated next to each other.
Making your own connector plates (or busbar)
I made some connector plates based on @bakepl measurements here. Here they are:
My steps:
- I used tin plated copper lugs, metric size 10-8 (meaning 10mm2 wire size and 8mm hole size). The lug fits onto the CTEK 250SE terminal, as I checked;
- I used 8B&S wire cut to 7cm in length (with the lugs I used);
- I crimped the lugs onto the wire, remembering to have the clear shrink tube on the wire for both ends, before crimping the second lug on. After I crimped the second lug I heat treated the dual wall tubing to each end.
- I made it slightly bigger than 98mm (100mm), as the wires can flex and being too short is a problem but being a little longer is not.
- The length measures correctly, but I cannot be 100% sure until I mate the two units together on the bracket, and I need my car for that.
- I wrapped the red wire using black automotive tape, after taking the photo.
Using both the CTEK 120S and the 250SE together
This following summerises additional key information from this CTEK instructional video. It is not a substitute for watching the video and reading the manual. It merely summerises key information to help an install.
Fuses
Two 300 amp fuses are needed (but one or both may already be installed on your INEOS).
One 300 amp between the Start Battery (aka main battery) and the CTEK 120S. I believe this is done via a battery fuse on one of the INEOS busbars, known as a MEGA range ZCASE® fuse.
A second 300 amp fuse between the CTEK 120S and the Service Battery (aka auxiliary battery). If you have selected the INEOS aux power pack INEOS uses an inline MEGA fuse in the Midi style (which are not MEGA range ZCASE fuses). I believe, but cannot be certain, this is the Littelfuse fuse holder used in the INEOS.
Warning: you must look at your car’s set up is before doing work, because set ups may vary between countries and models. Do not make assumptions! You may already have one or both fuses already installed.
Fuses used and cable length
Page 5 of the CTEK Manual lists the fuse ratings and cable requirements for your install (see extract above). Cable size can vary depending on the length of a cable run. What cables to use may vary between the CTEK 250SE and 120S. The CTEK supplied Table, extracted above, tells you both. So use it.
More fuse information
This thread has more detailed information on the fuses used in the INEOS.
Terminal screws/nuts on units
Use a 5mm Allen Key on the terminal screws (nuts) and tighten to 8 Nm/71 lb-in of torque (see Figure 2 on page 6 of the CTEK Manual). Tightening by hand is not good enough, as the connector plates and cables will come loose.
The unit itself can be secured using M4 or ST4.2 screws or bolts, in each of the four corners. The screw or bolt is torqued to 2 Nm/18 lb-in (see Figure 1 on page 6 of the CTEK Manual).
Solar panel for the CTEK 250SE
The CTEK 250SE charger is designed for unregulated solar panels:
- between 50 and 300 watts;
- with a maximum open circuit output value of 23 volts;
- using a 6mm cable from the solar panel to the CTEK 250SE.
Installing lithium batteries – cabling changes required
If you install an auxiliary Lithium battery consult the CTEK Manual because you need to make some minor cabling changes. See page 7 of the CTEK Manual. Note: you need to have the CTEK 120S and 250SE to install an auxiliary Lithium battery.
Additional resources
CTEK Support pages with Guides and Videos here.
Full CTEK Manual attached to post here.
View: https://youtu.be/kTRiqyzK9zA
Attachments

Last edited:


 ️
️